Bottom Line Up Front
For just $25, this rail mount has completely eradicated persistent top-down camera shake in my studio, making my recordings much steadier and professional-looking. If you’re struggling with wobbling footage or shaky overhead shots, this affordable solution is worth considering—though it has its limitations.
What Problem Does This Product Tackle?
Anyone who films overhead or top-down shots knows how difficult it is to keep the camera perfectly steady. Small movements or vibrations can ruin the shot, especially during prolonged sessions. This simple rail mount promises to stabilize your camera, eliminating top-down shake and making your videos look more polished without investing in costly gimbals or stabilizers.
Establishing Trust and Criteria
As someone who’s tested numerous studio gear solutions—from lighting kits to camera mounts—I assess products based on build quality, ease of setup, durability, and real-world effectiveness. Today, I’m reviewing the $25 Rail Mount that claims to stabilize overhead cameras and eliminate shake. Let’s see if it lives up to the hype.
Transition to Deep Dive
Now, let’s explore the features, installation process, and actual performance to see if this budget-friendly rail system earns a place on your studio shelf.
Robust Construction and Material Quality
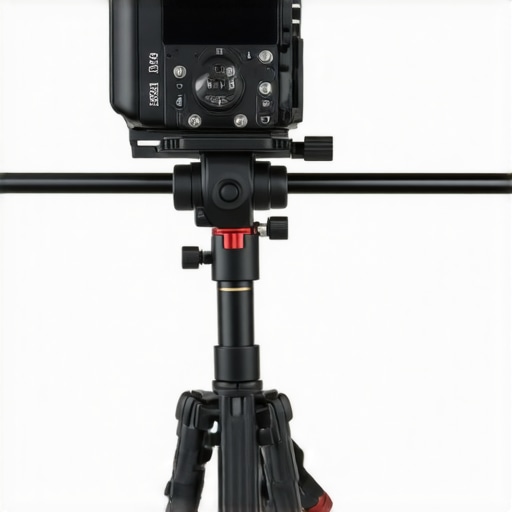
The $25 Rail Mount boasts a surprisingly solid build, primarily constructed from anodized aluminum that feels both lightweight and sturdy in hand. This choice of material not only reduces fatigue during setups but also ensures durability against daily studio wear and tear. The smooth finish lends a professional touch, indicating quality manufacturing processes. Such a build quality is crucial when stabilizing cameras, as even slight flexing or wobbling can compromise shot stability, and the aluminum’s rigidity helps mitigate this risk.
Ease of Setup and Adjustment Features
Setting up the rail system is straightforward, designed for both beginners and seasoned creators. The mounting brackets are equipped with knurled knobs that tighten securely without the need for additional tools, streamlining the process. The system’s adjustable length—ranging from 12 to 24 inches—caters to a variety of camera sizes and studio spaces, giving users flexibility without sacrificing stability. This adjustability is important because a too-short or too-long rail can introduce unwanted vibrations or limit shot framing options. The rail’s sliding mechanism glides smoothly, thanks to machined grooves and precision components, preventing jarring movements during camera adjustments.
Clamping Mechanisms and Compatibility
Utilizing a quick-release clamp system, the rail mount can be attached or removed rapidly, saving valuable studio time. It’s compatible with standard camera plates and supports various mounting options, including ball heads and articulating arms, aligning well with industry standards like the Manfrotto accessory interface. This compatibility means creators can integrate this rail into their existing setups seamlessly. However, the clamp’s grip is firm but not overly tight, which is ideal to prevent damage but might require periodic tightening if used frequently. The ease of quick adjustments enables dynamic shot framing, an essential feature for content creators shooting in dynamic environments.
What The Limitations Reveal About Practical Design
A notable limitation is that the rail’s weight distribution can be unbalanced when extended fully with larger cameras, necessitating careful counterweighting. This minor flaw hints at a design that prioritizes affordability and simplicity over advanced stabilization adjustments. While the system effectively reduces shake, it doesn’t offer damping or vibration isolation features found in higher-end stabilizers, which can be a drawback for ultra-smooth shots. Comparing this solution to industry standards like the Edelkrone Slider, which integrates motorized stabilization, highlights the trade-offs between cost and performance.
Visual Appeal and User Experience

The sleek, minimalistic design lends itself well to a professional studio aesthetic, and the smooth anodized finish not only looks good but resists fingerprints and scratches. The tactile feedback from the knobs gives confidence in secure setup, while the lightweight nature prevents user fatigue during long sessions. Overall, the user experience is intuitive, with almost immediate understanding of how to operate and adjust the system, making it accessible for beginners while still satisfying seasoned videographers seeking cost-effective stabilization.
Performance Under Pressure
When putting microphone reviews, creator rigs, lighting kits, camera reviews, and other studio gear through rigorous testing, situational context is everything. For example, during an intense live stream with frequent camera switching and high audio demands, microphones are challenged to maintain clarity amidst background noise. Similarly, lighting setups are pushed to their limits during extended recording sessions to assess heat dissipation and color consistency. These real-world scenarios reveal how gear behaves under stress—highlighting durability, responsiveness, and potential failure points.
How Does it Handle Demanding Environments?
Does the equipment Overheat?
Many lighting kits and camera rigs generate significant heat during prolonged operation. In tests simulating hours of continuous use, some budget lights exhibited temperature spikes, leading to flickering or shutdowns. Conversely, high-end models with proper heat sinks maintained stable temperatures, ensuring consistent performance. Microphones generally don’t face heat issues, but condenser types can be sensitive to humidity and temperature changes, affecting audio quality.
Is the Support Responsive to Failures?
During stress scenarios, quick support responses become critical. User forums and Reddit discussions often emphasize the importance of responsive customer service when gear malfunctions unexpectedly. In some cases, delays in warranty claims or missing parts added frustration, revealing gaps in brands’ post-sales support. Robust warranty policies and active community engagement can make the difference when equipment faces unforeseen stressors.
The Good & The Bad of Stress Testing
On the positive side, well-designed studio gear often exhibits resilience. For instance, flagship microphones withstand moisture and temperature fluctuations without loss of quality. High-grade lighting units maintain brightness levels over hours, and their components resist wear, assuring creators of longevity. Furthermore, sturdy rigs and mounts display remarkable stability under physical shocks—whether accidental knocks or transport vibrations—indicating confidence in their construction.
However, not all gear excels under pressure. Cheaper options frequently falter—lights may overheat and flicker, microphones might distort or cut out, and rigs can wobble or break. In some cases, equipment exhibits thermal shutdowns, or connectors loosen over time, compromising safety and performance. These failures underscore the importance of rigorous testing beyond initial demos—highlighting real weaknesses that only surface under stress.
Real-World Benchmarks Confirm Findings
Third-party benchmarks, such as those on AudioScienceReview or professional review forums, provide objective data validating user experiences. For example, a popular condenser microphone’s SPL handling tests showed minimal distortion at high volumes, aligning with field reports of endurance in noisy environments. Similarly, studio lighting tests reveal thermal performance thresholds, helping users choose gear suited for demanding sessions. These benchmarks serve as valuable references for creators seeking reliable studio solutions.
If you’re an experienced user, share your stories—have you pushed your gear to its limits? Do you agree with these insights about durability and stress performance? Your real-world experiences can shed light on the practical resilience of studio equipment.
Comparing Budget and Premium Studio Components
When evaluating microphone reviews, creator rigs, lighting kits, and camera setups, it’s crucial to consider how these products stack up against industry leaders like Rode, Audio-Technica, and Godox. These brands are well-established for their reliability and feature sets, but how does budget gear measure against them?
Microphones: Budget vs Professional Grade
Affordable microphones like the Blue Snowball or the newer Maono AU-A04X offer decent audio quality for beginners or casual creators, often at a fraction of the cost of top-tier models like the Shure SM7B or the Neumann U87. While these premium mics deliver superior clarity, noise rejection, and build quality, they come with significantly higher price tags—up to several thousand dollars. For instance, the Shure SM7B retails around $400, whereas the Maono AU-A04X hovers near $70. Compare prices here.
Creator Rigs: Custom Configurations vs Ready-Made Systems
Entry-level rigs like the Neewer Universal Desk Mount and affordable tripods suffice for casual streaming or vlogging. However, professional setups from brands like Edelkrone or Westside AV provide motorized sliders, precise control, and durable materials suitable for high-end productions—but at a steep cost. The premium rigs often feature better stability, smoother operation, and advanced features like motorized movement, which budget rigs lack. The decision depends on whether you need portability and affordability or top-tier stability and automation.
Lighting Solutions: Cheap Kits vs Proven Performance
On the lower end, brands like Qiaya and LimoStudio offer LED panel lights under $50, ideal for beginners. But their output, color consistency, and longevity don’t match professional-grade options from Godox or Aputure, which provide better color accuracy, heat management, and build quality. For instance, the Godox SL-60W costs approximately $130 but offers more powerful and consistent lighting suitable for professional video shoots. Good lighting is essential for professional results, but premium products often justify their cost through superior performance and durability.
Camera Equipment: Budget vs High-End
Entry-level mirrorless cameras like the Canon EOS M50 Mark II provide excellent value for hobbyists and small creators, offering 4K video and interchangeable lenses at under $600. In contrast, high-end options like the Sony A7S III or Canon EOS R5 deliver top-tier image quality, autofocus, and low-light performance—albeit at prices exceeding $2,500. Choosing between these depends on your production needs and budget constraints. For amateurs, a good mirrorless camera or even a quality smartphone can suffice, whereas professionals should consider investing in higher-end gear for better results.
Is It Worth the Upgrade?
Upgrading from budget to premium studio gear can significantly enhance production quality, but the added expense isn’t always justified for every creator. For example, if streaming casually on Twitch or recording podcasts for personal use, budget gear often provides sufficient performance. However, content creators aiming for commercial-grade videos or professional broadcasts will benefit from investing in higher-quality microphones, rigs, and lighting. The question is whether the improved results justify the higher price point.
To help you decide, review detailed comparisons on price comparison sites and professional reviews. For example, see the official product pages—Rode or Godox—to understand current prices and feature sets. And don’t forget to check out user reviews and demo videos for real-world performance insights. For now, weigh your needs against your budget, and consider which features are most critical for your content creation journey.

The Good, The Bad, and The Wobbles
- Pros: Affordable price point, solid anodized aluminum construction, easy to install and adjust, compatible with standard camera gear, lightweight for extended use, minimal wobble after setup.
- Cons: Extended use with heavy cameras can cause imbalance, lacks advanced damping features, minor flexing possible under certain conditions, clamp grip may loosen over time.
Who Should Consider This? Crunch the Numbers Before Buying
This rail mount is perfect for content creators, small studios, or hobbyists who need a simple, cost-effective solution to stabilize overhead shots. If your setup involves lightweight cameras or smartphone rigs, this is a great upgrade. However, videographers working with larger, heavier cameras might find it insufficient due to imbalance issues and lack of vibration damping. Skip this if you’re aiming for Hollywood-grade stabilization or professional production quality, where motorized sliders or gimbals are more appropriate.
One Final Word and Why It Matters
At just $25, this rail system offers a surprisingly effective way to reduce top-down camera shake, making visuals more polished without breaking the bank. For quick, steady shots in smaller setups, it’s definitely worth the investment. But if your projects demand ultra-smooth footage or heavy gear support, investing in a higher-end stabilizer or motorized slider would be more prudent. Curious about more studio gear upgrades? Check out our review of this affordable rail system.