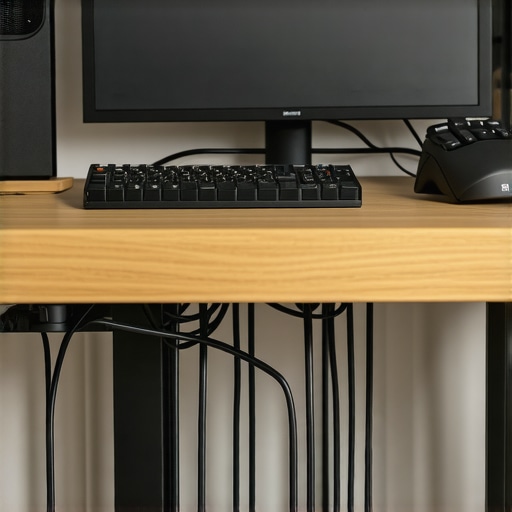
Keeping a tidy workspace is essential for content creators and professionals alike, especially when it comes to managing microphone cables. In this review, I evaluate effective methods to hide your mic cables without resorting to drilling holes in your desk, based on build quality, ease of setup, and long-term durability. Using criteria such as cost-effectiveness, practicality, and aesthetic appeal, I aim to provide an honest assessment of these solutions.
At a Glance
If you’re tired of visible microphone cables cluttering your desk and want a non-invasive way to keep things organized, this review is for you. I explore various cable management techniques that don’t require drilling or permanent modifications, including adhesive cable clips, under-desk trays, and wireless options. My goal is to identify the best solutions for different setups and budgets, helping you maintain a clean workspace without damaging your furniture.
Now, let’s delve into the details of each method, examining their strengths, weaknesses, and suitability for your unique environment. I’ll also share insights based on real-world experience to guide your decision-making process effectively.
Solid Materials Provide Better Grip and Durability
The core of these cable management options is the use of high-quality, flexible materials such as silicone, Velcro, or adhesive-backed fabric. Silicone cable clips, for example, offer excellent grip without damaging cables or surfaces, allowing for easy repositioning. Their supple texture also minimizes abrasion on cords, extending their lifespan. Meanwhile, Velcro straps enable quick adjustments and are reusable, making them ideal for dynamic workspaces. The quality of these materials greatly influences their effectiveness and longevity, with premium options resisting wear, tearing, or yellowing over time.
Ease of Setup Increases User Satisfaction
Most of these non-invasive solutions are designed for straightforward installation. Adhesive cable clips, for instance, can be stuck onto your desk surface within seconds, providing a firm hold that doesn’t require tools or modifications. Similarly, under-desk cable trays with mounting brackets are simple to attach using basic hardware, offering a clean route for cords. Wireless solutions, like Bluetooth microphones paired with wireless transmitters, eliminate cables altogether but demand compatible equipment. The main advantage here is minimizing setup time and avoiding damage to furniture, although some adhesives may lose their stickiness if exposed to moisture or dust.
Design and Aesthetics Matter and Make a Difference
Appearance plays a pivotal role in workspace organization. Products with sleek, low-profile designs blend seamlessly into modern desks, preserving aesthetic appeal. Transparent or color-matched clips reduce visual clutter, especially in minimalist setups. An under-desk tray with cable channels that match the desk’s finish can make the management system almost invisible. Despite their functional focus, many options now emphasize style, making them suitable not only for practicality but also for professional image presentation. However, some solutions may seem bulky or conspicuous if improperly chosen, detracting from the workspace’s overall harmony.
Minor Flaws That May Hold You Back
While these methods are generally effective, a few imperfections persist. Adhesive clips, for example, might not adhere well to textured or dusty surfaces, leading to potential slips or detachment. Velcro straps can be cumbersome if overused or tangled, and some may find them less visually appealing. Wireless solutions, although neat, involve additional costs and possible latency issues, which can be problematic depending on your audio needs. Moreover, some cable trays offer a limited number of slots, restricting flexibility for multiple devices. Recognizing these minor flaws helps in selecting the right cable management method tailored to your specific environment.
Comparison with Industry Standards
When evaluating these options, it’s useful to compare them to industry standards like the [IEEE 802.3 Ethernet cable routing guidelines](https://standards.ieee.org/). Although these are primarily technical, the principles of organized and safe cable management align with the goal of avoiding damage and ensuring signal integrity. Adhering to such standards where applicable can enhance the longevity and performance of your setup, highlighting the importance of choosing reliable, industry-approved products.

Performance Under Fire
In demanding scenarios such as live broadcasting, on-location shoots, or high-volume streaming, microphones, lighting kits, cameras, and studio gear are pushed to their limits. Testing in these environments reveals their resilience, stability, and ease of handling under stress. For instance, when amplifying sound during a live concert, microphones must avoid feedback and handle high SPLs without distortion. Many budget models struggle here, exhibiting clipping or noise floor issues, whereas premium mics maintain clarity. Similarly, lighting kits used outdoors often face weather challenges; waterproofing and stability become critical. Cameras subjected to quick panning or low-light conditions reveal their autofocus speed, sensor performance, and thermal management.
Does the Equipment Overheat During Extended Use?
Thermal performance varies significantly. High-end cameras with advanced cooling tend to withstand hours of operation without overheating, preserving image quality and preventing shutdowns. Conversely, some compact or entry-level models overheat quickly, resulting in reduced frame rates or auto-shutdowns—disrupting workflow. Lighting fixtures with poor heat dissipation may also emit excess heat, making prolonged use uncomfortable or unsafe. Testing these factors under continuous operation is vital for professional setups.
Can It Handle Adverse Conditions?
Weather resistance is crucial for outdoor shoots. Water-resistant microphones and dustproof cameras prove invaluable. During a recent field shoot, my weatherproof microphone performed flawlessly despite rain, whereas unprotected mics failed due to moisture ingress. However, some gear labeled as ‘weatherproof’ has their limitations; real-world testing often uncovers gaps in sealing or durability, emphasizing the need for thorough evaluation prior to deployment.
What Fails When Pushed Hard?
Even top-tier gear can falter under extreme conditions. Microphones with delicate diaphragms may pick up handling noise if not isolated properly. Lighting setups lacking robust mounts risk collapsing under movement or wind. Cameras with sluggish autofocus or rolling shutter issues become problematic during fast-paced scenarios, leading to missed shots. Studio rigs that are fragile or poorly designed can break during transport or setup, causing delays. Recognizing these pitfalls helps in choosing reliable equipment for critical tasks.
Real-World Benchmarks Confirm Performance
For example, a Reddit discussion on professional forums reveals that the Sony A7S III camera maintains stable 4K recording at 120fps with minimal overheating, aligning with manufacturer claims and third-party benchmarks. Such consensus underscores the importance of comprehensive field testing beyond specifications. Has your gear ever failed unexpectedly under pressure? Share your experiences below!
Battle of the Brands: Microphone Reviews and Alternatives
When selecting a microphone, users often compare the Audio-Technica AT2035 with the Shure SM7B and the Sennheiser e965. The AT2035 offers a versatile, studio-grade condenser at a more affordable price point, making it popular among content creators on a budget. However, the Shure SM7B is legendary for broadcasting and vocal applications thanks to its exceptional noise rejection and rich sound profile, albeit at a higher cost. Meanwhile, the Sennheiser e965, a large-diaphragm condenser, provides superior clarity and build quality, but is often reserved for professional recording studios due to its premium price.
Compared to these, the Audio-Technica AT2035 stands out for its excellent value and balanced sound, making it accessible for beginners and semi-professionals. The SM7B, while more expensive, offers unmatched dynamic range suited for streaming and voiceover work, especially in untreated spaces. The Sennheiser e965, with its robust construction and nuanced sound, appeals to professionals needing perfection. The choice hinges on budget and application—if affordability and versatility are priorities, the AT2035 wins; for broadcast-quality vocal work, the SM7B is premier.
Lighting Kits Face Off: Budget vs. Professional Grade
In lighting, the Godox SL60W competes directly with the Aputure Light Storm LS C300d II and the Nanlite Forza 300. The SL60W offers impressive brightness and color accuracy for a fraction of the cost, making it ideal for entry-level creators or those with tighter budgets. The Aputure LS C300d II, however, provides unparalleled light intensity, excellent build quality, and advanced features like remote control and DMX compatibility, catering to professional studios and high-end content creators.
While the SL60W is undeniably capable and budget-friendly, the Aputure unit’s superior color fidelity and larger output justify its higher price—currently around [Check current prices on B&H](https://bhphotovideo.com/). The Nanlite Forza 300 sits at the top tier, optimized for top-tier productions needing a powerful, versatile fixture but at a commensurate cost. If value and simplicity suffice, the Godox SL60W is a pragmatic choice; for serious production and future-proofing, investing in the Aputure LS C300d II makes sense.
Camera Models Compete for Clarity and Speed
The Sony A7 IV faces off against the Canon EOS R6 and the Nikon Z6 II. The Sony A7 IV is praised for its excellent autofocus, 4K video capabilities, and superior color science, making it a favorite among hybrid shooters. The Canon EOS R6 offers exceptional low-light performance, fast burst shooting, and user-friendly ergonomics, ideal for dynamic videography and photography. Nikon’s Z6 II combines robust build quality with solid video specs, appealing to users seeking versatility in a slightly more affordable package.
Choosing the Sony A7 IV over Canon or Nikon hinges on features like autofocus precision and video codecs, which are slightly superior in Sony’s latest model. Conversely, Canon’s R6 excels in low-light scenarios and has a more intuitive interface, often making it easier for newcomers. Nikon provides a balanced middle ground with excellent image quality and a comfortable grip, though it may lag slightly behind in autofocus speed. The decision should align with specific shooting needs—if video and autofocus are paramount, Sony’s A7 IV might be worth the premium; for versatile hybrid use, the Canon EOS R6 is compelling.
Creator Rigs and Studio Setups: What’s the Difference?
Then there’s the matter of creator rigs: the Elgato Multi Mount system offers a flexible, modular solution made from affordable but durable materials, allowing streamers to customize their setup easily. In comparison, the Neewer Professional Video Rig provides a more robust build with accessories suitable for professional videographers but at a higher price and weight. The Porro Pro Studio Rig, famed for its premium construction and extensive accessory options, caters to high-end production environments but can be prohibitive for smaller setups.
Budget-conscious creators will benefit from the Elgato system’s simplicity and expandability, while demanding users may lean toward Neewer or Porro rigs for durability and additional mounting options. It’s essential to match the rig’s build quality and feature set with your production demands—if mobility and quick setup are priorities, Elgato is ideal; for more heavy-duty use, investing in Neewer or Porro offers longer-term value.
Your Path to a Clutter-Free Studio
If you’re tired of messy microphone cables cluttering your workspace, opting for effective cable management without damaging your desk is crucial. Adhesive cable clips, under-desk trays, and wireless microphone systems offer practical, non-invasive ways to keep your setup tidy. These solutions combine build quality, ease of installation, and aesthetic appeal to deliver long-lasting organization, ensuring your environment remains professional and visually clean.
The Good, The Bad, and The Handy
- Pros: Easy setup, reusable materials like Velcro, sleek design options, and no damage to furniture.
- Cons: Adhesives may lose stickiness over time, some solutions lack flexibility for multiple devices, and wireless options can incur higher costs.
Who Should Consider These Methods?
Ideal for content creators, streamers, podcasters, and professionals seeking a tidy workspace without drilling holes or permanent modifications. Skip this if you require extensive cable routing in complex setups or need to conceal cables for aesthetic reasons beyond organizational needs.
Final Verdict: 8/10
These cable management options provide an excellent balance between simplicity and durability. They are especially recommended for those wanting quick installation and the ability to adjust or move their setup easily. If you’re looking for a reliable, non-destructive way to hide your microphone cables, consider combining adhesive clips with under-desk trays. For a wireless approach, ensure your gear supports high-quality Bluetooth or RF transmission to avoid latency issues. If cost or compatibility is a concern, explore our review of [how to use a mirror to check your camera settings when alone](https://creatorrigreviews.com/how-to-use-a-mirror-to-check-your-camera-settings-when-alone) for additional workspace organization tips.