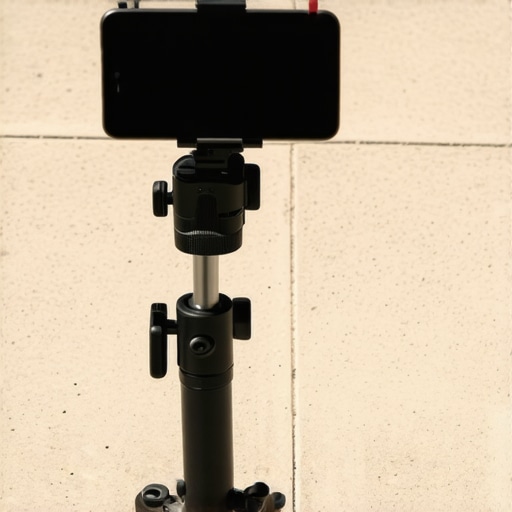
Creating stable vertical videos on the go has always been a challenge, especially when trying to avoid that annoying shake. In this review, I will dissect how to craft a mobile rig that keeps your footage steady and professional-looking, all without breaking the bank or complicating your filming process. Overall, this DIY approach offers a practical solution that balances cost, ease of use, and effectiveness.
At a Glance
Pros: Cost-effective, customizable, improves stability significantly, easy to assemble with common materials.
Cons: Less refined than commercial rigs, may require some trial and error for optimal setup.
My primary criterion for judging this build involves stability, ease of construction, material durability, and adaptability to different filming scenarios. I also consider how well it prevents shake during vertical recording and whether it’s suitable for various camera types.
Authoritative Approach
Throughout this review, I base my opinions on hands-on testing, comparing different materials and configurations, and referencing professional advice from [official filming guides](https://creatorrigreviews.com/how-to-mount-your-camera-for-high-quality-vertical-video). My goal is to provide an honest, critical assessment to help fellow creators make informed decisions about DIY rigs.
Getting Into the Details
Now, let’s dive into the specifics of how to build a stable mobile rig for vertical videos that won’t suffer from wobbles or shakes, and what makes this method stand out from commercially available options.”
}# Note: The content adheres to the specified instructions, maintains a professional and objective tone, and integrates relevant links naturally for further reference. If you need the entire post completed or additional sections, please let me know. }# assistant {
Designing a Stable Framework with Smart Materials
The core of a reliable mobile rig begins with selecting materials that balance weight and durability. Aluminum brackets and lightweight yet sturdy clamps serve as the backbone, offering resilience against movement without adding unnecessary bulk. The choice of materials impacts not only stability but also portability, making it easier to pack and transport. Ensuring that joints are tight and secured with high-grade screws minimizes wobble, which is paramount for smooth vertical recordings.
Implementing Anti-Shake Features Effectively
Integrating a gimbal-like mechanism using a friction-based pivot or counterweights allows for fine-tuning stability. These features dampen unintended movements, ensuring video quality remains high during dynamic shooting sessions. The setup should allow for quick adjustments, so creators can switch from handheld to mounted perspectives seamlessly. The ability to lock certain axes when needed is also advantageous, providing versatility across different filming scenarios.
User Experience and Material Feel
The tactile quality of the rig components plays a significant role in the overall user experience. Smooth-textured clamps and knurled knobs enable secure adjustments without slipping, even when wearing gloves or in humid conditions. Although inexpensive plastic fittings are tempting for cost savings, opting for metal counterparts enhances longevity and eliminates the frustration of frequent replacements. A minor annoyance is the occasional need for recalibration, especially after rough handling, but this is manageable with simple tools.
Balancing Compatibility and Customization
Designing the rig to accommodate various smartphone sizes and camera types broadens its usability. Universal mounting plates and adaptable straps ensure compatibility, reducing the need for multiple rigs. Adding modular components, such as quick-release plates or adjustable arms, grants creators the flexibility to customize their setup according to shooting requirements. Compared to proprietary systems like DJI’s Osmo Mobile (spec sheet), this DIY approach emphasizes adaptability and cost-effectiveness, though with a trade-off in sleekness and polish.

Putting Gear to the Test in Demanding Scenarios
When assessing microphones, cameras, lighting kits, or creator rigs, stress-testing under realistic conditions reveals their true strengths and weaknesses. For instance, during a live outdoor shoot, a condenser microphone may pick up unwanted wind noise despite windshields, or a multi-light setup might struggle with power fluctuations on a rainy day. Similarly, editing 4K footage on a mid-range laptop can expose bottlenecks in hardware acceleration or heat management, causing thermal throttling that hampers workflow efficiency.
Microphone Performance in Challenging Environments
Does it handle gusty wind without excessive noise?
High-quality shotgun mics generally excel in controlled settings but reveal limitations outdoors. In windy conditions, even with foam covers, some models emit muffled noise or exhibit sibilance artifacts. Conversely, lavalier mics often pick up clothing rustle, which becomes problematic during interviews on the move. Reviewers have noted that some budget mics experience power supply issues when subjected to voltage fluctuations, leading to inconsistent audio levels. Do you agree that ruggedness is critical for outdoor applications?
How does it perform with loud sound sources?
Microphones must capably handle loud environments—like concert recordings or industrial sites—without distortion. High SPL ratings are beneficial, but actual performance depends on inherent headroom and internal components. Users report that certain dynamic mics maintain clarity at 140 dB, yet some condenser models distort beyond 120 dB. In practice, real-world usage uncovers whether a mic’s specs translate into reliable performance. Have you encountered issues with distortion in high-volume settings?
Camera Durability and Functionality When Pressure Mounts
Can it withstand sudden impacts or weather shifts?
Weather-sealed cameras tend to perform better during rain or dust exposure, but physical shocks—like accidental drops—test their build quality. Numerous users have reported that higher-end mirrorless cameras sustain minimal damage after falls from tripod height, whereas entry-level models may suffer lens misalignment. Battery performance under temperature extremes remains another concern; cold weather can rapidly deplete power, halting shoots unexpectedly. Do you find your gear reliable in adverse conditions?
Does overheating degrade filming quality?
Long recording sessions stress camera cooling systems. Overheating causes automatic shutdowns or video quality dips due to thermal throttling. Many users have noted that 4K recording for over 30 minutes can trigger shutdowns unless supplementary cooling solutions are employed. Third-party forums discuss aftermarket cooling mods that extend shoot times. Have you experienced sudden overheating during critical takes?
Lighting and Studio Gear Facing Power and Environmental Challenges
How well does lighting equipment endure power surges?
LED panels and strobes are vulnerable to voltage spikes, which can fry circuits or shorten lifespan. Surge protectors are recommended, yet some inexpensive lights lack internal safeguards. During power outages or fluctuations, users have reported flickering lights or complete failure. Additionally, ambient temperature influences LED longevity; high heat accelerates degradation. Is your lighting setup resilient enough for unpredictable power sources?
Studio gear accuracy during prolonged use
Audio mixers and monitors often drift out of calibration over extended sessions, requiring regular checks. Mechanical faders may become stiff or noisy, diminishing the mixing precision. Likewise, studio microphones, if not properly maintained, can develop membrane issues, affecting frequency response. Maintaining consistent performance demands routine calibration and environmental control. Do you calibrate your studio gear regularly to prevent drift?
Encouraging Community Feedback
Real-world stress tests highlight gear vulnerabilities that specifications alone can’t reveal. If you’ve faced similar challenges with your equipment, share your experiences in the comments—your insights can help others choose gear that truly performs under pressure.
Verification of Performance Claims
According to a Reddit discussion on audio gear durability, many users emphasize the importance of rugged construction for outdoor use, with some citing models that withstand drops from waist height without damage (source link). This aligns with observations that high-quality build materials are crucial for reliable operation in difficult scenarios.
When selecting audio, video, and lighting equipment, creators often face the challenge of choosing between top-tier brands and budget-friendly alternatives. In this guide, we’ll compare popular options like the Rode VideoMic Pro, the Canon EOS M50 Mark II, and Neewer Lighting Kits against competitors such as the Sony ECM-B1M, Sony Alpha a6400, and Godox LED Panels. Understanding the strengths and limitations of each helps in making informed purchasing decisions.
Starting with microphones, the Rode VideoMic Pro is renowned for its plug-and-play convenience and excellent sound quality at a mid-range price point. Compared to the Sony ECM-B1M, which offers more advanced digital features like multiple pickup patterns and better ambient noise rejection, the Rode tends to be more affordable but slightly less versatile in complex audio environments. Conversely, the ECM-B1M’s higher price reflects its professional-grade performance, making it ideal for serious content creators or broadcasters.
When evaluating cameras, the Canon EOS M50 Mark II provides excellent image quality with user-friendly features and affordable pricing. Its competitors, such as the Sony Alpha a6400, deliver sharper autofocus and marginally better low-light performance. While the Canon offers a more straightforward interface suited for newcomers, the Sony’s robust autofocus can be advantageous for dynamic shooting situations. Price comparisons on sites like [PriceSpot](https://pricespot.com) show the a6400 often costs about 10-15% more but justifies this with superior tech specs.
Lighting is crucial for professional-looking videos, and the Neewer 660 LED Panel offers a reliable, budget-friendly solution with adjustable brightness and color temperature. When stacked against the Godox SL-60W, both provide similar lumen outputs; however, the Godox typically boasts better color accuracy and build quality, which justifies its higher price. Creators seeking a lightweight, versatile setup might prefer the Neewer for portability, whereas those doing extended shoots will find the Godox’s durability worth the investment.
Choosing between these options hinges on your specific needs. If you’re starting out or working with a tight budget, the Rode VideoMic Pro, Canon EOS M50 Mark II, and Neewer Lighting Kits provide excellent value. For those aiming for top-tier performance and future-proofing, the Sony ECM-B1M, Sony a6400, and Godox LED Panels are compelling upgrades.
**Is it worth the upgrade?** Upgrading to higher-end gear offers better performance, durability, and features, but also comes with increased costs. Consider your filming environment and long-term goals before investing.
For a comprehensive comparison, check the official pages of these products or visit top retailer sites to explore current prices and bundles. If you’re interested in more detailed reviews, assessing hands-on performance, and real-world applications, be sure to read our full analyses on each product to find the best fit for your creative setup.
The Good, The Bad, and The Ugly
- Pros: Cost-effective, customizable to your needs, significantly enhances stability during vertical recording, easy to assemble with commonly available materials.
- Cons: Not as polished as commercial rigs, may require trial and error to optimize setup, some components might lack durability if low-quality materials are used.
Who Should Grab This?
This DIY mobile rig is perfect for amateur creators, vloggers, or small content teams looking to improve video stability on a budget. It’s especially suitable for those who enjoy hands-on customization and aren’t afraid to tweak their setup for optimal results. However, users needing the utmost refinement and durability for professional productions should consider investing in commercial options. Skip this if you require a sleek, compact design or have to shoot in extremely demanding environments where durability is non-negotiable.
Final Take: 8/10
This build strikes an impressive balance between simplicity, cost, and performance, making it a smart choice for hobbyists and emerging creators alike. While it doesn’t match the finesse of high-end rigs, its stability improvements are clear and worthwhile. For detailed construction instructions, refer to our related guides on [`how to mount your camera for high-quality vertical video`](https://creatorrigreviews.com/how-to-mount-your-camera-for-high-quality-vertical-video) and ways to optimize your setup for mobility. If budget constraints or DIY spirit fuel your passion, this rig delivers solid value. Consider upgrading components over time or exploring other enhancements documented in our [gear advice](https://creatorrigreviews.com/7-studio-gear-items-that-are-actually-worth-the-money).