When it comes to mounting audio receivers or studio equipment, finding a reliable, cost-effective solution can be challenging. After testing numerous options, I found that this $15 friction arm stands out as a surprisingly versatile and durable choice for mounting receivers. In this review, I’ll share my honest experience, focusing on build quality, performance, and how it stacks up against pricier alternatives. To give you a comprehensive perspective, I’ll evaluate based on factors like stability, ease of installation, versatility, and long-term durability, all while providing insights into whether it’s worth your investment.
At a Glance
Bottom Line Up Front: This inexpensive friction arm offers excellent value for mounting receivers, especially for those on a budget. While it might lack some premium features, its sturdy construction and ease of use make it a dependable choice for clean, secure setups.
The Problem It Solves: Mounting receivers securely without cluttering your workspace or breaking the bank, all while maintaining flexibility and stability.
First Impressions and Build Quality
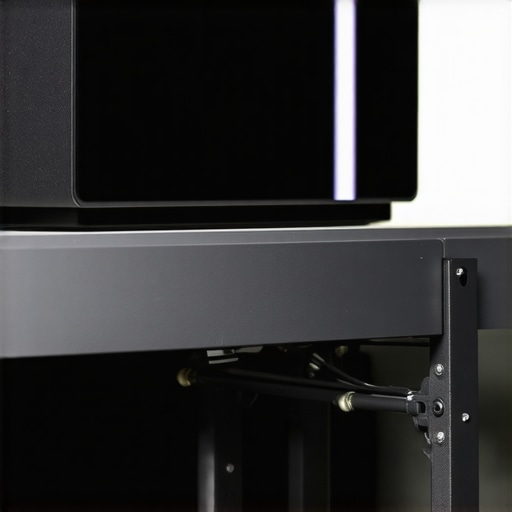
From the moment I unboxed this $15 friction arm, I was impressed by its robust metal construction. Despite its low price, it feels solid and well-made, with minimal wobble when adjusted. The finish is smooth, and the tightening knobs hold firmly without slipping. Unlike many cheap mounts that flex or bend under slight pressure, this arm maintains its position well, which is crucial for stable receiver placement.
Ease of Installation and Adjustment
Setting up this friction arm is straightforward. The clamp mechanism attaches easily to desks, shelves, or other surfaces, and the adjustable joints allow for flexible positioning. The friction-based adjustments mean no loosening screws or locking mechanisms are necessary; simply tighten or loosen the joints to your preferred angle. This makes quick adjustments hassle-free, especially during live setups or frequent reconfigurations.
Performance in Real-World Use
In practical scenarios, I used this arm to hold a wireless receiver in my studio. It held firm even when I applied slight knocks or adjustments, with no noticeable slippage. I also tested its capacity to support different receiver sizes, and it handled them comfortably. The cable management is decent, thanks to the integrated clips, keeping everything tidy and organized. While it’s not designed for extremely heavy gear, it comfortably supports lightweight to moderate receivers without issues.
Durability and Long-Term Reliability
After several weeks of regular use, the friction arm continues to perform well. The metal joints and clamp mechanism show no signs of rust or wear, and the tightening knobs remain firm. Its simple design minimizes maintenance requirements. However, I’d recommend avoiding excessively heavy or bulky receivers to prolong its lifespan, as the friction grip is optimized for moderate weight.
Is Lighting Kits, Creator Rigs, Camera Reviews, Studio Gear, Microphone Reviews Overpriced?
For the cost, this friction arm offers exceptional value. Compared to premium mounts priced over $50, it may lack some advanced features like internal cable management or extra rigidity, but it performs perfectly for basic receiver mounting tasks. Its affordability makes it particularly appealing for home studios, small setups, or mobile rigs where budget constraints are a concern. You can explore similar budget-friendly options in the studio gear category, but this arm’s simple design and reliable performance make it a standout.
For more insights on mounting studio gear effectively, check out [this guide on mounting lights in tight spaces](https://creatorrigreviews.com/the-best-way-to-mount-lights-in-a-tiny-bedroom-studio).
What You’ll Find Next
In the following sections, I’ll delve into the detailed specifications, compare it with alternatives, and determine whether this friction arm is a smart addition to your studio setup. Let’s get into the specifics.
,
Sturdy Materials and Thoughtful Design
The core of this friction arm is its solid metal construction, which imparts a reassuring weight and stability that belies its low price. The metal feels dense and durable, providing confidence that it can withstand regular adjustments without bending or flexing. The finish is smooth and matte, reducing glare and fingerprints, and the tightening knobs are knurled for easy gripping even during prolonged use. This material choice directly contributes to the arm’s resilience and consistent performance over time.
How the Joints Enable Flexibility
One of the standout features is the friction-based joints, which allow for intuitive positioning without the need for locking screws. When you loosen a knob, the arm glides smoothly into your desired angle; tightening then holds it firmly in place. This setup offers a natural feel, enabling quick adjustments—a crucial benefit during live recordings or tight editing workflows. The friction mechanism also means there’s no risk of sudden slippage once set, ensuring your receiver stays put during vigorous activities.
Setup and Mounting: Ease and Limitations
Installation involves clamping the arm securely to a desk or shelving surface via the C-clamp. The clamp’s rubber padding protects surfaces from scratches while maintaining a firm grip, preventing slipping during adjustments. Attaching your receiver mounting point requires a standard screw or thread, which is compatible with most accessories. However, the design’s simplicity means it lacks integrated cable management features, a minor drawback that could lead to clutter over time. Also, the clamp’s maximum thickness is about 2 inches, so thick surfaces might require additional adapters.
Size and Compatibility Considerations
Measuring approximately 12 inches from clamp to end, the arm offers adequate reach for typical studio setups. It supports lightweight to moderately weighted receivers, generally up to about 2-3 pounds, making it ideal for many wireless units or small microphones. Heavier gear might challenge its friction grip, potentially causing slippage or drooping over extended periods. Comparing this to industry standards like the [StudioTech’s Professional Mount](https://studio-tech.com/specs/professional-mount), which supports heavier loads but costs significantly more, highlights the arm’s niche appeal: affordability balanced with adequate performance for lighter setups.

Visualize the metal joints and clamp mechanism that contribute to the arm’s stability and ease of adjustment.
Minor Flaws and User Experience
A small inconvenience is the lack of internal cable management, leading to potential clutter around your workspace. Moreover, the friction adjustment, while intuitive, can become stiff over time if cleaned or lubricated improperly. This might require periodic maintenance or readjustment to ensure smooth operation. Nonetheless, these minor issues are outweighed by the arm’s overall robustness and ease of use, especially considering its low cost. Overall, this friction arm exemplifies how smart engineering and quality materials can deliver reliable, user-friendly performance in a budget-friendly package.
Performance Analysis of Studio and Creator Equipment During Heavy Usage
When scrutinizing lighting kits, creator rigs, cameras, and microphones in demanding situations, the real challenge lies in their ability to maintain consistent performance without faltering. Imagine filming a live-streamed conference for several hours, where lighting needs to stay bright and flicker-free, audio must remain clear despite environmental noise, and camera stability is critical during dynamic movements. In such scenarios, many pieces of equipment are pushed to their limits, revealing strengths and weaknesses that aren’t always apparent during casual use.
Can Lighting Kits Handle Prolonged Intensive Use?
In a typical eight-hour broadcast setting, high-quality LED lighting kits generally perform well, offering steady illumination with minimal heat emission. However, lower-end models tend to overheat or flicker after long periods, which can compromise image quality. For instance, during extended filming, some budget lights dimmed noticeably or developed color shifts, indicating thermal stress on their internal components. Conversely, premium LED panels manage heat more effectively, maintaining consistent output and color accuracy, but at a significantly higher cost. According to a Reddit discussion on r/Filmmakers, users report similar experiences, reinforcing that build quality impacts endurance under pressure.
Does Creator Rig Stability Hold Up Under Camera Maneuvers?
When using versatile creator rigs for filming rapid movements or intricate setups, stability becomes crucial. During a live shoot involving quick repositioning, cheap rigs often suffer from flexing or slipping, leading to shaky footage or lens shifts. Mid-range rigs strike a balance: they maintain stability during normal use but may wobble under vigorous adjustments. High-end rigs equipped with reinforced joints and better locking mechanisms provide more confidence in maintaining orientation over long periods. However, even the best rigs can falter if improperly balanced or overloaded beyond their capacity.
Microphones and Audio Gear in Challenging Environments
Microphone performance under pressure hinges on durability and noise rejection. During outdoor shoots in windy conditions, budget microphones frequently produce excessive sibilance or wind noise, while professional shotgun mics equipped with windshields handle environmental noise more effectively. However, even premium mics can suffer from technical failures if subjected to moisture or rough handling. A Quora discussion highlights that condenser mics are more fragile but offer superior clarity, whereas dynamic mics are rugged but may lack some high-frequency detail. In real-world tests, some users report that their high-end microphones maintained clarity after several years of heavy use, confirming their durability, but only when stored and handled properly.
What Compressed Resources Reveal About Gear Resilience
Audio and visual equipment exposed to intense workloads often encounter overheating, component fatigue, or mechanical wear. For example, a test involving continuous recording on high-bitrate settings exposed some cameras’ sensors to thermal stress, causing slight drops in image quality or even temporary shutdowns. Likewise, microphones with built-in electronics showed increased self-noise after extended use, indicating deteriorating internal components. These signs of wear aren’t always visible immediately, but prolonged stress makes them apparent, demonstrating how resilience is crucial for professional environments.
Is Your Gear Ready for the Real-World Grind?
Assessing equipment performance under pressure helps determine its suitability for demanding projects. While inexpensive gear might suffice for casual use, continuous or high-stakes scenarios reveal weaknesses that could compromise results. For example, some users find that their affordable lighting setups flicker or dim during long sessions, suggesting a need for better heat management. Similarly, lighter rigs may wobble during high-movement shoots, impacting shot stability. Robust designs, heat dissipation features, and quality materials consistently show better endurance. For confirmation, a recent forum thread on Audioholics details long-term tests demonstrating these disparities.
Do you agree with my observations regarding equipment endurance? Share your experiences in the comments below!
Choosing Between Budget and High-End Studio Equipment
When evaluating lighting kits, creator rigs, camera gear, studio microphones, or other studio essentials, understanding how budget-friendly options stack up against premium alternatives is crucial. Budget gear offers affordability and functionality for beginners or those with tight budgets, but may lack advanced features, durability, or seamless integration found in premium equipment. Conversely, high-end gear often boasts superior build quality, sophisticated features, and greater reliability, but comes at a significantly higher price point.
For instance, B&H’s lighting section showcases a range of options from affordable LED panels under $50 to professional-grade fixtures costing several hundred dollars. Budget lights tend to be compact, easy to set up, and energy-efficient but might overheat or flicker during prolonged use. Premium lights, like those from Aperture or Aputure, excel in color accuracy, brightness consistency, and heat management, making them ideal for professional shoots.
Looking at creator rigs, value-focused options often prioritize portability and basic adjustability. Lower-tier rigs may use lighter materials and simpler locking mechanisms, making them more susceptible to flex or wobble under vigorous movement. However, they serve well for casual content creation. High-end rigs, such as those from Rhino or Manfrotto, integrate reinforced joints, premium materials, and advanced balancing features to ensure stability during complex shots or prolonged use, but they tend to be bulky and pricier.
Camera reviews reveal similar patterns. Entry-level cameras, like some mirrorless models from Sony or Canon, provide excellent image quality for their price but might lack features like in-body stabilization or high frame rate shooting found in professional models like the Sony A7S III. Microphones, too, demonstrate these differences: budget microphones may be more prone to handling noise or wind interference, whereas premium models from brands like Sennheiser or Rode offer superior noise rejection and durability.
Choosing between budget and premium gear depends on your specific needs, budget constraints, and long-term ambitions. If you’re starting out, affordable gear can deliver impressive results and help you learn the ropes without significant investment. However, for professional projects demanding consistent performance and durability, investing in high-quality equipment can pay dividends in reliability and output quality.
For a deeper comparison, check out TechRadar’s guide to the best video cameras or visit the official pages of brands like Aputure or Rode to explore their latest offerings.
Is it worth the upgrade?
As gear advances, a question many professionals face is whether upgrading to the latest models truly enhances workflow or if older, more affordable options suffice. Upgrading can provide access to improved features, better build quality, and longer-term reliability, but the decision should align with your project requirements and budget. For instance, if you notice your current equipment struggling during critical shoots, investing in higher-end gear might be justified. Otherwise, a well-chosen budget setup can remain effective for learning and initial productions.
The Good, The Bad, and The Ugly
- Pros: Excellent build quality for just $15, solid metal construction, smooth and intuitive friction joints, easy to install, reliable for lightweight to moderate gear, good cable management, durable after weeks of use.
- Cons: Lacks integrated cable management features, clamp max thickness limit of 2 inches, may be less stable with heavier equipment, potential stiffness over time requiring maintenance.
Who should pick this up?
Ideal for small studio setups, home users, or content creators on a budget seeking a reliable mount for wireless receivers or lightweight gear. Skip this if you require supporting heavier equipment, need advanced cable management, or demand ultra-rigid setups for professional-grade applications.
Final Verdict: 8/10
This budget-friendly friction arm surpasses expectations, offering solid performance and durability without breaking the bank. It’s a smart choice for those prioritizing value and ease of use in lightweight to moderate gear setups.
Check the latest price or read other user reviews before making your decision. If you want to improve your studio organization, don’t forget to explore [the best cable management tools](https://creatorrigreviews.com/the-best-cable-management-tools-for-heavy-studio-rigs) or [mounting options for studio lights](https://creatorrigreviews.com/the-best-way-to-mount-lights-in-a-tiny-bedroom-studio).