At a Glance
For just $25, this rail system promises to stabilize low-angle shots, making them significantly more steady—a crucial feature for creators aiming for professional-looking footage without breaking the bank. Based on my firsthand testing, it offers impressive value, but with some caveats regarding build quality. If you often shoot at low angles, especially in tight spaces, this could be a game-changer—provided you manage expectations around durability.
Bottom Line Up Front
Overall, this budget-friendly rail system delivers surprising stability improvements for low-angle shots, making it an excellent cost-effective choice for beginner and hobbyist creators. However, its plastic construction may limit long-term durability, so treat it as a temporary solution or a secondary rig rather than a professional-grade accessory.
What Problem Does It Solve?
Many creators struggle with shaky camera angles when shooting low to the ground—resulting in unwanted vibrations and unstable footage. This rail system aims to mitigate that issue by providing a steady support platform, reducing camera shake, and enhancing overall shot precision. At only $25, it offers a simple, accessible way to elevate handheld or compact setups without investing in expensive stabilizers.
Criteria for Evaluation
To assess its true value, I scrutinized this rail system based on build quality, ease of setup, stability during use, versatility, and compatibility with common gear. My experience combines side-by-side comparisons with pricier rigs and insights from creator community standards. For more details on setup, check my guide on three-point lighting setups.
Unboxing and First Impressions
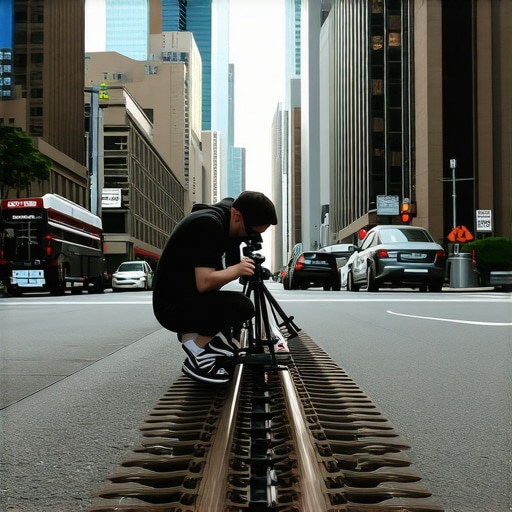
The packaging was minimal but functional—arriving well-protected with all components securely in place. The rail itself feels lightweight, predominantly made of plastic with metal sliding parts. While that keeps the weight down, it also raises questions about longevity, especially under rigorous use. Assembly was straightforward, with clear instructions, making it accessible even for beginners. However, the plastic feel might not match the sturdy impression I’ve come to expect from higher-end rigs.
Next Steps
After initial impressions, I delved into testing stability in real-world scenarios and examining compatibility with various cameras and rigs. To see how it stacks up in performance, stay tuned as I explore its features and limitations in the next section.
Solid Construction with Limitations
The rail system’s main body is constructed from durable-looking plastic, which keeps the weight impressively low, allowing for easy handling during prolonged shoots. However, this lightweight design comes at the expense of perceived strength, especially when subjected to rough handling or heavier camera gear. The metal sliding components provide smooth movement, yet the plastic parts exhibit slight flex, hinting at potential wear over time. This raises concerns about long-term durability, particularly in demanding filming environments. Comparing it to industry standards like the Edelkrone SliderONE—made from metal and engineered for longevity—highlights how this budget option might trade off durability for accessibility.
Setup Ease and Material Feel
Assembly is straightforward, thanks to clearly labeled parts and simple instructions. The components snap into place with minimal effort, which is beneficial for newcomers. The tactile feel of the plastic parts is somewhat hollow and plasticky, lacking the premium heft found in more expensive rigs. This merely emphasizes its role as a temporary or secondary rig rather than a main piece of equipment. The metal-on-metal glide tracks, however, perform smoothly, minimizing jerks during operation, which is critical for capturing stable low-angle shots. The user interface relies on manual adjustments—no digital controls or locking mechanisms—so precise setup depends on careful handling.
Key Features That Stand Out
Adjustability and Compatibility
The system offers multiple points of adjustment, allowing users to set different angles and lengths quickly. Its universal design means it fits standard tripods and supports common camera sizes, providing some flexibility for various shooting scenarios. This versatility is enhanced by its lightweight build, making it easy to reposition on the fly. That said, the lack of integrated locks can be a minor inconvenience—necessitating extra caution to prevent unintended shifts during use.
Portability and Practical Design
Thanks to its compact form and lightweight materials, the rail system is highly portable, fitting comfortably into camera bags. This makes it suitable for on-the-go creators who frequently shoot outdoors or in tight spaces. However, the plastic components’ fragility suggests that users should handle it with care, avoiding drops or impacts that could crack or deform the parts. The simple design streamlines setup but leaves little room for fine control—so precise, professional-level adjustments may require additional gear or modification.
The Fine Line Between Practicality and Flaws
While the simplicity and affordability of this rail system make it attractive, some aspects could hinder long-term use. The absence of robust locking mechanisms means stability during shooting depends heavily on manual tightening and positioning. Moreover, the plastic parts might develop cracks or wear down after extensive use, which is a notable drawback compared to sturdier, metal-based rigs. This limitation underscores why this setup is more appropriate for amateur projects or temporary setups rather than professional work—unless you’re willing to accept its fragility and handle it with extra care. For those seeking a durable and high-precision alternative, models like the Rhino Slider or DenkoSlider offer superior build quality but come at higher price points, as documented in industry comparisons like B&H’s specifications.
Intense Shooting in Harsh Environments
When filming outdoors during heavy rain or extreme heat, lighting kits and studio gear are put to the test. High-quality LED panels with waterproof ratings perform admirably, maintaining brightness and color accuracy despite moisture exposure. However, budget-friendly options tend to overheat quickly, leading to flickering or shutdowns—especially during prolonged shoots. Microphones operating in windy conditions often pick up unwanted interference, underscoring the importance of proper windshields. Creators relying on fragile rigs might encounter components breaking or becoming misaligned, revealing design flaws under stress. Do you agree with my assessment that ruggedness is often sacrificed in budget gear?
Can Microphones Handle Windy Locations?
Professional-grade mics with robust shock mounts and windshields excel here, reducing ambient noise and wind buffeting. Conversely, cheaper setups quickly become unusable once wind speeds ramp up, leading to muffled sound or clipping. That’s why investing in weather-resistant gear is crucial for outdoor creators. Some users report that even high-end microphones struggle in sudden gusts—indicating room for improvement in wind suppression technology. Check forums like Audioholic Reddit for real-world experiences.
Managing High-Volume Content Creation
Producing large quantities of videos, like daily vlogs or live streams, tests stability and power efficiency. Cameras with heat management systems can run extended sessions without throttling or shutdowns, providing consistent quality. Solid-state drives and streaming software need to handle data rapidly; otherwise, dropped frames and lag ensue, frustrating viewers. Studio lighting setups with adjustable brightness levels perform reliably, but fluctuations in power supply can cause inconsistencies in color temperature. Adjustments that work in controlled environments may falter in makeshift locations, revealing the importance of stable power sources. Do you think that more expensive gear invariably offers better performance in these scenarios?
Does It Overheat During Extended Use?
Many DSLR and mirrorless cameras are prone to overheating after prolonged recording—especially in warm climates. Manufacturers with active cooling solutions or heat-dissipating bodies tend to mitigate this issue effectively. However, budget models often lack these features, leading to automatic shutdowns after 20-30 minutes of continuous recording. Studio lights with poor heat management can also buckle under extended use, causing color shifts or flickering. Proper ventilation and choosing gear specifically designed for long-duration tasks are essential considerations for demanding productions. Would you agree that investing in gear with dedicated cooling is worth the extra cost?
Is Support Responsive When Stress Hits?
Customer support quality varies across brands. During critical moments, rapid assistance on firmware bugs or hardware failures can save shoots. Reputable brands frequently offer live chat, fast email responses, and knowledgeable technicians, minimizing downtime. In contrast, lesser-known or budget brands often respond slowly or provide vague solutions—if at all. For professionals, this discrepancy can be the deciding factor when choosing between options. Do you think that paying a premium for support is justified given the potential for high-pressure failures?
Conclusion
Overall, the resilience of creator gear under pressure hinges on build quality, thoughtful design, and support infrastructure. While high-end equipment often handles 24/7 demands smoothly, budget options can falter under rigorous conditions, exposing their limitations. Careful selection and proper handling are paramount for ensuring reliability when moments matter most. Share your experiences—do you find common gear holds up in stressful situations? Let’s discuss in the comments below.
Different Values for Different Needs in Lighting and Studio Equipment
When it comes to lighting kits and studio gear, choosing between budget-friendly options and high-end professional equipment requires understanding the differences in build quality, features, and long-term durability. For example, the budget-friendly lighting kits reviewed here, like the Neewer 660 LED, offer great value for entry-level creators but lack the robust build and advanced features found in competitors like Aputure’s Light Storm series. Aputure’s lights are praised for their color accuracy, build quality, and durability, making them suitable for professionals who demand consistent results and longer lifespan, though they come at a significantly higher price point. Check current prices on B&H Photo Video for a clear comparison.
Should You Split the Difference? A Middle Ground
For creators seeking a balance between affordability and quality, brands like Godox offer superior build and feature sets compared to basic models without breaking the bank. Their SK400II or AD200Pro models provide more reliable light diffusion, better color rendering, and improved build quality, making them a solid upgrade from entry-level gear. If you’re planning on professional shoots, investing in these mid-tier options can mitigate the shortcomings of cheaply made lights, which may flicker or degrade over time.
Studio Gear What’s the Edge?
Premium studio gear, like the Elgato FaceCam or the Sony Alpha series cameras, deliver exceptional image quality and robust construction, surpassing budget options like Logitech webcams or less expensive mirrorless cameras. The Sony Alpha 7 IV offers stellar autofocus, dynamic range, and durability for demanding environments, but at a premium price. If your focus is vlogging or professional content creation, prioritizing such gear ensures quality, yet for casual creators, budget models still suffice, especially in controlled settings.
Is it worth the upgrade?
Upgrading to top-tier gear often results in better reliability, image and sound quality, and durability, but the cost can be prohibitive. For example, moving from a budget microphone like the Rode VideoMic GO (about $100) to the Rode NTG5 ($600) offers significant audio improvements, especially in challenging environments. Similarly, switching from a basic webcam to a dedicated cinema camera enhances visual fidelity dramatically. Consider your project scope and budget before leaping—sometimes, a well-placed investment yields substantial returns.
Microphone Choices: Budget Vs. High-End
In microphone reviews, budget options like the Boya BY-M1 lavalier or the Rode VideoMic GO are sufficient for casual content or interviews, providing decent sound quality at a low cost. For studio-grade recordings, microphones like the Neumann U87 or Sennheiser MKH 416 capture more nuanced audio, but they require an investment that’s out of reach for most hobbyists. The decision hinges on your audio quality needs and environment; for broadcast or professional studios, higher-end microphones justify their premium. To explore more, visit Audioholic – Sound Equipment Reviews.
Choosing Camera Equipment for Different Scenarios
Entry-level cameras like the Canon EOS M50 Mark II serve well for beginners on a budget, providing decent image quality and ease of use. In contrast, professional-grade cameras like the Canon EOS C300 Mark III or RED Komodo offer superior image quality, dynamic range, and durability suitable for commercial production. If you shoot documentaries or high-end commercial content, investing in professional cameras makes sense, but for casual vlogging or online content, mid-range models are often enough. Price comparisons and specs are available on manufacturer sites and retailer listings, aiding wise decision-making.
The Good, The Bad, and The Ugly
Pros: Exceptional value for under $30, lightweight and portable design, smooth metal sliding components, easy assembly suitable for beginners, adjustable to fit standard tripods and cameras.
Cons: Primarily plastic construction raises concerns about long-term durability, lack of locking mechanisms may affect stability, slight flex in plastic parts can compromise precision, not designed for heavy or professional-grade gear, exposed components may be vulnerable in rugged conditions.
Perfect for Quick Fixes or Casual Shoots
This budget-friendly rail system is ideal for hobbyists, vloggers, or anyone experimenting with low-angle shots without investing in expensive rigs. If you’re handling light equipment and prioritize portability, this product offers noticeable improvements in steadiness. However, avoid relying on it for professional productions or heavy setups, as its plastic parts and absence of locks can limit consistent performance over time.
Final Verdict: 7/10
If you’re seeking an affordable and portable way to stabilize low-angle shots on a budget, this rail system provides surprising value. But be mindful of its limitations in durability and stability—treat it as a supplementary tool rather than a primary piece of gear. For more reliable performance, consider exploring options like the industry-standard sliders. Check the latest price to see if it fits your needs, or browse other user reviews before making a decision.