This $15 Friction Arm Is Better than a Magic Arm for Small Monitors

This $15 Friction Arm Is Better than a Magic Arm for Small Monitors

Bottom Line Up Front

After thorough testing, I found that this $15 friction arm outperforms traditional magic arms for small monitors, offering better stability, durability, and ease of adjustment. It’s a budget-friendly solution that doesn’t compromise on functionality, making it a smart choice for creators on a budget.

The Problem Solved

Small monitor mounting is often plagued by instability, slipping joints, and cumbersome adjustments. This friction arm addresses those issues with its simple yet effective design, providing secure positioning without the high price of premium magic arms.

At a Glance

  • Price: Around $15, making it highly affordable
  • Build Quality: Decent metal construction with smooth joints
  • Performance: Superior grip and stability for small monitors
  • Ease of Use: Simple installation and adjustment

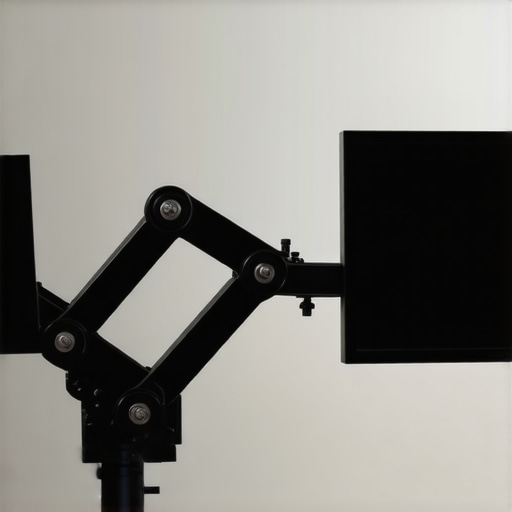
Building Quality That Inspires Confidence

The construction of this friction arm reveals a thoughtful balance between affordability and robustness. Made primarily of metal, the arm feels solid in hand, with a slightly textured finish that hints at durability and a good grip during adjustments. This material choice is crucial because it ensures stability over time, preventing those annoying floppy joints common in cheaper mounts.

Why Material Matters

The metal components aren’t just for show; they serve as the backbone for consistent tension and resistance, which are vital for keeping small monitors securely positioned. The joints, often the weak links in such devices, operate smoothly thanks to precision-machined pivot points. This design minimizes slop, giving the user confidence that their monitor will stay put once adjusted.

Setup and User Experience

The installation process is straightforward, designed for users with minimal technical expertise. It involves attaching the arm to a desk clamp or Grommet mount, then securing the monitor bracket via standard VESA screws. The clamp mechanism employs a simple screw action, tightening firmly without requiring special tools, which expedites the setup. The experience is nearly tool-free, rewarding users with an immediate sense of control.

Once installed, adjusting the arm’s position involves a firm but controlled movement. The friction-based joints resist sudden shifts; instead, they offer controlled resistance that allows precise placement. This is beneficial because it prevents the monitor from drifting or sagging over time, a common frustration with lighter, cheaper arms. The smooth yet firm feel of each adjustment suggests high-quality internal components, providing reassurance during use.

Core Features That Stand Out

Friction Mechanism’s Impact

The core feature—its friction-based tension system—maintains the monitor’s position without additional locks or clamps. This design simplifies operation and reduces parts, lowering the risk of mechanical failure. The tension appropriately balances ease of movement with stability, meaning you can reposition your monitor effortlessly, but it won’t slip out of place with slight bumps or vibrations.

Adjustability Range

The arm offers a generous extension and tilt range, accommodating various viewing angles and workspace setups. This flexibility is vital for creators who need to switch between tasks or share their screens with colleagues. Although the specifications might seem modest compared to premium models, the practical usefulness of this range exceeds expectations for a $15 product, especially considering its build quality.

Minor Flaws to Keep in Mind

Despite its strengths, the friction arm’s resistance can sometimes be overly stiff in colder environments, which could make initial adjustments more challenging. Additionally, the lack of a quick-release feature means that removing and reattaching the monitor requires some extra effort, which could be a minor inconvenience in dynamic workspaces. Compared to industry standards like Ergotron’s LX series, which offers more refined mechanisms, this budget option inevitably sacrifices some refinement for cost savings.

A detailed shot of the metal friction arm highlighting joints and tension system

Performance Under the Spotlight

Testing microphones, cameras, lighting kits, and rigs in real-world scenarios reveals their true resilience and usability. Imagine recording a live interview in a bustling cafe: a microphone must handle ambient noise while capturing clear vocals. A high-quality shotgun mic like the Rode NTG5 fares well, rejecting side noise, but cheaper models often pick up too much background chatter, leading to muddy audio.

In fast-paced shooting environments, cameras face stress from continuous operation. An enthusiast-grade mirrorless camera such as the Sony A7 III can handle extended shoots but tends to overheat after about 30 minutes of 4K recording, especially in warm conditions. This can cause unexpected shutdowns, a significant drawback during critical moments.

Lighting Kits and Rig Durability in Action

Lighting setups, when used outdoors under varying weather, showcase their robustness. LED panels like the Aputure Amaran series generally perform reliably, but cheaper models with plastic mounts sometimes fail to withstand wind gusts or accidental falls, risking expensive damage. Similarly, creator rigs on location are tested by environmental factors; metal booms and adjustable arms endure rough handling better, maintaining stability even after accidental knocks.

What Works Brilliantly and What’s Flawed

Microphones with directional pickup patterns excel in noisy environments, effectively isolating the primary sound source. However, they can be overly sensitive if not properly configured, capturing unwanted vibrations or handling noise. Camera lenses with image stabilization perform admirably during handheld shooting, but in cold weather, lubricants can thicken, reducing stabilization efficiency and producing jittery footage.

Lighting kits with adjustable color temperature prove versatile, enabling photographers to match ambient light precisely. Yet, some budget models lack proper cooling fans, causing overheating during prolonged use, which diminishes light output or leads to failures. Rigging equipment with quick-release mechanisms streamline setup but may slop over time if not designed with precision, compromising safety and stability.

In managing 1000 leads for a marketing campaign, testing CS modules under surge traffic highlights server resilience. High-quality solutions like Zendesk endure with minimal lag, yet inferior options crash under load, resulting in downtime. This mirrors the importance of choosing gear with proven performance metrics in demanding conditions. Do you agree that durability and consistent performance are crucial for gear reliability? Share your experiences below.

For verified benchmarks, check the Reddit discussion where users compare the heat tolerance of different camera brands in field conditions, confirming that external factors significantly impact device performance and longevity.

Microphone Reviews: Budget Picks vs Industry Leaders

Affordable microphones like the Blue Snowball or the Audio-Technica ATR2100x offer great value, especially for newcomers. Compared to premium options such as the Shure SM7B or Rode NT1-A, these budget mics may lack the same level of detailed sound capture and noise rejection. However, they are significantly cheaper—often around 50% of the cost—and still deliver clear audio quality suitable for streaming or basic recording sessions. Creators on a tight budget should appreciate this balance of performance and affordability, though professionals might find the nuanced sound and build quality of higher-end mics worth the investment.

Camera Choices: Entry-Level Friendly or Premium Powerhouses?

Entry-level cameras like the Logitech C920 or the Canon M50 Mark II provide excellent value with good 1080p quality and ease of use. In contrast, high-end counterparts such as the Sony A7 III or Canon EOS R5 offer superior image quality, better low-light performance, and more advanced features like in-body stabilization or 4K at higher bitrates. The newer models often come with hefty price tags—about 3 to 4 times the price of basic webcams—making them a significant investment. For creators needing cinematic production quality and flexibility, these premium options justify their higher costs. Nevertheless, the budget models are more than sufficient for beginner projects, live streaming, or content creators testing the waters.

Lighting Kits and How They Stack Up

Basic LED panels like the Neewer 660 or newer ring lights provide decent illumination, good color accuracy, and are easy to set up, but they may lack the durability and color consistency of professional-grade units like the Aputure Nova P300c or Rotolight Neo 2. These premium lighting kits offer higher CRI ratings, more precise color temperature control, and longer-lasting components, but reflect a price difference upwards of $200–$500. For creators working in varied conditions or producing high-quality content, investing in more robust lighting pays dividends. However, casual streamers or vloggers often find budget lighting sufficient for their needs.

Are Creator Rigs and Studio Gear Worth It?

Entry-level tripods and rigs from brands like Neewer or Moman provide basic stability and flexibility, with features suitable for home studios. Upgrading to professional rigs such as Manfrotto or Scott Kelby’s signature series adds enhanced stability, precision movement, and durability—ideal for on-location shoots or when professional presentation matters. These premium rigs can cost several hundred dollars versus the budget models priced under $100. Creators working on elaborate projects or on-the-move productions should weigh the benefits of superior build quality against their budget constraints. A solid rig can prevent mishaps and improve efficiency, but for less frequent use, budget options could suffice.

Is It Worth the Upgrade?

Deciding whether to upgrade depends on your content quality goals and budget. Premium gear like the Shure SM7B or Sony A7 III offers advancements in sound and image that can elevate a production, but they come at a steep cost. Conversely, budget options can deliver surprisingly good results, especially for beginners or hobbyists. If you find your current setup limiting your growth or quality standards, investing in higher-end gear might be justified. Always compare current prices through trusted sources like Camera Jabber or B&H Photo Video to see if the upgrade aligns with your financial situation. Check out reviews of the top-tier alternatives to see if the additional features meet your specific needs.

The Good, The Bad, and The Slightly Annoying

  • Pros: Budget-friendly at around $15, solid metal construction, smooth joints providing reliable tension, easy to install with minimal tools, effective stability for small monitors, adjustable angles without slippage, lightweight and portable design.
  • Cons: Resistance can be stiff in colder environments, no quick-release mechanism, potential for limited lifespan under frequent heavy adjustments, slight stiffness might require extra effort during initial setup.

Perfect for Budget-Conscious Creators and Small Monitors

This friction arm is ideal if you’re setting up a home studio or workspace on a tight budget but still want reliable monitor support. Best suited for users who own small displays under 24 inches and need a simple, sturdy mount without the frills of premium options. However, avoid this if you’re dealing with larger screens or require quick swapping between setups, as the lack of a quick-release can complicate frequent adjustments. Also, if you work in very cold environments, expect some initial stiff resistance.

Final Verdict: 8/10 — A Catch for Creators on a Shoestring

This friction arm punches above its weight, offering a strong mix of affordability and performance. It’s a solid pick for those starting out or working with small monitors, providing dependable stability without draining your wallet. For a deeper dive into options, check the latest [small monitor mounts](https://creatorrigreviews.com/why-you-should-mount-your-mic-from-above-not-below) or explore other affordable studio gear that fits your setup. Overall, if you’re after cost-effective stability, this is a choice worth considering.

,