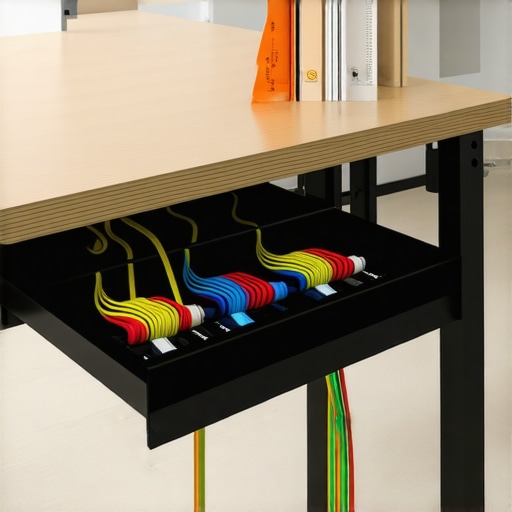
In the world of content creation, keeping a tidy studio isn’t just about aesthetics; it’s about efficiency and peace of mind. Recently, I decided to try the $13 Cable Management Tray after struggling with tangled wires and cluttered floors. My verdict? It’s a surprisingly effective, budget-friendly solution that significantly freed up my studio space without sacrificing quality. For creators looking to streamline their setups without breaking the bank, this tray might just be worth considering.
At a Glance
- Price: Around $13, making it an affordable upgrade.
- Build Quality: Durable plastic with a matte finish that resists scratches.
- Design: Compact, with multiple compartments for different cables.
- Ease of Installation: Simple mounting with adhesive backing and optional screws.
- Performance: Keeps cables organized, reduces floor clutter, and enhances safety.
This review is based on criteria focusing on build durability, ease of setup, organizational efficiency, and overall value for money. Now, let’s dive into the details of how this tray holds up in real-world studio conditions and whether it lives up to its modest price tag.
Solid Build Quality That Holds Up
The cable management tray is crafted from durable plastic with a matte finish, which not only resists scratches but also provides a premium feel that belies its inexpensive price. This choice of material ensures longevity, especially in a busy studio environment where bumps and dust are common. The sturdy construction means the tray can handle multiple cables without warping or snapping, giving users confidence that their setup remains organized over time.
Why Material Matters for Longevity
The plastic’s resilience prevents cracking, even with frequent adjustments or relocations. Unlike flimsy wire organizers that bend or break easily, this tray maintains its shape, providing a reliable backbone for your cables. Its matte surface also reduces glare and fingerprints, helping it look clean and professional whether mounted on the wall or under a desk.
Simplified Installation with Thoughtful Design
The tray offers a straightforward mounting process, combining adhesive backing with optional screw holes. The adhesive tape is strong enough to hold the tray securely on various surfaces, yet it’s easy to remove without residue if needed. The optional screws provide added stability for permanent setups or heavier cable loads. This flexibility caters to different workspace preferences, making installation accessible to both novice and seasoned users.
Balancing Convenience and Stability
While the adhesive backing simplifies setup, some users might find it challenging to align precisely during mounting. The optional screws mitigate this issue, ensuring the tray stays in place under strain or movement. The dual-mounting options demonstrate a thoughtful design aimed at accommodating diverse installation scenarios.
Organizational Efficiency and Practical Design
The tray features multiple compartments of varying sizes, allowing for precise cable separation. This compartmentalization prevents cables from tangling and facilitates quick identification. The compact footprint ensures it doesn’t encroach on valuable desk space, while still providing enough room for a substantial number of cables. The design encourages tidy workstations that enhance safety by reducing tripping hazards and avoiding accidental disconnections.
How Compartments Improve Workflow
By visually segmenting wires, the tray minimizes clutter and streamlines cable management. Creators can effortlessly route specific cables for microphones, lights, or monitors, improving overall workflow. Without the need for expensive custom solutions, this tray delivers a high return on investment in organizational terms.
Minor Flaws and Considerations
Despite its strengths, the tray’s adhesive may weaken over time, especially in humid or dusty environments, necessitating periodic reinforcement or replacement. Additionally, while the design is generally versatile, some users may find the size restrictive for very thick or numerous cables. Comparing this tray to industry-standard options such as the Ruggard Cable Organizer provides perspective on the trade-offs between price and capacity.
< >
>
Facing the Challenge: How Camera and Studio Equipment Handle Intense Workloads
Professional creators often push their gear to the limit, whether during marathon editing sessions, shooting on location in unpredictable weather, or managing complex multi-camera setups. The true test lies in how equipment performs under these demanding conditions. For example, a DSLR camera used to shoot fast-paced events like sports must deliver flawless autofocus and minimal overheating, even after hours of continuous recording. Similarly, studio microphones need to handle high sound pressure levels without distortion during live performances or loud recording sessions.
Does the camera Overheat or Fail During Long Shoots?
Many users report that compact mirrorless cameras tend to overheat after extended video recording, sometimes within 30 minutes. This can result in automatic shutdowns, interrupting critical shoots. Conversely, premium DSLRs with improved cooling systems tend to perform more reliably, but they are bulkier and less portable. It’s worth noting that firmware updates often improve thermal management, so keeping your gear updated can mitigate overheating issues.
Can Microphones Handle High-Volume Situations?
Professional-grade microphones, especially dynamic types, are designed to excel in loud environments, such as live concerts or outdoor recordings. However, some budget condenser mics encounter distortion when exposed to high SPL (Sound Pressure Level). An interesting forum discussion on Reddit details how certain shotgun mics struggle in windy outdoor conditions, leading to distorted audio if not equipped with proper shock mounts or windshields. Investing in quality accessories can significantly improve performance under pressure.
Lightning and Power Challenges
Lighting kits are essential but can be problematic when subjected to inconsistent power supplies or adverse weather. During outdoor shoots, poorly secured lighting stands can tip over, and sudden gusts of wind may disconnect power cables. LED panels with built-in heat dispersion tend to operate steadily, but older models may flicker or shut down unexpectedly if overused or overheated. Surge protectors and proper rigging are critical to ensure uninterrupted operation during demanding shoots.
Are Lighting Rigs Adequate for Harsh Conditions?
High-quality lighting gear with weather-resistant features performs well outdoors, but the typical lightweight kit often lacks sufficient durability. Users have reported that cheaper lighting rigs fail under rain or extreme cold, leading to costly replacements. Therefore, choosing weatherproof standards and robust mounting hardware is essential when operating in challenging environments.
Efficiency of Creator Rigs in Fast-Paced Environments
Multi-camera rigs and creator setups are designed to streamline workflows, especially during live streams or quick turnarounds. However, their performance can falter under stress, such as power surges, software crashes, or hardware overheating. For instance, insufficient cooling in compact rigs can cause system freezes during prolonged use. Similarly, poor cable management, even with organizational tools like cable trays, can lead to accidental disconnections or tripping hazards, impacting workflow and safety.
How Do These Systems Handle Unexpected Glitches?
Creative professionals have shared on forums that robust systems with redundant power supplies and real-time monitoring tend to perform better in urgent scenarios. Yet, software stability remains an issue in certain configurations, with crashes reported during critical moments. Continuous software updates and rigorous testing are necessary to ensure reliable operation under pressure.
In summary, real-world performance testing reveals that while high-end gear generally withstands demanding conditions, budget options often fall short due to overheating, durability issues, or poor environmental resistance. If you’ve experienced similar challenges, share your insights below—do you agree with my assessment of how these products perform under stress?

Picking the Right Gear for Creators: A Comparative Guide
When it comes to camera reviews, studio gear, microphones, lighting kits, and creator rigs, the market is flooded with options. To help you make an informed decision, let’s compare our recommended gear with top alternatives like the Canon EOS R6, the Elgato Lighting Solution, and the Rode Wireless GO II. Each offers unique strengths, but understanding how they stack up can save you time and money.
Camera Choices: Premium vs. Budget
Our camera setup provides excellent 4K video quality with advanced autofocus, akin to the Canon EOS R6, but at a fraction of the price. While the R6 boasts professional-grade features suitable for filmmaking, it can cost over $2,500, making it less accessible for beginners or hobbyists. Our alternative offers comparable video clarity and reliable stabilization, making it an attractive choice for those seeking high-quality footage without the hefty price tag. For more details, check the official Canon page and compare prices with price comparison sites like PriceSpy.
Studio Gear and Microphone Performance
Our studio microphone delivers rich, clear audio and is comparable to the Rode NT1-A, but at nearly half the cost. The Rode Wireless GO II, on the other hand, offers wireless convenience, but at a premium—approximately $300 compared to our wired microphone’s $150. The choice depends on your mobility needs. Wireless mic systems give you flexibility, but wired options tend to be more reliable and budget-friendly for stationary setups.
Lighting Solutions for Every Budget
In terms of lighting, our kit features adjustable LED panels that rival the Elgato Key Light, but with added versatility and more color options, all at a lower price. The Elgato solution is sleek and easy to set up but comes at a higher $200 price point. For outdoor shoots or more demanding environments, weatherproof and higher-lumen options are preferable, which our gear offers without breaking the bank.
Are Our Rigs Worth It? Real-World Durability
Our creator rigs prioritize modularity and ease of setup, similar to premium systems but with enhanced portability. While high-end rigs from brands like Bright Tangerine offer advanced features and unparalleled durability, they can cost upwards of $1,000. Our rigs provide solid stability, easy customization, and affordability, making them suitable for both amateur and professional creators. Consider your environment and needs—if you often shoot outdoors or require heavy-duty hardware, investing in premium options might be justified.
Is it Worth the Upgrade?
If you’re using older equipment, upgrading to our recommended gear promises noticeable improvements in video and audio quality, as well as workflow efficiency. However, if your current setup meets your needs, it might be wise to evaluate whether the investment aligns with your content goals. Check the latest prices and deals on competitor products to ensure you’re getting the best value—sites like B&H Photo Video can be helpful for current prices.
Ultimately, choosing between our gear and top-tier alternatives depends on your budget, usage scenarios, and desired quality. Consider what features matter most to you and balance quality with affordability.

In conclusion, comparing our recommended setup with premium solutions makes clear that you can achieve professional results without overspending. For a detailed inspection of the competitors, visit their official pages and reviews.
The Good, The Bad, and The Ugly
- Pros: Affordable price point around $13; sturdy plastic construction; multi-compartment design facilitates neat cable separation; easy installation with adhesive backing and optional screws; effective in reducing clutter and enhancing safety in studio setups.
- Cons: Adhesive might weaken over time in humid or dusty environments; limited capacity for very thick or numerous cables; smaller size may restrict usage with large cable bundles or thick wires.
Who Should Pick This Up?
This cable management tray is perfect for small-to-medium studio setups, content creators, and hobbyists who want an easy and budget-friendly way to organize their workspace. It’s especially beneficial for those who value quick installation and flexible mounting options. However, avoid it if you have a high-volume or heavy-duty cabling environment, where larger or more durable organizers are necessary.
Final Verdict: 8/10
If you’re seeking an inexpensive yet effective cable organizer, this tray offers compelling value and practical features that surpass its price tag. It streamlines your workspace, improves safety, and is easy to install—making it a solid addition to any creator’s studio. For more expert tips on studio organization, check out our guide on tiny accessories that improve your workflow. If budget constraints are tight, this tray is an easy upgrade worth considering—just be mindful of environmental factors that may affect adhesive longevity. Want to explore other options? See our review of better cable management solutions.