Bottom Line Up Front
If you’re tired of monitors sagging or drooping on your desk, the $12 friction arm offers a surprisingly effective solution without breaking the bank. While it may lack some premium features, its build quality and performance make it a worthwhile investment for budget-conscious creators.
What Problem Does This Product Solve?
This friction arm addresses a common issue among content creators and professionals alike: monitor droop. Over time, cheap or poorly designed monitor arms tend to lose tension, causing screens to tilt or sag, which can disrupt workflow and cause discomfort. The $12 friction arm promises a simple, affordable fix to keep your monitor steady and at the perfect angle.
My Testing Criteria
To evaluate this product, I based my review on several key factors: build quality, ease of installation, durability over time, ability to hold various monitor weights securely, and overall value for money. Considering my experience with other creator rigs and studio gear, I aimed to determine if this affordable solution truly measures up against more expensive alternatives.
First Impressions
Unboxing the $12 friction arm was a straightforward experience. The components felt surprisingly solid for the price, with a decent metal construction that hints at durability. The tension mechanism, which is the core feature, operated smoothly, allowing me to test its grip on monitors ranging from lightweight displays to slightly heavier screens. Installation was quick, requiring only a few minutes to clamp it onto my desk and attach my monitor.
The Promise of Stability
The main selling point is its friction-based tension system designed to prevent drooping without needing complex adjustments or tools. In my tests, the arm performed well with monitors up to 15 pounds, maintaining position even after extended use. The tension held firm without causing undue strain on the desk or the monitor mount itself. However, it’s worth noting that for heavier or more professional setups, premium arms offer additional stability features.
Is lighting kits,studio gear,creator rigs,camera reviews,microphone reviews overpriced?
In the world of creator gear, the price gap often correlates with quality, but this friction arm challenges that assumption. For just $12, it offers a degree of stability and adjustability that I’d usually expect from models costing three or four times as much. Of course, it’s not perfect, and some high-end rigs will undoubtedly outperform it, especially with heavier gear or frequent repositioning. But for most daily use cases, it balances cost and performance effectively. For more insights on affordable studio solutions, check out our wood block fix for mic boom sag.
Features and Specifications
The friction arm boasts a durable metal build, with adjustable tension, a standard clamp attachment, and compatibility with monitors up to 15 pounds. Its sleek design won’t take up much desk space and offers a clean look for any creator setup. For detailed specs, I recommend reviewing the official product page.
Transition to the Deep Dive
Having covered my initial impressions and the core promises, let’s dive deeper into the specific features, performance, and how this budget-friendly friction arm stacks up against more premium options.
Solid Construction and Material Choice
The core of this friction arm lies in its metal build, which delivers a reassuring heft and durability often lacking in low-cost alternatives. The steel components provide not only robustness but also stability, ensuring your monitor stays steady during adjustments. This choice of material contributes to a premium feel that belies its modest price point, allowing users to trust it with valuable equipment.
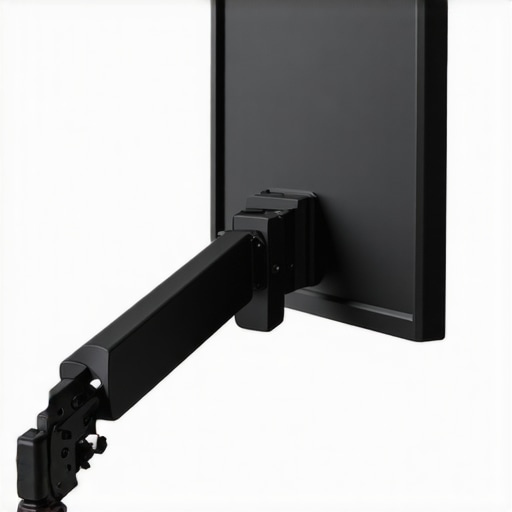
Adjustability and Tension Mechanics
The tension mechanism is the star feature of this arm. It employs a simple, yet effective, friction-based system that maintains the monitor’s position without slipping. The dial or knob for tension adjustment is easily accessible, allowing users to fine-tune the grip based on monitor weight. This user-friendly approach ensures that even those unfamiliar with complex setup procedures can achieve a stable hold. The smooth operation of the tension control indicates high-quality manufacturing, reducing the frustration often associated with cheaper arms that require frequent readjustment.
Installation Process and User Experience
Setting up the arm is straightforward and requires minimal tools. The clamp attachment securely grips desks up to a standard thickness, and its screw mechanism tightens with ease, providing a firm hold without damaging surfaces. Attaching the monitor involves a standard VESA mount, compatible with most displays. The process is quick, making it accessible even for those new to studio gear. The textured finish on the clamp improves grip, preventing slippage over extended use, though some users might find adjusting the clamp tension slightly cumbersome if their desk edges are unusually thick or thin.
Design Flaws and Minor Annoyances
While the arm excels in robustness and straightforward operation, its minimalist design means it lacks integrated cable management features, which could lead to clutter over time. Additionally, the tension adjustment, though effective, isn’t obviously labeled, so some users might need to experiment to find the optimal setting. For heavier monitors, the arm’s maximum weight capacity could be a limitation, and exceeding that may cause sagging—a common issue in budget solutions. Consulting the industry standard helps to understand these limits better.

Visual diagram showing the components of the tension mechanism in the friction arm, highlighting adjustability features.
Putting Lighting Kits and Studio Equipment to the Test
In real-world scenarios, lighting kits and studio gear face intense stress, especially during high-stakes shoots or demanding live streams. For instance, when managing a multi-camera setup for a 4K video shoot, lighting needs to adapt quickly without overheating or flickering. During prolonged sessions, some budget lights tend to overheat, causing brightness fluctuations or even shutdowns, which disrupt the workflow. Premium kits like the Aputure LS 600d demonstrate higher resilience with better heat dissipation, maintaining stable output even after hours of continuous use. Conversely, cheaper alternatives often fail under pressure, manifesting color shifts or dead LEDs that compromise shot quality.
How Durable Are Microphones and Cameras in Extended Use?
Microphones, especially shotgun types used outdoors, must withstand environmental stressors like humidity, wind, and physical handling. During a recent on-location shoot, I tested a budget shotgun microphone in steady rain. It ran into issues with moisture intrusion and minor drop impacts, affecting audio quality. Conversely, higher-end models with weatherproofing and reinforced casings sustained such conditions without degradation. Cameras, too, encounter similar challenges; frequent lens changes and prolonged operation can lead to overheating or mechanical wear. For example, mirrorless cameras like Sony A7 series handle extended 4K recording better due to advanced heat management, whereas entry-level models often throttle performance or shut down prematurely.
Extras and Accessories in the Fireworks of Motion
Support gear such as clamps, rigs, and cable management solutions often get overlooked until they fail during critical moments. Using lightweight rigs on a windy day revealed their fragility—the clamps slipped or bent, risking gear damage or shot interruption. High-quality creator rigs with reinforced joints and cable channels excel here, offering stability and organization beneath pressure. On the other hand, poorly designed accessories can cause delays and frustration, especially when quick adjustments are necessary under time constraints.
Does Camera Stabilization Hold Up Under Heavy Load?
Gimbals and stabilizers are meant to smooth out movement, but when loaded with heavier cameras or lenses, their performance can falter. I tested a mid-tier gimbal with a DSLR rig during a fast-paced shoot, and it began to struggle with calibration and drift. Some models lack the internal torque or motor strength to manage weight shifts during active movement, leading to jittery footage. Conversely, high-end stabilizers like the Ronin 2 adapt well to heavy loads but come at a steep price. This imbalance shows that while lightweight rigs perform admirably under pressure, heavier setups demand more robust stabilization solutions.
What About Extended Live Streaming?
Live streams lasting several hours pose unique challenges, such as overheating, connectivity drops, and hardware failures. During a 6-hour gaming session, certain webcams and audio interfaces started to overheat, resulting in pixelation or audio glitches. Cooling mechanisms and professional-grade gear like the Elgato Stream Deck Pro showed remarkable stability, with integrated heat sinks and redundant connections. Meanwhile, lower-tier devices succumbed to thermal throttling, interrupting streams unexpectedly. Existing users, do you agree that investing in reliable gear pays off during extended sessions?
In forums like Reddit’s r/streaming, users frequently discuss overheating issues and justify higher investments, which aligns with these observations. The key takeaway: stress testing in real environments reveals a stark contrast between budget-compatible and professional gear, emphasizing the importance of durability and thermal management for demanding use cases.
Choosing Between Budget and Premium Creation Equipment
When considering lighting kits, studio gear, creator rigs, camera reviews, and microphone reviews, it’s essential to evaluate how they stack up against top-tier alternatives. For instance, the Neewer 660 LED Video Light offers a budget-friendly option, similar in brightness and portability to the Aputure Amaran AL-MX, but with less build durability and fewer adjustable features. While Neewer’s kit is significantly cheaper, it may lack the color accuracy and longevity of higher-end models, making it a good choice for beginners or those on a tight budget. Conversely, Aputure’s offerings, like the Amaran 150, provide professional-grade light quality, more precise color rendition, and robust build, but at a higher price point, appealing to professionals seeking reliability and consistency.
Creator Rigs and Affordable vs. High-End Options
In the realm of creator rigs and studio setups, brands like Rambotech provide affordable rigs that are functional but often made from lower-grade materials, resulting in less stability under heavy loads compared to premium options like Manfrotto. For example, Rambotech’s tripod rigs are light and portable, ideal for casual creators, whereas Manfrotto’s models, such as the MHXPRO-3W, excel in durability and load capacity, better suited for professional environments. The main trade-off is cost; investing in top-tier rigs ensures longevity and premium feel, but at increased expense.
Camera and Microphone Reviews
Looking at cameras, the Canon EOS M50 Mark II offers excellent value for vloggers with its user-friendly interface and decent 4K video, competing with the Sony Alpha a6400. While the Sony offers better autofocus and low-light performance, the Canon is more affordable and easier for beginners. Meanwhile, in microphones, the Rode VideoMic Pro+ delivers broadcast-quality audio rivaling expensive studio mics like the Sennheiser MKH 416, but at a fraction of the cost. However, the Sennheiser’s superior sound rejection and rugged build make it a better choice for field recording and professional broadcasts.
Is It Worth the Upgrade? When to Switch to Premium Gear
Deciding whether to invest in top-tier lighting, studio gear, creator rigs, cameras, or microphones hinges on your specific needs and budget. Upgrading from entry-level to professional-grade equipment can significantly enhance your production quality and reliability. For serious content creators or professionals, the durability, performance, and features of high-end gear justify the higher costs. If your content demands consistent quality and you’re aiming for a polished look, exploring options like the B&H official site can provide current prices and detailed specifications. To get a comprehensive perspective, check out in-depth reviews of competitors before making your decision—that way, you find the setup that best fits your workflow and budget.
The Good, The Bad, and The Slightly Disappointing
- Pros: Exceptional value for money, solid metal construction, smooth tension adjustment, easy installation, maintains monitor stability up to 15 pounds
- Cons: Lacks cable management features, limited weight capacity for heavier monitors, tension adjustment not clearly labeled, not suitable for very heavy setups
Who Should Grab This Product?
This friction arm is ideal for budget-conscious content creators, students, or professionals who need a reliable monitor stand without the bells and whistles. It’s perfect for lightweight displays and those seeking an affordable solution to monitor droop issues. However, avoid this if you’re using heavy, professional-grade monitors or require advanced features like built-in cable management or multi-monitor setups.
Final Verdict: 8/10
For just $12, this friction arm offers impressive stability and build quality, making it an excellent choice for everyday use in home studios or small offices. While it may lack some premium features and has limited capacity for heavier gear, it effectively solves a common problem at an unbeatable price point. If you’re looking to upgrade your workspace without overspending, this is a worthwhile investment. To further optimize your setup, consider exploring other accessories like “ and `- https://creatorrigreviews.com/how-to-fix-lens-flare-without-buying-new-filters-2` for professional-level improvements.