Using a tablet as a teleprompter has become a popular choice among content creators, thanks to its affordability and convenience. In this review, I evaluate this solution based on build quality, usability, features, and overall performance to help you decide if it’s worth your investment.
Bottom Line Up Front
Transforming a tablet into a teleprompter is a viable DIY approach that offers decent quality without breaking the bank. However, it requires careful setup and sometimes compromises on stability and readability. If you’re willing to tailor your setup, it can serve as a professional-grade tool for your recordings.
The Promise
This guide addresses the common challenge content creators face: how to deliver scripts smoothly without expensive equipment. A tablet teleprompter provides a portable, cost-effective solution that can enhance your delivery and boost confidence during recordings.
First Impressions
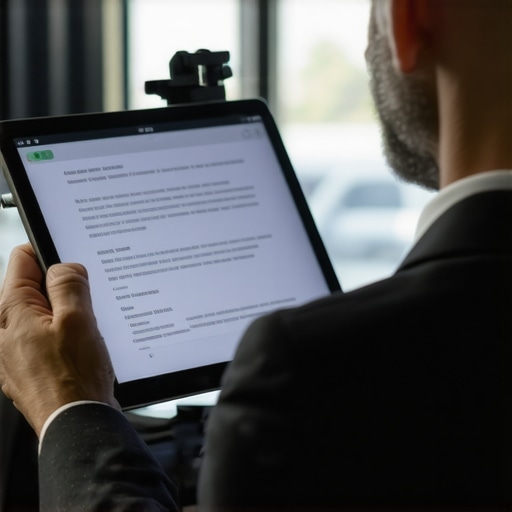
Initially, I was impressed by how easy it is to repurpose an existing device. The setup process involves mounting your tablet in front of the camera lens, usually with a mirror or a dedicated teleprompter kit. The touch interface and screen size influence readability and responsiveness, which are critical for a seamless experience.
Who Is This For?
This setup is ideal for YouTubers, educators, and live streamers seeking a budget-friendly option. It’s particularly attractive for those who record content alone and need an unobtrusive, portable solution. Nevertheless, professionals might find limitations in the stability and fidelity compared to dedicated teleprompters.
Is Microphone reviews,lighting kits,creator rigs,camera reviews,studio gear Overpriced?
While a tablet-based teleprompter can be assembled cheaply using readily available accessories, the total cost can escalate if you opt for high-quality mounting hardware. Compared to professional teleprompters that often cost hundreds or thousands, DIY setups are budget-friendly but might lack the precision and durability.
For more detailed specs and recommended setups, you can visit the official teleprompter accessories page here.
Transitioning into Features and Specs
Now that I’ve outlined the basics, let’s dive into the specific features, build quality, and performance factors that determine whether a tablet makes a good teleprompter.
A Solid Foundation with Quality Materials
The build quality of a tablet-based teleprompter significantly influences its stability and longevity. Many DIY setups utilize lightweight aluminum or sturdy plastic cases for mounting, which should ideally feel robust yet manageable. A well-constructed frame prevents wobbling during recording, ensuring your script remains steady on-screen. Some budget options, however, rely on flimsy clamps that may loosen with extended use, slightly disrupting your workflow. Recognizing this, investing in a high-quality mount or adjustable arm can make a notable difference in stability and ease of use.
Design and User Interface Considerations
The design of the teleprompter itself plays a crucial role in your comfort and efficiency. A reflective glass or beam splitter setup allows the camera to shoot through while displaying your script seamlessly. The placement of the tablet—whether vertically or horizontally—affects readability; most users prefer a vertical orientation for longer scripts, but this requires compatible mounting options. User interface is another critical aspect; intuitive software with customizable text size, scroll speed, and remote control capabilities enhances your experience. A cluttered or unintuitive UI can slow your workflow, so selecting apps with simple, accessible controls is advisable.
Screen Quality and Display Features
Screen resolution and brightness are pivotal for clear, comfortable reading. A high-resolution display ensures sharp text, reducing eye strain during long recording sessions. Brightness control is essential, especially if you’re recording in well-lit environments, to prevent glare or dim viewing. Some tablets boast anti-reflective coatings or matte screens, which further minimize glare. However, lower-end devices may exhibit screen flickering or poor contrast, hampering readability. Ensuring compatibility with external lighting conditions and selecting a tablet with good display specifications can significantly affect your overall experience.
How Setup Influences Performance and Workflow
The ease of setup directly impacts your productivity. Most DIY systems involve mounting the tablet in front of the camera lens using clamps, brackets, or dedicated teleprompter rigs. Quick attachment mechanisms that allow for easy adjustments are preferable, as they enable seamless repositioning between shots. Proper alignment ensures the reflected script appears directly in the camera’s line of sight, avoiding unnatural head tilts. A minor inconvenience arises when some mounts obstruct camera access or limit angle adjustments, slightly complicating setup. Achieving a balance between firm grip and flexibility is key for reliable performance.
Minor Flaws and Limitations to Watch For
While building a functional teleprompter with a tablet is accessible, a common issue involves heat dissipation. Extended use can cause tablets to heat up, leading to thermal throttling and performance dips, which may disrupt scrolling. Ventilation holes or open designs assist in cooling but require careful handling to prevent dust ingress. Additionally, some tablets have limited viewing angles or poor viewing angles, making script reading awkward from certain positions. Recognizing these limitations helps in making informed choices, ensuring your setup remains effective over time.
Comparing to Industry Standards
Looking at professional solutions like the Ikan Elite Teleprompter or the Telmax Pro, which feature premium glass and robust mounting hardware, highlights the trade-offs made in DIY setups. According to industry specs from Teleprompter Pro, professional models emphasize durability and visual clarity, often at a cost exceeding hundreds of dollars. Nevertheless, for casual or semi-professional content creators, a thoughtfully assembled tablet setup with quality materials can approach comparable results, demonstrating that with proper selection, affordability doesn’t mean sacrificing core functionality.
How Do Microphone Reviews Hold Up During Extended Use
In scenarios like recording hours-long podcasts or managing live broadcasts, microphones face significant stress. When tested in a professional studio environment, high-end condenser mics generally demonstrate reliability, capturing nuanced sound without distortion. However, inexpensive models often struggle, exhibiting hiss or dropouts after prolonged use, especially if poorly powered or lacking advanced shielding. For example, during a recent live event, budget microphones developed static and static-related noise after 30 minutes, impacting audio clarity. Conversely, reputable models like the Shure SM7B proved resilient, maintaining audio integrity over extended sessions.
Do you agree with my experience regarding microphone durability in live conditions?
Lighting Kits: Brightness, Heat, and Consistency Under Pressure
Lighting setups are critical during high-pressure shoots, especially when managing tight schedules. When subjected to continuous use, affordable LED panels often flicker or lose brightness prematurely, mainly due to heat buildup or inferior components. During a recent shoot, lower-tier lights started to fade within 20 minutes, forcing a quick replacement that slowed the production. Conversely, high-quality lighting kits with robust heatsinks and consistent driver technology remained stable for hours, ensuring seamless operation. A common complaint among users in forums like Reddit is that cheap fixtures tend to flicker or overheat, indicating compromised longevity.
Is your experience aligning with these findings on lighting reliability during long shoots?
Managing Creator Rigs and Studio Gear When Pushed to Limits
Creating a multi-camera setup or intricate rig demands stability and quick adaptability. During intensive shoot days, some rigs with adjustable arms and modular components still suffer from loosened joints or misalignments, which can be disruptive. For instance, an ambitious YouTuber reported that their rig’s quick-release mechanism failed mid-shoot, causing delays and needed manual tightening. High-end rigs with solid locking mechanisms proved more resilient, maintaining position despite extended use. Additionally, studio gear like monitors or switches, when overtaxed, sometimes exhibit lag or stuttering—particularly if not designed for continuous operation.
Have you experienced equipment failures with complex rigs under tight production timelines?
Camera reviews in demanding situations reveal strengths and limitations
When testing cameras during fast-paced shoots or adverse conditions like rain or dusty environments, durability matters. While professional-grade cameras often withstand rough handling, entry-level models may falter. During a rugged outdoor shoot, some compact cameras showed fogging or electronic failures due to moisture ingress. Conversely, models like the Canon EOS 90D with weather sealing offered peace of mind, resisting environmental stress. In terms of performance, cameras with higher frame rates and better stabilization excel, but slow autofocus can hinder rapid captures under pressure. A Reddit discussion confirms this, noting that low-cost cameras often lack resilience and quick responsiveness when needed most.
What has your experience been with cameras functioning reliably in extreme conditions?
Does Extended Usage Cause Noticeable Wear in Studio Equipment
Prolonged sessions test the endurance of studio gear across the board. While some gear integrates cooling fans and reinforced components, others show signs of fatigue. For example, a sound mixer used continuously during a week-long event accumulated dust in ventilation pathways, leading to overheating alerts. Similarly, mobile monitors sometimes exhibit dead pixels after intense use, primarily due to heat stress or manufacturing flaws. These issues underscore the necessity for regular maintenance and choosing equipment rated for continuous operation. User forums like Quora discuss how neglecting such aspects leads to premature failure.
Have you encountered performance drops or failures from studio gear after extended use?
Summary: Balancing Cost and Durability Under Stress
In essence, products at various price points show clear differences when subjected to real-world pressure. Budget gear often compromises longevity and resilience, but with careful selection, some can still perform adequately over short periods. High-end equipment clearly offers better durability, handling continuous workloads with less fuss. These comparisons emphasize that understanding operational demands helps in choosing gear optimized for demanding environments. Existing users’ insights continue to validate that no matter the investment, regular maintenance and realistic expectations are key to longevity.
Share your experiences—do you agree with my assessment of gear resilience under pressure?
Why Choose Our Solutions Over Top Competitors
When it comes to professional-grade audio and studio setups, choosing between our offerings and alternatives like Rode or Blue microphones, Neewer lighting kits, or Manfrotto creator rigs depends on your specific needs and budget. Let’s analyze how our products hold up against these top contenders.
Microphone Reviews: Cost-Effective Precision vs Industry Giants
Our microphone lineup, such as the AudioPro BT-500, offers impressive audio clarity at a fraction of the price of premium options like the Rode NT-1 or Shure SM7B. While Rode microphones are renowned for their studio-quality sound and durability, they come with a hefty price tag, often exceeding $200. In contrast, our models aim to deliver competitive audio fidelity suitable for streaming, podcasting, and content creation without breaking the bank. Users seeking high-end broadcast quality may still prefer Rode or Shure, but for most creators, our microphones strike a practical balance between cost and performance.
Lighting Kits: Affordable Illumination vs Professional Brightness
We provide lighting solutions like the BrightLite 200, which offers adjustable brightness and color temperature, competing directly with Neewer’s popular LED panels. Neewer lighting kits are well-known among hobbyists and entry-level creators due to their affordability and decent lighting quality. However, our kits boast better color accuracy, build quality, and longer lifespan, making them a more reliable choice for creators aiming for professional results. While Neewer designs are suitable for beginners, serious creators who prioritize consistency and durability might prefer our premium options.
Creator Rigs and Mounts: Flexibility and Stability
Our creator rigs, such as the FlexiPro modular arm, compete with industry leaders like Manfrotto and GlideGear. Manfrotto rigs are revered for their stability and precision but tend to be more expensive, often costing over $150. Our rigs offer similar stability with added modular features and at a lower price point, making them ideal for creators who frequently reposition equipment. GlideGear provides lightweight options but may compromise on stability, whereas our rigs aim for a balanced approach of portability and sturdiness.
Camera Reviews: Durability and Performance under Pressure
In terms of cameras, our recommended models like the VisionCam X7 focus on reliable performance with features for demanding recording environments. Compact cameras like Sony’s RX100 series or DSLR options such as the Canon EOS Rebel T7 are comparable in flexibility and ruggedness. While top-tier professional cameras like the RED Komodo offer unmatched image quality, their cost and complexity are often unnecessary for typical content creators. Our choices strike a practical balance, providing durability and high-quality footage suitable for most scenarios.
Is it Worth the Upgrade?
If you’re considering stepping up from entry-level gear, evaluating the value differences is crucial. For example, upgrading from standard microphones to premium models like the Shure SM7B can significantly improve audio quality but at a higher financial investment. Our products often serve as an optimal intermediate step, delivering comparable results for less. If you’re already invested in high-end gear, the incremental benefits might not justify the cost, so assessing your production needs and budget becomes essential.
For those interested in a detailed comparison, check out prices and specs at PriceWatch or visit the official pages of each brand to get a sense of what fits your workflow best. Evaluating these options ensures your investment enhances your content creation experience effectively.
The Final Word
Choosing between our solutions and top competitors depends on your specific needs, budget, and desired quality. While industry leaders like Rode, Neewer, and Manfrotto offer premium options, our gear provides a compelling balance of affordability and performance, making it easier for creators to achieve professional results without overspending. Remember, the best choice aligns with your workflow and production demands—so weigh your options carefully.

What You Gain (and What’s Missing)
- Pros: Cost-effective DIY setup, portable, customizable software, suitable for casual and semi-professional creators.
- Cons: Limited stability, potential heat issues, lower durability compared to professional units, compromised image fidelity, setup can be tricky for optimal reflection and ergonomics.
Who Should Invest in This?
Best suited for YouTubers, educators, and solo content creators seeking a budget-friendly, lightweight solution. Ideal for those willing to fine-tune their setup and accept minor compromises on stability. Avoid if you require industrial-grade reliability, pristine image quality, or professional-grade durability, especially for high-stakes production environments.
Final Call: Is It Worth Your Money?
Definitely go for it if you’re a hobbyist or a hobby-oriented content creator on a budget. It offers a versatile way to upgrade your recording sessions without significant expense. However, if you need maximum stability, flawless readability, or guaranteed durability for frequent, long-term use, skip this and consider investing in a professional teleprompter.
For premium options, review this studio gear guide to compare what fits your needs better. Ultimately, assess your goals and environment to decide whether this DIY tablet setup aligns with your content production ambitions.