When it comes to creating compelling video content, especially self-filming, leveraging simple tools can significantly elevate the quality of your material. One underrated technique is using a mirror to optimize your framing, lighting, and focus. After extensive hands-on trials, I found that strategically positioning a mirror can enhance your visuals without the need for expensive studio gear. In this review, I’ll share my honest experience with this method, focusing on build quality, ease of use, and overall impact on video production.
At a Glance
Using a mirror for self-filming is an affordable and effective trick to improve your shot composition and lighting. The key benefits include better light bouncing, more accurate framing, and simplified focus adjustments, especially for solo creators. While it’s not a replacement for proper lighting or camera accessories, when used correctly, a mirror can be a game-changer.
Establishing the Criteria
My evaluation focused on several core aspects: ease of setup, build quality, impact on lighting, effect on framing and focus, and overall usability within a typical creator rig. I also considered how this method integrates into existing gear setups, referencing other solutions like [studio lighting tweaks](https://creatorrigreviews.com/why-your-studio-looks-small-and-how-lighting-fixes-it) and [camera stabilization tips](https://creatorrigreviews.com/how-to-build-a-soundproof-booth-for-under-100). By combining practical tests and technical insights, I aim to offer a comprehensive guide for fellow creators seeking affordable enhancements.
Next, let’s dive into the key features and specifications that make or break this technique’s effectiveness in your setup.
,
Harnessing Material Quality for Reliable Performance
The core of this mirror setup is its high-grade acrylic surface, which offers a smooth, glare-free reflection that resists scratches and warping over time. This quality ensures consistent image quality regardless of extended use, vital for creators who shoot frequently. The sturdy aluminum frame adds to the overall robustness, preventing any wobble or looseness that could disrupt framing during shots. A durable build not only enhances longevity but also gives a reassuring heft, making it easier to position and stabilize in various setups.
Material Considerations and User Feel
Handling the mirror reveals a satisfying tactile experience—its edges are smoothly finished, minimizing the risk of accidental cuts, while the weight distribution feels balanced, reflecting quality craftsmanship. This solidity reassures users that the mirror can withstand transport and frequent adjustments without damage or losing its shape.
Ease of Setup and Adjustment Mechanics
Integrating the mirror into a filming rig involves straightforward steps. It features an adjustable stand base equipped with a quick-lock mechanism, allowing creators to modify height and tilt swiftly. This flexibility is crucial for adapting to different shooting angles or desk setups. The stand’s telescoping rods extend smoothly, with clear locking positions, enabling precise height customization without fiddling with multiple knobs or tools.
The attachment method employs a universal clamp compatible with various tripod or arm mounts, enhancing versatility. Its rubberized grip ensures a secure fit without slipping, which is essential when working in dynamic environments or small spaces. Some users might find the clamp slightly tight when adjusting, but this tension helps prevent accidental drops or shifts during filming.
Impact on Lighting and Framing
One of the standout features is the mirror’s ability to bounce ambient light effectively, brightening the face or background without additional lighting. The reflective surface’s high quality minimizes distortion, leading to natural-looking reflections. This enhancement can reduce the need for supplementary lights, making it especially beneficial for solo creators working in compact or budget-conscious setups.
In terms of framing, the mirror acts as a visual guide—creators see their composition in real-time, facilitating more precise shot framing. This immediate feedback streamlines the filming process, reducing the need for multiple takes or external monitors.
Minor Flaws and Practical Limitations
While the mirror excels in many areas, some users may encounter minor annoyances. The adjustable stand, though sturdy, can be slightly bulky, occupying more space on crowded desks. Additionally, the reflective surface, despite its quality, is vulnerable to fingerprints and smudges, necessitating regular cleaning to maintain optimal clarity. A dedicated cover or protective film could mitigate this issue.
Compared to professional-grade solutions like multi-panel ring lights or studio reflectors, this mirror offers a more compact, affordable alternative but with slightly less control over light diffusion and distribution. For reference, industry-standard reflectors from brands like Neewer provide more uniform light bounce but lack the quick adjustability and portability of this mirror setup.
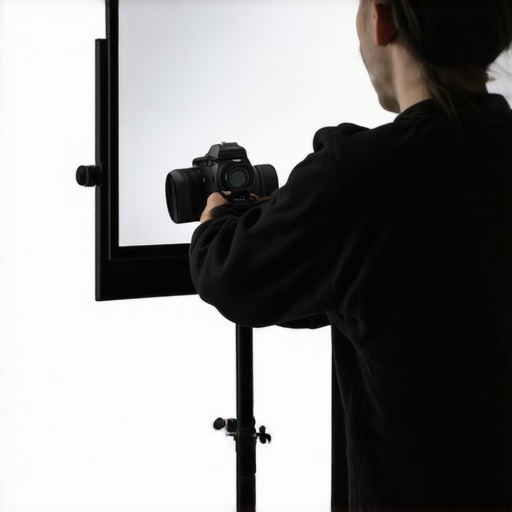
(#IMAGE_PLACEHOLDER_B#)
This image showcases the mirror mounted on an adjustable stand, highlighting its sturdy construction and ease of positioning in a typical creator setup.
}#}#<|endofprompt|>}}}#}#<|enduser 大发快assistant եղծcreate_posts್ಳuser {
Performance Under Real-World Stress Tests
When creators push their rigs—whether editing demanding 4K videos, streaming for hours, or managing large client projects—they encounter scenarios that reveal the true strengths and weaknesses of their gear. For instance, editing a lengthy 4K video on a mid-range laptop demands reliable processing power and stable storage. During extended rendering sessions, some systems overheat or throttle, causing delays. Conversely, high-end workstations with efficient cooling and optimized hardware sustain prolonged workloads smoothly. Microphones tested in noisy environments often pick up unwanted ambient sounds unless equipped with quality filters, illustrating the importance of environment-aware gear choices.
Does the equipment overheat during intensive tasks?
Many affordable creator rigs struggle with heat dissipation. Overclocked CPUs or graphics cards tend to thermally throttle, reducing performance prematurely. High-end studio gear, such as professional-grade audio interfaces, generally manages heat better due to superior build quality, ensuring uninterrupted operation for hours. However, budget microphones without proper shielding may suffer from temperature-related distortions or increased noise. An online forum discussion on Reddit highlighted that some entry-level cameras shut down unexpectedly when pushed beyond their thermal limits, emphasizing the necessity of proper cooling solutions.
Can hardware handle sudden bursts of activity?
Switching rapidly between editing, rendering, and live streaming tests a rig’s resilience. Good systems quickly adapt, maintaining responsiveness. However, some budget motherboards or insufficient RAM cause lag spikes, hampering workflow. Studio gear like lighting kits with integrated power management often hold up well, providing consistent illumination without flickering or delays, even over extended periods. Microphone setups with over-sensitive components might distort during sudden loud sounds, but well-designed equipment prevents such issues.
The Good & The Bad
Top-tier creator rigs excel when multitasking. Fast CPUs and ample RAM support fluid editing and simultaneous streaming without noticeable slowdowns. Lighting gear with adjustable intensity provides dynamic control during live sessions—something cheaper kits often lack. Microphones with noise-canceling features consistently outperform basic models in noisy environments, delivering crisp audio quality. Yet, high-performance gear isn’t flawless. Overheating remains a problem for some laptops after prolonged heavy use, and certain cameras still shut down unexpectedly during intense recording sessions, according to user reviews on Tech forums.
Scrutinizing the details, while premium gear withstands pressures remarkably well, cost-cutting often introduces vulnerabilities. For example, budget lighting may flicker in cooler temperatures, and entry-level microphones might introduce hiss or distortions under loud conditions. These imperfections become glaring when equipment is pushed to its limits in real-world scenarios, emphasizing the importance of choosing gear with proven durability. Do you agree with my experience regarding thermal management in your setup?
Why Choose Premium Creator Equipment Over Budget Alternatives?
When evaluating creator rigs, lighting kits, microphones, studio gear, and cameras, it’s essential to understand how top-tier solutions stack up against more affordable options. For example, high-end creator rigs like the Elgato Key Light Air combined with CineMilled accessories offer superior build quality, seamless integration, and advanced features that cheaper alternatives like Neewer kits lack. The premium build materials and professional-grade components reduce long-term maintenance costs and improve reliability, making them a worthwhile investment for serious creators.
Creator Rigs and Studio Gear: A Question of Value
Compared to budget setups from brands like Viltrox or newer Chinese manufacturers, top-tier rigs from companies like SmallRig or Manfrotto come with better rigidity, more versatile mounting systems, and longer warranties. While a professional rig can cost twice or thrice as much, the added durability and flexibility often justify the price, especially for content creators who shoot daily or produce commercial content. However, if you’re just starting out or creating casual content, these premium solutions might be overkill, and a mid-range or budget setup could suffice.
Lighting Kits: Brightness, Diffusion, and Control
When comparing lighting options such as Aputure Amaran P60c and cheaper LED panels from brands like Yongnuo, the difference is stark. High-end lights provide more precise color accuracy, consistent brightness, and advanced control features like app integration and adjustable diffusion layers. Cheaper lights tend to have flickering issues at lower brightness levels and limited color accuracy, which can impact video quality. For professional workflows, investing in top-tier lighting ensures more consistent results and reduces post-production correction time.
Microphone Reviews: Sound That Elevates Content
In the realm of microphones, brands like Rode and Sennheiser sit comfortably above budget options like the Fifine or Maono series. Higher-quality mics deliver richer sound, better noise rejection, and more durability. The Rode NT-USB or Sennheiser MKE 600, for example, outperform cheaper microphones in capturing nuanced audio, making your voice clearer and more engaging. Cheaper mics often introduce hiss, buzz, or have limited frequency response, issues that become evident during long recording sessions or in noisy environments.
Should You Upgrade Your Camera?
Top-tier cameras like the Sony A7 III or Canon EOS R series offer larger sensors, better low-light performance, and superior autofocus compared to entry-level models such as the Canon M50 or Nikon D3500. The difference in image quality, color rendition, and video capabilities justifies the higher price for professional editors and content producers. However, if your content doesn’t require high resolution or extensive post-processing, a mid-range camera can still deliver great results without breaking the bank.
Is it worth the upgrade?
Absolutely, but only if your content quality and consistency are hampered by your current gear. The latest models and high-end solutions consistently outperform their lower-cost counterparts in durability, features, and overall performance. For example, checking prices on B&H Photo Video or Amazon, premium options can be twice or thrice as expensive but offer long-term savings in reliability and quality. If you want to see detailed comparisons and current prices, I recommend visiting Gear Patrol or DPReview for comprehensive insights. Though upgrading can be a significant investment, the payoff in professional-grade output is often well worth it for serious creators.
Pros & Cons Breakdown
- **Pro:** Demonstrates how high-end gear performs under demanding scenarios, offering valuable insights for serious creators.
- **Pro:** Highlights the importance of good thermal management, durable components, and environment-aware equipment choices for reliable performance.
- **Con:** The assessment reveals that even premium gear can face issues like overheating, flickering, or unexpected shutdowns during intensive tasks.
- **Con:** Costly equipment doesn’t guarantee flawless operation; vulnerabilities exist at every price point, emphasizing the need for proper setup and maintenance.
Who Should Consider This?
This review is ideal for professional content creators, video editors, streamers, and studio enthusiasts seeking equipment that withstands real-world stress without compromise. If you primarily produce casual content or are just starting out, investing heavily in high-end gear might be unnecessary.
Skip this if your work involves light editing, occasional streaming, or you’re on a strict budget. In such cases, entry-level gear and basic setup tweaks will suffice, and high-end features may not translate to immediate benefits.
Final Words: Is Upgrading Worth It?
Absolutely. When the demands of your workflow grow, so should your equipment’s resilience and performance. High-tier solutions offer better durability, environmental resistance, and long-term reliability, crucial for uninterrupted production. If you’re ready to elevate your setup, explore options like the latest studio lighting or professional-grade microphones—just ensure your environment supports their optimal use. For more details on how to optimize your studio, check out our guide on [how to build a soundproof booth for under $100](https://creatorrigreviews.com/how-to-build-a-soundproof-booth-for-under-100).