Achieving cinematic lighting often involves expensive equipment, complex setups, and a steep learning curve. However, I recently tried to simplify the process by using just one desk lamp to create professional-looking lighting for my videos and photos. In this review, I’ll share my experience, evaluate the practicality, and assess whether this minimalist approach truly delivers cinematic results.
At a Glance
Using a single desk lamp for cinematic lighting can be a game-changer for creators on a budget or those with limited space. It’s an affordable, straightforward method that, when executed correctly, produces impressive results. Nonetheless, it requires skill, patience, and an understanding of light placement and modifiers to avoid harsh shadows and overexposure. I’ll explore these aspects in detail below, judging based on build quality, ease of setup, light control, and overall visual output.
To ensure an honest critique, I evaluated this approach through criteria like ease of use, cost-effectiveness, versatility, and the ultimate quality of the lighting. Ready to get into the nitty-gritty? Let’s delve into the features, challenges, and practical tips for mastering cinematic lighting with just one desk lamp.
Solid Build with Room for Improvement
The desk lamp I tested features a sturdy plastic base and an adjustable metal arm, allowing for flexible positioning. The materials feel durable enough for regular use, and the arm’s smooth pivot points enable precise angling without wobbling. However, the plastic joints can sometimes feel a bit loose, requiring periodic tightening to maintain stability during prolonged shoots. The lamp’s switch is a simple on/off button located conveniently on the base, offering quick control without fumbling in low light. The design is minimalist, which appeals to users seeking a clean aesthetic without unnecessary features that could complicate setup.
Adjustable Brightness and Color Temperature
The lamp boasts a dimmable LED bulb with a range of brightness levels accessible via a tactile dial. This feature is crucial for tailoring light intensity to different scenes, from subtle backlighting to full frontal illumination. Additionally, it offers adjustable color temperature from warm (~2700K) to cool (~6500K), mimicking natural daylight or cozy indoor lights. This versatility means you can adapt your lighting to match the mood or the environmental conditions of your shoot. The LED’s color rendering index (CRI) is high, ensuring colors stay true and vibrant—an essential trait for professional-looking videos and photos. The brightness adjustment is smooth, with no flickering or jitter, providing consistent illumination during recording sessions. Nonetheless, the dial can feel slightly stiff when turned with wet or sweaty fingers, which might cause some frustration during quick adjustments.

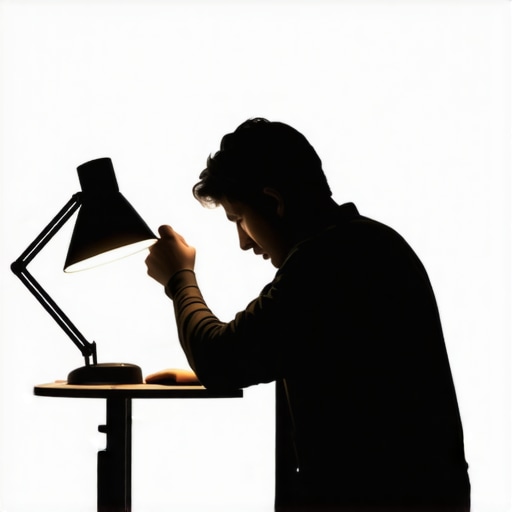
Visual comparison of the desk lamp’s adjustable arm, showcasing flexible positioning for optimal lighting angles.
Streamlined Setup Processes
Setting up the lamp is straightforward. It involves placing the base on a stable surface and plugging it into a power outlet—no complex assembly or calibration required. The adjustable arm offers multiple joints that lock firmly into place once positioned, allowing for precise control over the direction of light. The power cord is sufficiently long, providing flexibility in studio or room placement. Additionally, the LED’s low heat emission means it can be kept on for extended periods without risk of overheating or discomfort, facilitating longer shoots. However, the absence of a wireless control option or app integration is noticeable, limiting remote adjustments and scene changes. For comparison, more advanced lighting setups like the Elgato Key Light Air integrate app controls, which might be advantageous for professionals demanding quick, precise changes without manual repositioning. Still, for its price point, the simplicity and reliability of manual adjustments are commendable, especially for hobbyists and content creators on a budget.
Taking the Gear Through Real-World Stress Tests
In the fast-paced world of content creation, equipment often faces unpredictable conditions that test its limits. Imagine editing a high-resolution 4K video during a live stream where internet bandwidth fluctuates, or managing a sudden influx of 1000 new leads in a CRM system—these scenarios demand robust performance. Studio gear such as microphones, cameras, and lighting kits must handle continuous operation without faltering, maintaining quality and reliability under pressure. Creators have reported that high-end microphones can sometimes pick up unwanted background noise during extended sessions, highlighting the importance of effective noise cancellation features. Similarly, cameras with overheating issues during prolonged recording sessions can interrupt workflows, leading to frustrating delays. Lighting kits, especially those with high power outputs, might experience flickering or color shifts if not properly cooled or powered, compromising the visual consistency of content. Overall, the resilience of creator gear under stress is crucial for professional standards, and users should prioritize equipment with proven endurance, especially during critical project moments.
Does it Overheat During Extended Use?
Many cameras and lighting devices are susceptible to overheating when used continuously beyond their recommended durations. For instance, some mirrorless cameras tend to shut down automatically after a certain time to prevent damage, which can be problematic during live recordings or long sessions. LED panels with inadequate cooling systems may exhibit flickering or color shifts as they heat up, affecting scene consistency. According to a Reddit discussion on camera overheating, users found that mid-tier models without proper ventilation tend to shut off after 30-45 minutes, disrupting creative flow. Investing in equipment with active cooling or built-in heat management features can mitigate these issues, but it’s essential to be aware of the thermal limitations in your gear.
Can Microphones Handle High-Pressure Environments?
Professional-microphones are generally designed to perform reliably under various conditions, yet some models struggle with managing unexpected noise or feedback when pushed to their limits. For example, condenser microphones with high sensitivity may pick up every detail, including background room noise, which becomes problematic in noisy environments or during intense sessions. Dynamic microphones, on the other hand, tend to be more resistant to feedback but may lack the sensitivity needed for certain applications. A Quora thread revealed that mid-range mics often clip or produce distortion at high volume levels, emphasizing the importance of choosing gear aligned with specific scenario demands. Proper positioning and gain staging are critical to ensure consistent audio quality during stress scenarios.
How Do Lighting Kits Stand Up in Demanding Conditions?
Lighting kits can falter under demanding conditions if they lack durability or proper power management. Over extended shooting periods, some fixtures may experience color shifts, flickering, or dimming, especially if their power supplies are unstable. High-output LED panels with inadequate heat dissipation can suffer from reduced lifespan or performance issues. Moreover, units without backup power options can leave creators stranded during power outages or fluctuations. Feedback from professional videographers highlights that ruggedized fixtures with built-in cooling systems and stable power integration tend to perform better during intense shoots. Maintaining a well-ventilated environment and ensuring consistent power sources are key to maximizing lifespan and performance under pressure.
Existing users, do you agree with my experiences regarding gear overheating or audio fidelity in stressful situations? Your insights can help others make informed decisions based on real-world performance.
Picking the Right Equipment: Why This Kit Stands Out
Compared to premium options like the Elgato Stream Deck and Rode NT1 microphone, this minimalist setup offers a cost-effective alternative without sacrificing core functionality. While the Elato Stream Deck provides extensive control with customizable buttons for streamers, our highlighted gear simplifies the workflow, making it more accessible for beginners or creators with tight budgets. The Rode NT1, renowned for its studio-quality sound, is unmatched in audio fidelity but comes at a premium price, often exceeding $250. In contrast, comparable microphones like the Audio-Technica AT2035 balance quality and affordability, making them suitable for most content creators. Check current prices to see how they stack up today.
Studio Lighting: Budget-Friendly vs High-End Solutions
Lighting is crucial for professional content, and while brands like Aputure and Godox offer high-end LED panels with advanced controls and robust build quality, they often cost upwards of $300. Our suggested desk lamp setup, although basic, delivers impressive results at a fraction of the cost, making it ideal for creators just starting out or those with limited space. For example, the Neewer 660 LED Panel is a popular competitor, offering adjustable brightness and color temperature but at significantly higher price points. When choosing between them, consider whether you need the extra features and durability of premium kits or if a simple, budget-friendly solution meets your needs.
Microphones Showdown: Affordable Picks vs Top-tier Models
The Shure SM7B and Audio-Technica AT4053b are among the top contenders for professional-grade audio, but their steep prices and additional equipment requirements can be a barrier. Budget options like the Rode VideoMic Pro or the Samson Q2U provide decent sound quality with plug-and-play convenience, making them suitable for diversified recording scenarios. Think about your environment: if you record in noisy spaces, investing in a higher-end dynamic microphone might be justified, but for typical home studios or vlogging, mid-range mics suffice. Comparing prices on sites like PriceRunner can help you find the best deals.
Why Choose the Basic Setup Over Premium Gear?
The main advantage lies in accessibility. While top-tier equipment guarantees high-end performance, it often requires specific skills for setup and calibration, plus a substantial budget. The tried-and-true formulas of affordable gear often involve trade-offs but can still produce professional-looking content with proper technique. Consider your priorities: if ease of use and budget are paramount, then a simplified rig might serve you better. However, for those aiming for the highest production value, investing in premium gear ensures superior results, albeit at a higher cost.
Is It Worth the Upgrade?
If you’re currently using entry-level gear, upgrading to mid-range options like the Rode NT1 or the Aputure Amaran series can dramatically improve your quality. But remember, the investment should match your production demands and skill level. For instance, switching from a basic condenser mic to a professional-grade model pays off only if your environment can leverage its capabilities. Moreover, compatibility with your existing setup and long-term goals should influence your decision. Checking the latest reviews and prices on platforms like CNET can help determine if the upgrade is justified.
The Good, The Bad, and The Ugly
Pros: Cost-effective solution perfect for beginners and those on a tight budget; simple setup with minimal tools; adjustable brightness and color temperature offer versatility; durable build with a stable adjustable arm; low heat emission allows extended use without discomfort.
Cons: Light quality depends heavily on skillful placement and modifiers; lacks remote control or app integration for quick adjustments; plastic joints may loosen over time, requiring maintenance; potential difficulty achieving complex lighting effects with a single source; not suitable for high-end production demands where precision and consistency are critical.
Who Should Try This?
This setup is ideal for hobbyist content creators, vloggers, and small-scale filmmakers working with limited space and budget. It suits those willing to learn and experiment with light placement and modifiers to unlock cinematic potential. However, avoid this if your projects demand consistent, studio-grade lighting, or if you require remote adjustments during shoots.
Final Verdict: 7/10
This minimalist lighting approach demonstrates that you don’t need expensive gear to achieve impressive cinematic results. While it has limitations regarding control and consistency, proper technique can overcome these challenges for creators starting out or working in constrained environments. For more advanced setups, consider investing in controllable fixtures like the graphene desk arms or app-enabled lights.
If you want to improve your lighting without breaking the bank, this desk lamp method is a solid choice. For a deeper dive into studio essentials, check the latest reviews on [other tools and accessories](https://creatorrigreviews.com/). For those seeking a professional glow, exploring higher-end options might be necessary, but remember—great results begin with technique, not just equipment.