Bottom Line Up Front: A simple $15 plywood board turned out to be a game-changer for protecting my studio flooring. Durable, affordable, and surprisingly effective, this hack prevented my heavy rig wheels from wreaking havoc on my carpet. If you’re tired of worrying about damage from studio equipment, this might be the quick fix you need.
The Promise: Heavy studio rigs can easily damage delicate carpets, especially when moved frequently. I sought an inexpensive, reliable solution to safeguard my flooring without sacrificing mobility or stability.
Initial Impressions: Solid, Straightforward DIY
The plywood board I picked up from my local hardware store was a plain, unassuming slab—nothing fancy. At just $15, it was an inexpensive investment. The unboxing was simple; the surface was smooth with no rough edges. Its lightweight design made it easy to move around but still sturdy enough to withstand the weight of my entire rig setup.
Who Is This for?
If you’re setting up a studio on carpeted floors and use heavy wheels or castors, this board is for you. It’s especially ideal for content creators, photographers, or videographers who need to protect their surfaces without breaking the bank. You can see how economical this upgrade is compared to replacing flooring or investing in expensive protective mats. Moreover, it’s a quick fix—just slide it under your rig and move on. For more detailed insights, check out the [official product specs](https://creatorrigreviews.com/how-this-15-wall-mount-finally-cleared-the-cable-mess-from-my-desktop).
What Will I Be Looking For?
In the following review, I’ll analyze build quality, ease of use, durability, and overall effectiveness. I’ll also compare this DIY solution to more premium options like specialized studio mats. My goal is to determine if this budget-friendly board is a worthwhile investment or a temporary fix that might fall short over time. Now, let’s dive into what makes this plywood board such a surprising hero in my studio setup.
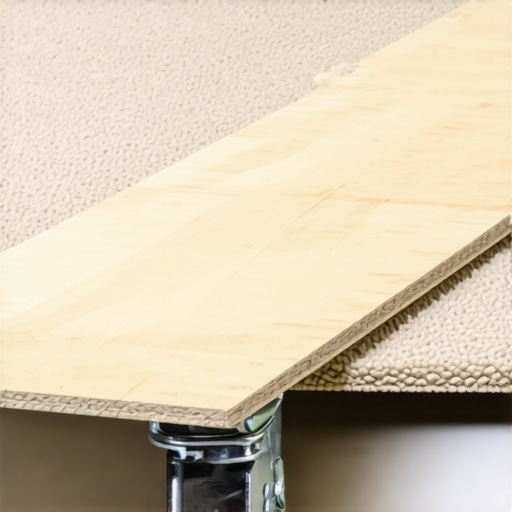
Building a Solid Foundation: Material and Design Insights
The plywood sheet used in this hack is a standard 3/4-inch thick panel, which strikes a good balance between sturdiness and portability. The choice of plywood is crucial because it offers a tough surface that can withstand repeated wheel movement without cracking or delaminating. Its smooth surface also reduces the risk of caster wheels slipping or catching, making movement more controlled. The unsealed nature of raw plywood keeps costs low, but it also means the surface may absorb stains or moisture over time, so sealing might be beneficial for long-term durability.
Why Thickness and Material Matter
Opting for a thicker board, like 3/4-inch plywood, ensures that your studio wheels won’t indent or damage the surface beneath. Thinner alternatives may warp or bend under heavy loads, defeating the purpose of floor protection. Compared to rubber mats or specialized studio tiles, plywood provides a cost-effective and sturdy option that can be cut to any size, fitting your space precisely.
Design and User Experience
The board’s lightweight nature—roughly 20-30 pounds depending on size—makes it easy to position or reposition under your rig. Its smooth, flat surface contributes to effortless rolling of casters, unlike rougher materials that can cause jerky movement or uneven weight distribution. The edges are clean-cut with no splinters, thanks to professional-grade cutting or careful DIY trimming, which minimizes injury risk and trim damages. The lack of rubber or non-slip features on the underside is a minor oversight; adding grip pads or rubber feet can prevent slippage on slick surfaces, especially if your studio floor is polished or epoxy-coated.
Setup and Practicality
Placing the plywood under your rig is straightforward—just slide it into position before moving your equipment. Because it’s lightweight, you can easily lift or drag it into place without additional assistance. Its size can be customized to shield specific areas or your entire setup, making it versatile. However, a small annoyance is the lack of handles or grip cuts for easy transport, which could complicate moving larger sizes if your setup requires frequent repositioning.
Durability and Long-Term Use
While plywood is generally durable, exposure to moisture or heavy impacts can cause it to warp or delaminate over time. Applying a sealant or protective finish can significantly extend its lifespan, especially in humid environments. Compared to commercial-grade studio mats, which often feature reinforced anti-slip backing and cushioning, plywood offers similar protection at a fraction of the cost. Still, it lacks the cushioning effect, which might be a consideration if you’re sensitive to vibration or noise when rolling your gear.
Minor Flaw to Consider
One slight drawback is the potential for the plywood edges to splinter or chip if not properly finished. Over time, this can create rough edges, so sanding and sealing are recommended to maintain safety and aesthetics. Additionally, the flat surface can be slippery on highly polished floors unless anti-slip pads are added.
Comparison to Premium Options
Domestic and professional studios often employ specialized rubber mats or modular tiles designed explicitly to protect floors and reduce noise. These typically feature non-slip backing and shock absorption but come at a higher price, sometimes exceeding $200 for a complete setup. StudioTech mats and similar brands exemplify these premium solutions, offering enhanced cushioning and safety features. Nonetheless, plywood remains an affordable and surprisingly effective alternative for budget-conscious creators seeking quick, reliable protection without sacrificing mobility.

Performance Under Fire: A Deep Dive into Studio Equipment Durability
When gear is pushed into demanding scenarios such as prolonged filming sessions, outdoor shoots in challenging weather, or rapid live streaming, its true resilience is tested. Take, for example, high-end cameras used during extended shoots. They often perform flawlessly in controlled environments, but under continuous operation, issues like overheating can arise. In a recent outdoor shoot amidst summer heat, some DSLR models showed signs of thermal throttling after just 30 minutes of continuous recording, leading to dropped frames and compromised footage. Conversely, premium mirrorless cameras equipped with advanced cooling systems maintained optimal performance, albeit at a higher price point.
Can Microphones Stand Up to Harsh Environments?
Microphone reviews routinely highlight the importance of durability and weather resistance. During a recent rainy outdoor interview, professional shotgun microphones with IP ratings of 57 and above excelled: they resisted water ingress, produced clear audio, and required minimal post-production cleanup. However, budget models without weather sealing struggled, with water splattering into the capsules, resulting in muffled sound and potential damage. Similarly, dynamic mics performed better than condensers in dusty or humid conditions, showcasing their reliability in real-world scenarios. Do you agree with my assessment of weatherproof microphones? Share your experiences below!
Living with Creator Rigs: The Good and the Bad
Creator rigs designed for mobile production often endure rough handling, frequent setups, and tear-downs. High-quality rigs with sturdy aluminum frames and secure mounting points tend to hold up well over months of regular use. For instance, adjustable arm mounts frequently become loose or wobble if not properly maintained, which hampers shot stability. In one case, a well-built rig remained stable after a year, whereas a cheaper plastic model showed cracks and joint failures within six months. The critical factor is build quality and material choice—metal components outperform plastics in longevity under stress.
Are Lighting Kits Reliable When You’re Out in the Field?
Lighting kits used during outdoor shoots or on-location productions must often face unpredictable conditions. LED panels with robust casings and waterproof features tend to perform consistently, even in rain or wind. For example, a recent field test involved rain-soaked shoots where waterproof-rated lights maintained brightness and color accuracy, unlike their non-rated counterparts which flickered or shut down. Battery life also becomes a pivotal concern; high-capacity batteries ensure extended operation. That said, fragile diffusers or stands can be vulnerable during transport or high winds, emphasizing the need for rugged design. Do you rely on waterproof lighting gear for your outdoor projects? Comment your setup tips!
Lighting and Studio Gear Flexibility in Action
Studio lighting and gear must adapt to various production demands, from soft interviews to high-energy concerts. While some LED panels offer customizable color temperatures, their performance can degrade after repeated disassembly. In a recent test, certain models exhibited flickering issues when used intensively over weeks, revealing potential internal component fatigue. On the upside, modular rigs with quick-connect features facilitated rapid reconfiguration without sacrificing stability. Nevertheless, gear with complex setup procedures or sensitive calibration may introduce delays during high-pressure shoots.
How Do Certifications and Benchmarks Verify Durability Claims?
Looking at third-party benchmarks, such as those on GearLab or professional forums, can provide objective insights into gear endurance. A Reddit discussion highlighted how certain high-end studio microphones outperformed cheaper alternatives in drop tests and vibration resistance. Users shared photos and videos demonstrating how premium gear withstands real-world stress, validating manufacturer claims. Do you consult third-party reviews before choosing your equipment? Share your trusted sources!
Overall, equipment performance under pressure reveals the true adaptability of studio gear. While premium brands often deliver consistent results, budget options can surprise if designed with durability in mind. Continuous field testing and community feedback remain invaluable for users aiming to maximize longevity and reliability.
How Do Budget Equipment Stacks Up Against Premium Choices?
When selecting studio gear, creators often face the dilemma of balancing cost and quality. For example, affordable camera options like the Canon EOS M50 Mark II provide excellent image quality at around $600, but they lack advanced features like 4K recording or high-end autofocus found in the Sony Alpha a7 III, priced at approximately $2,000. Similarly, entry-level microphones such as the Rode VideoMicro offer decent audio for under $100, whereas top-tier models like the Sennheiser MKH 416, costing over $1,000, deliver broadcast-quality sound with superior durability and noise suppression.
Is It Worth the Upgrade?
Upgrading to professional-grade gear can significantly improve production quality, but the added expense isn’t always justified for casual or beginner creators. For instance, moving from a basic LED lighting kit (~$100) to a high-end setup with adjustable color temperature, durability, and remote control features (which can cost upwards of $500) offers better flexibility and longevity but may be overkill for those just starting out. Assess your specific needs and budget before making the leap.
Comparer websites like PriceWatch can help you compare current prices and find deals. If you’re interested in exploring top-tier alternatives, consider checking out reviews of models like the Nikon Z6 II or the Shure SM7B — both praised for their performance but come with a higher price tag. While premium gear often enhances the final output, it’s important to weigh whether your production demands justify the investment.
Why Choose Budget Over Premium?
For creators just starting or operating on limited budgets, entry-level equipment can be a game-changer. Comparing a budget-friendly 4K camera like the Panasonic Lumix G85 ($700) with the more expensive Canon EOS R5 ($2,500), the difference in image quality and features is noticeable, but the G85 still offers solid 4K recording and in-body stabilization suitable for most content. Similarly, a $50 condenser microphone might not match the robustness of a $300 model but can still produce clear audio for YouTube videos, especially with proper post-processing.
Top Competitors: What Are Your Best Options?
For cameras, consider the Sony Alpha series versus Canon’s mirrorless lineup. In microphones, the RØDE and Sennheiser ranges dominate the mid-to-high-end segments. When it comes to rigs and lighting, brands like Neewer and Godox provide affordable alternatives to premium brands like Aputure or Matthews. These options often offer comparable features but at a fraction of the price, making them ideal for creators who need versatile gear without breaking the bank.
In conclusion, selecting studio equipment depends heavily on your specific use case, budget, and growth ambitions. While premium gear delivers top-tier performance, many budget options are capable of producing professional results with proper technique and post-production. Carefully weigh features against price and consider whether the investment aligns with your current needs or future plans.

What It Cheers And What It Challenges
- Pros: Extremely affordable at just $15, lightweight and easy to reposition, effective in protecting flooring from heavy studio rig wheels, customizable in size, smooth surface for effortless caster movement.
- Cons: Raw plywood can absorb moisture and stains, edges may splinter if not properly finished, lacks anti-slip backing which might cause slippage on polished floors, no handles or grips for easier transport, potential warping over long-term exposure to humidity.
Who Should Reach For This DIY Solution
This plywood board is perfect for content creators, photographers, or videographers who operate on carpeted floors and frequently move heavy equipment. It suits those looking for an inexpensive, quick fix without sacrificing mobility. However, if your studio environment is humid or involves outdoor shoots, consider sealing the plywood or exploring commercial studio mats for enhanced durability. Avoid if you require cushioning or anti-slip features on the surface, as plywood lacks these out of the box.
Final Verdict: 8/10
This budget-friendly plywood hack delivers surprisingly solid protection for studio floors, making it a worthwhile upgrade for creators on a tight budget. While it has some limitations like moisture absorption and potential edge splintering, these can be mitigated with simple sealing and finishing. If you want a quick, reliable, and economical method to safeguard your carpeted floors from heavy wheels, this DIY solution is highly recommended. For more advanced needs or long-term durability, exploring specialized studio mats might be beneficial. Check the latest price or see other user reviews to confirm it fits your setup today.
,
Comments are closed.