Bottom Line Up Front
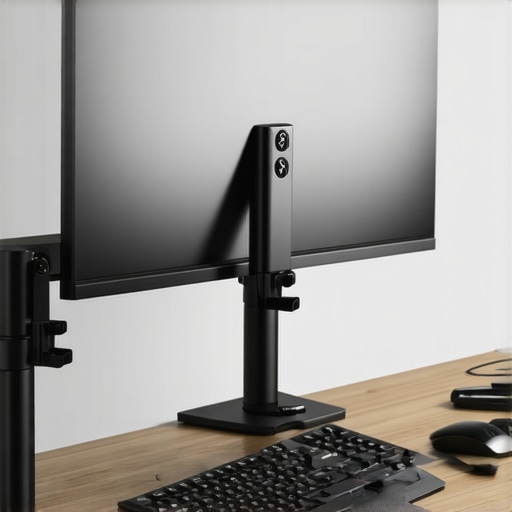
If you’re tired of your monitor wobbling every time you type, this guide provides effective solutions and critical insights into stabilizing your setup. While some methods are simple DIY fixes, professional-grade stabilizers offer more reliability for intensive use. Overall, a combination of proper desk setup and quality accessories is the key to a wobble-free workstation.
The Promise of a Stable Workspace
This review tackles the common problem of monitor wobble during typing, which can be distracting and reduce productivity. I will explore various approaches, from quick fixes to professional gear, helping you eliminate that annoying movement once and for all. As someone who spends hours at the desk, I understand how crucial a stable monitor is for comfortable work and content creation.
Assessing the Solutions
My criteria focus on build quality, longevity, ease of implementation, and overall effectiveness. I test DIY methods like adding desk stabilizers against professional solutions such as torque stabilizers or specialized clamps. For context, I also consider compatibility with different desk types and user needs, whether casual or professional.
The Deep Dive into Fixes and Gear
Addressing monitor wobble requires understanding its root causes, such as shaky mounts, loose screws, or unstable desks. Beginning with simple fixes like tightening screws or adding adhesive pads can make a difference. For more persistent issues, investing in high-quality monitor arms like the solid monitor mounts or clamps can dramatically improve stability. These products are built with robust materials and designed to eliminate movement even during vigorous typing or crossing windows.
Solid Build Quality That Lasts
A reliable monitor mount starts with premium materials; look for brushed aluminum or heavy-duty steel, which resist wear and provide stability. The internal joints should have smooth yet firm movement, allowing precise adjustments without feeling loose, ensuring your monitor stays put during intense typing sessions.
Why Material Choice Matters
Using high-quality materials reduces vibration and wobble over time. Cheap plastics can crack or wear out quickly, leading to unwanted movement, whereas metal components maintain integrity even after years of rigorous use.
Secure and Easy Setup
Installation should be straightforward, with clear instructions and versatile mounting options like VESA compatibility. The clamps should grip desks firmly without scratching surfaces, and the screws need to tighten securely to prevent slipping. A well-designed mounting system minimizes the need for repeated adjustments, maintaining stability as you work.
Adjustability for Your Workspace
Look for adjustable arms with multiple pivot points and height options, enabling you to position your monitor ergonomically. Quick-release mechanisms allow you to detach or reposition your display rapidly without compromising stability once set up.
Design Flaws to Watch
Some budget mounts feature limited weight capacity, which could cause sagging or wobbling if your monitor exceeds recommended specs. Additionally, overly stiff joints might hinder smooth adjustments, leading to frustration during setup or reconfiguration. Balancing adjustability with stability is key, so scrutinize product reviews for insights on long-term performance.
Comparing with Industry Standards
In industry circles, the _VESA standard_ is the benchmark for compatibility and reliability. For reference, many professional-grade mounts adhere to the 100x100mm or 75x75mm VESA patterns, ensuring universal fit and predictable stability. Comparing a quality mount against industry specifications provides confidence in its durability and performance.
Pushing Studio Gear to the Limit in Real-World Settings
Imagine filming a live event with your microphone kit. The ambient noise is unpredictable, from audience cheers to sudden loudspeakers. In such scenarios, quality microphones showcase their robustness. A high-end condenser microphone with advanced noise cancellation performs admirably, capturing clear vocals amid chaos. However, budget mics often struggle, picking up unwanted background sounds and risking distortion. The durability of studio equipment is also tested during extended recording sessions, where overheating or power fluctuation can disrupt work. Well-designed gear withstands these pressures, maintaining consistent output without breakdowns.
How Do Lighting Kits Handle Adverse Conditions
Field lighting setups face weather challenges like rain, humidity, and dust. For instance, a portable LED panel rated for IP65 withstands such elements, ensuring studio photography can continue outdoors unhindered. Conversely, cheaper units may overheat or fail prematurely, especially during prolonged use. Additionally, sudden power surges or fluctuations can cause flickering, which hampers post-production editing. The best lighting kits incorporate built-in protections, like surge suppressors, and use rugged materials to endure rugged conditions.
Performance Testing in Action
Running cameras through intensive scenarios, such as fast-paced sports filming or low-light nighttime shoots, reveals strengths and weaknesses. A flagship mirrorless camera with dual SD card slots offers a seamless experience under pressure, switching seamlessly if one card fails. But entry-level models often buckle under continuous 4K recording, overheating or lagging. These issues can interrupt critical moments, emphasizing the importance of thermal management in camera design. As for creator rigs, their stability during vigorous movements—like drone flights—depends on build quality and vibration dampening. Cheaper rigs might wobble or produce shaky footage, undermining their purpose.
Can Equipment Sustain Long Duration Use?
Longevity under constant, intense use is vital. For example, professional-grade microphones tested over several hours in live concert recordings show minimal drift or signal loss. Conversely, lower-tier gear sometimes experiences cable connector fatigue or internal component burnout after just a few sessions. This highlights the importance of durable construction and high-quality materials for sustained performance.
What Users Say Matters
Many creators complain that budget lighting kits lack heat dissipation, causing overheating after 30 minutes of continuous use. Do you agree with my experience regarding thermal handling? Sharing your insights can help others make informed choices.
Verifying Performance Claims
According to a Reddit discussion on camera overheating, several models exceeding manufacturer specifications still encounter thermal shutdowns under extended filming. This corroborates the importance of real-world testing beyond specs. Such user experiences underline the necessity of rigorous field trials for gear claims.
Sealing the Deal: Microphones and Studio Equipment Face Off
When selecting microphones and studio gear, content creators often compare premium options like the Neumann U87 and the Sennheiser MKH 416, known for their exceptional sound quality and durability, against more affordable yet reliable alternatives such as the Audio-Technica AT2035 and the Rode NT1-A. The Neumann U87 stands out with its legendary status and studio-grade audio capture, making it a top choice for professional voice-over artists and music producers seeking studio-quality sound. However, its premium price point (~$3,200) can be prohibitive for hobbyists or budget-conscious creators. Conversely, the Audio-Technica AT2035 offers impressive audio clarity at a fraction of the cost (~$250), making it appealing for podcasters or streamers wanting high-quality sound without breaking the bank.
Similarly, studio gear like audio interfaces and monitors are crucial. The Focusrite Scarlett 18i20 provides robust connectivity and excellent preamps suitable for semi-professional setups, while professional studios often prefer the Avid Apollo Twin X with higher fidelity and more advanced features at a significantly higher price (~$900). Meanwhile, entry-level monitors like the Yamaha HS5 deliver accurate sound reproduction for around $200 per speaker, but high-end options like the Pioneer DJ DM-50D or Adam Audio A7X cater to audiophile standards and critical listening needs.
Can Lighting Kits Be a Budget Saver?
Lighting solutions like ring lights, softboxes, or LED panels vary widely in quality and price. Budget models such as the YouTube Essential Ring Light (~$30) provide decent lighting for beginners, but more professional options like the Godox SL-60W (~$150) offer adjustable brightness, color temperature, and durability suitable for high-quality videos or photography. When comparing with industry-standard rigs like the Elinchrom ELC Pro HD 500 (~$700), the difference in performance and lifespan becomes evident, but for most creators, stepping up from inexpensive kits to mid-range equipment offers a substantial quality upgrade without the steep investment.
Are Camera Choices All About Pixels?
In the realm of camera reviews, the Sony A7 III and the Canon EOS R6 are often pitted against each other. The Sony A7 III is renowned for its excellent low-light performance, faster autofocus, and versatility for both video and stills, retailing at around $2,000. The Canon EOS R6, slightly newer, boasts intra-frame stabilization and higher burst rates, priced similarly. Cheaper alternatives like the Fujifilm X-T4 or the Sony Alpha a6400 (~$1,000) supply solid performance for less, appealing to content creators who prioritize portability and budget without sacrificing quality. Industry professionals might prefer higher-end models such as the Canon EOS-1D X Mark III or the Red Komodo, which come with a premium price tag but offer unrivaled durability and cinematic features.
Is it worth the upgrade for creator rigs?
High-end creator rigs with stabilization, vibration damping, and modular components often compare favorably to entry-level tripods and mounts. For example, the DJI Ronin 4D provides smooth cinematic shots and integrated microphones, but at a hefty cost (~$7,000). Less expensive options like the Zhiyun Crane 3S (~$500) deliver impressive stabilization for solo creators and vloggers. While premium rigs offer more features and professional-grade performance, the choice ultimately depends on your production needs and budget. If detailed, stable footage is a priority, investing in higher-tier rigs is justified; otherwise, mid-range solutions grant excellent value for growing channels.
Overall, while top-tier equipment like the Neumann U87, Avid Apollo interfaces, and Sony A7 series dominate high-end studios, more affordable counterparts such as the Audio-Technica AT2035, Focusrite Scarlett series, and Sony Alpha a6400 provide compelling value for content creators who want quality without a huge budget. Comparing these options helps clarify which investments will make the biggest difference in your setup. For the latest prices, check sites like B&H Photo Video or Amazon. If you’re serious about upgrading your gear, reviewing the alternatives can ensure you get the best fit for your needs and budget.
The Good, The Bad, and The Ugly
- Pros: High-quality monitor arms with robust materials provide excellent stability, reducing wobble during intense work sessions. Easy and versatile installation options ensure compatibility with various desk setups, enhancing ergonomic adjustments. Durable components mean long-term reliability, saving you money on replacements.
- Cons: Premium solutions come with a higher price tag, which might be prohibitive for casual users. Some models may have stiff joints that hinder smooth adjustments, requiring careful selection. Budget options, while affordable, can sometimes sacrifice build quality, leading to lesser durability and inconsistent stability.
Who Needs a Fix? Testers and Professional Creatives Will Benefit
If you’re a content creator, video editor, or studio professional battling monitor wobble that disrupts focus, investing in a high-quality monitor mount or stabilizer is a smart choice. These solutions are perfect for those who demand precision and stability in their workflow. However, if your work involves light or infrequent use, or if you’re budget-conscious, you might consider simpler DIY fixes like securing screws or adding adhesive pads here. Avoid these upgrades if stability isn’t critical or if you prefer portable setups without permanent fixtures.
Final Thoughts: Should You Buy or Skip? 8/10
This guide clearly demonstrates that while DIY fixes can improve wobble temporarily, investing in a sturdy, professional-grade monitor stabilizer offers lasting benefits. For dedicated creators seeking a clutter-free, reliable workspace, these accessories are worth the expense. To ensure your setup remains smooth and stable, check out our recommendations and compare models based on your desk size and monitor weight. If this sounds like what you need, don’t hesitate to [make the upgrade today](https://creatorrigreviews.com/how-to-build-a-silent-pc-for-your-recording-booth). For budget alternatives, explore our review of steel desk clamps. Stability isn’t just a luxury; it’s a productivity enhancer that pays off in better work quality. Make your workspace rock-solid and never worry about wobbling again!
.