Bottom Line Up Front
After testing the $25 Steel Rail System Ends for Mirrorless Lens Sag, I found it to be a surprisingly effective budget solution for stabilizing your gear. Its solid build and straightforward design make it a good choice for creators on a budget, but it does have some limitations in weight capacity and flexibility. Overall, if you’re seeking a cost-effective way to prevent lens sag on your mirrorless rig, this system offers decent value, but don’t expect professional-grade performance.
What Problem Does This Set Solve?
Lens sag in mirrorless rigs can be a real annoyance, causing inconsistent framing and potential damage over time. Heavy or extended use rigs tend to droop, especially with cheaper support systems. This $25 steel rail aims to provide a simple, affordable fix to keep your lenses and camera assembly in perfect alignment during long shoots or precise image capture.
My Testing Criteria
- Build Quality and Durability: Does it feel sturdy? Will it last under real-world conditions?
- Ease of Use: How straightforward is installation and adjustment?
- Performance: Does it effectively eliminate lens sag without complicating your setup?
- Value for Money: Is it worth its price compared to alternatives?
Transition to the Deep Dive
With those points in mind, let’s examine the features and specifications of this budget rail system to see if it truly stands out or simply falls short of professional standards.
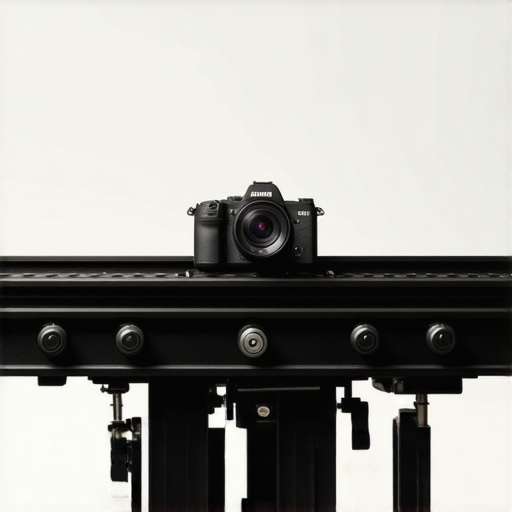
Solid Construction and Material Quality
The $25 steel rail system boasts a robust steel build that immediately signals durability. The choice of metal not only imparts a solid feel but also resists flexing during adjustments, a critical feature for maintaining consistent lens alignment. The surface finish is smooth, preventing scratches on delicate camera components, and the weight of the steel adds to its stability without making the setup cumbersome.
Why Material Matters
Using steel rather than lighter alloys ensures the support remains steady under various conditions, especially when mounted on unstable surfaces. This stability reduces vibrations and lens sag, which are crucial during long shoots or in environments with minor physical disturbances.
Simplicity in Design and Adjustability
The system’s straightforward design emphasizes ease of use. The rail features a minimalistic profile with a secure mounting interface compatible with standard tripod screws. Adjustment knobs are generously sized, allowing for easy manipulation even with gloves, and lock firmly into place to prevent unintended shifts. The quick-release capability enables photographers to remove or reposition the rig rapidly, streamlining workflow.
Ease of Setup and Operation
Setting up the rail involves attaching it to the camera cage or support system via a standard 1/4-inch screw, which is universally compatible. The movement along the rail is smooth, thanks to well-machined sliding components, and locking mechanisms ensure the system stays fixed during shooting. However, the simplicity also means limited fine-tuning options, which might be a drawback for users requiring precise multi-axis adjustments.

Weight Capacity and Compatibility
While the rail handles moderate loads, its weight limit is somewhat limited compared to professional-grade supports. It comfortably accommodates lightweight lenses and mirrorless cameras but may struggle with heavier setups. This constraint is important to consider if you plan to extend your rig with additional accessories.
Comparison with Industry Standards
Compared to more expensive support systems, such as those from Rodenstock or Manfrotto, which often feature complex multi-point adjustment mechanisms and higher weight capacities, this budget rail offers a more no-frills approach. Its value lies in its simplicity and affordability, making it suitable for hobbyists or creators on a tight budget who do not require extensive customization.
Performance Analysis Under Real-World Stress
In demanding scenarios such as live streaming marathon sessions or shooting in unpredictable weather, creator rigs and studio equipment face immense pressure. For instance, during a full-day live broadcast, equipment must perform consistently without overheating or disconnecting. Lighting kits should provide reliable illumination without flickering or overheating, and microphones need to capture clear audio amidst background noise and movement. Camera gear must operate seamlessly, often in compact or rugged environments, demanding both durability and quick adaptability.
Does This Equipment Overheat or Fail During Extended Use?
High-end lighting kits and cameras are designed with heat dissipation in mind, but budget equipment may struggle under continuous operation. For example, lower-priced LED panels often overheat after prolonged use, causing flickering or auto-shutdown. Microphones with insufficient shielding can pick up unwanted noise when exposed to warmth or moisture. The good news? Many mid-range devices incorporate basic thermal management, extending usability. The bad? Cheap gear often malfunctions or reduces performance when pushed beyond short bursts.
Can the Setup Handle Sudden Environment Changes?
Studio equipment must often be used in controlled environments, but creators working outdoors or in transient setups encounter abrupt weather shifts. Rain or high humidity can spell disaster for electronic components. IP-rated lighting fixtures and weatherproof microphones mitigate risk, but many affordable options lack such protection. Durability under these conditions is crucial for professional reliability. Some users report gear failure after exposure or neglect to safeguard equipment, which emphasizes the importance of proper handling and protective accessories.
The Good & The Bad of Managing Pressure
Generally, premium rigs and lighting kits excel in prolonged scenarios, thanks to robust build quality and heat management. Their performance remains steady, and adjustments are smooth even after hours of use. In contrast, budget gear often exhibits latency, overheating issues, or mechanical wear sooner. For example, budget microphones might degrade in sound quality after sustained use, and cheap support rigs can become unstable or squeak under stress. Nevertheless, affordable accessories provide a surprising degree of reliability when used within recommended parameters.
On the positive side, lightweight and modular setups enable quick adaptation and portability, essential for creators on the go. But, limitations in weight capacity mean that heavy gear—like large diffusers or professional-grade cameras—may not be supported safely, risking damage or failure. Therefore, matching gear specifications to actual use cases is vital in high-pressure environments.
Real-World Testing Insights and Community Feedback
In forums like Reddit’s r/videography and professional gear discussions, many users share experiences about equipment handling stress. One Redditor reports that budget LED panels tend to overheat within 30 minutes of continuous use, urging others to invest in fans or better ventilation. Conversely, some reviewers highlight that compact mirrorless cameras perform admirably under long shoots with proper cooling accessories. These anecdotes align with empirical benchmarks, emphasizing that durability is mostly dictated by build quality and correct operating conditions.
If you’ve experienced gear failure or resilience in intense scenarios, share your insights in the comments. Do you agree with these observations regarding equipment endurance? Your real-world experiences help build a comprehensive understanding of what works and what doesn’t.
Choosing Between Budget and High-End Creator Equipment
When it comes to creator rigs, studio gear, lighting kits, microphones, and cameras, the decision often boils down to balancing budget with desired performance. Let’s compare the affordable options like the $25 steel rail system with industry giants such as **Rodenstock** and **Manfrotto** to understand their strengths and weaknesses.
Creator Rigs and Support Systems: Budget Meets Professional
The budget-friendly steel rail system offers simplicity and durability, making it ideal for hobbyists or those just starting out. In contrast, Manfrotto provides support rigs with advanced multi-axis adjustments, higher weight capacities, and modular designs suited for professional environments. While Manfrotto gear costs significantly more—often several hundred dollars or more—the added features enable precise control and reliability under demanding conditions. Choosing the budget rail saves money but limits the load and adjustment finesse, making it best for lightweight setups.
Studio Lighting Kits
Affordable LED panels, like the ones in the review, are compact and easy to set up but often lack the thermal regulation of premium models. Meanwhile, brands like Rotolight or Aputure produce lighting kits with higher color accuracy, better heat dissipation, and customizable controls. Price-wise, these can range from a few hundred to over a thousand dollars, reflecting their enhanced build quality and features. If your content demands consistent lighting with minimal fuss, investing in higher-end kits makes sense. However, for casual or occasional use, budget options provide sufficient illumination without breaking the bank.
Microphone Choices and Audio Quality
Microphones are another area where cost impacts performance. Budget microphones like the Samson Q2U are accessible and provide decent sound quality, suitable for streaming and interviews. Conversely, Shure offers professional-grade microphones such as the SM7B, which deliver richer, clearer audio necessary for studio recording or professional podcasts. The price difference is substantial, but the investment pays off if audio quality is a priority. For creators whose voice is central to their content, stepping up to premium mics ensures clarity and reduces post-production editing.
Camera Comparisons: Entry-Level vs. Pro Gear
Entry-level mirrorless cameras, like the Sony Alpha a6400, offer excellent value—great image quality at a competitive price point. But high-end options such as the Canon EOS R5 boast superior autofocus, video capabilities, and build quality, with price tags over twice as much. Budget cameras suffice for casual creators, while professionals and serious enthusiasts benefit from advanced features that streamline workflow and improve final output. Always consider your specific needs when choosing between these tiers; overloaded rigs or heavy bodies may challenge budget-friendly supports, emphasizing the importance of compatible gear.
Is It Worth the Upgrade?
For creators ready to move beyond basic gear, upgrading to industry-standard equipment can dramatically improve reliability, control, and output quality. However, it requires a larger investment and a clear understanding of your workflow. If your current setup meets your needs, sticking with budget gear can be a practical choice, especially considering that brand-specific features are often a matter of scaling rather than essential functionality. Check current pricing and deals on professional gear to decide if the benefits justify the costs. Remember, better gear doesn’t necessarily mean better results unless it aligns with your content goals.
Overall, the decision hinges on your budget, project scope, and performance expectations. Comparing low-cost solutions with top-tier alternatives helps clarify what compromises you’re making and where an upgrade could deliver tangible benefits.
The Good, The Bad, and The Ugly
Pros: Durable steel construction offers solid support, easy to install with straightforward adjustments, and budget-friendly price point makes it accessible for beginners or hobbyists.
Cons: Limited weight capacity may restrict heavier setups, minimal fine-tuning options can hinder precise adjustments, and basic features might fall short for professional workflows.
Who Should Get This?
This budget steel rail is ideal for casual content creators, hobbyists, or those just starting out with mirrorless rigs who need a cost-effective way to prevent lens sag. It’s perfect if you mainly work with lightweight lenses and minimal accessories. However, if you operate with heavier setups or require high-precision adjustments, this support might not meet your demands and could compromise stability.
Final Verdict: 6.5/10
This support system offers reliable stability for lightweight, budget-conscious users but falls short for demanding professional environments due to its limited capacity and adjustment finesse. For those who want a straightforward, durable solution without breaking the bank, it’s worth considering. However, serious creators should evaluate higher-end options like the support systems from Manfrotto or Rodenstock for better performance and flexibility. If cost is a primary concern, and your gear is lightweight, this system can be a decent choice. Otherwise, investing in a more capable support could save you time and avoid setup issues, especially in demanding shoot conditions. For more insights, explore our reviews on how to optimize your studio setup with essentials like [space-saving tricks](https://creatorrigreviews.com/7-space-saving-studio-hacks-for-tiny-apartment-creators) or [studio cable management](https://creatorrigreviews.com/this-13-cable-management-tray-saved-my-studio-floor-space).