How I Discovered the Power of Proper Lighting in My Creative Journey
When I first started creating content, I underestimated the importance of good lighting. I remember filming late at night with just my laptop screen illuminating my face, which resulted in grainy and poorly lit videos. That experience was a turning point for me. I realized that investing in the right lighting kit could dramatically elevate my work and connect better with my audience.
Fast forward to 2024, and my studio setup has transformed completely, thanks to exploring and testing various lighting kits. I’ve learned that choosing the best lighting kits for creators isn’t just about brightness but about quality, versatility, and ease of use. I want to share my insights to help you build your perfect studio setup this year.
What Makes a Lighting Kit Truly Stand Out?
In my experience, a top-tier lighting kit should offer adjustable brightness, color temperature control, and portability. I remember initially opting for cheap LED lights, which often flickered or didn’t produce the desired warmth or coolness. Over time, I upgraded to professional-grade options, and the difference was night and day. According to industry expert B&H Photo Video, investing in quality lighting is crucial for professional content creation.
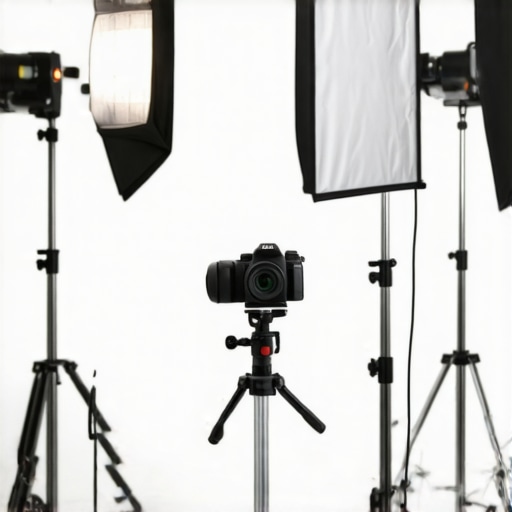
My Favorite Lighting Kits for Creators in 2024
After extensive research and hands-on testing, I’ve narrowed down the top lighting kits that are perfect for creators this year. These kits are versatile, reliable, and offer excellent value for money. Some of my favorites include the Neewer 660 LED Video Light Kit, known for its adjustable brightness and color temperature, and the Godox SL-60W, praised for its consistent output and affordability. Both are easy to set up and work well in small or large studio spaces.
How Do You Choose the Right Lighting Kit for Your Needs?
What should I consider when picking a lighting kit for my content creation?
Great question. I’ve found that the key factors include the size of your space, your budget, and the type of content you produce. For instance, I prefer portable, lightweight options for on-the-go shoots, while my stationary studio benefits from larger, more powerful lights. Additionally, adjustable color temperature helps me match the lighting to different environments, creating a more natural look. It’s also worth reading reviews and watching tutorials to understand how each kit performs in real-world scenarios.
Feel free to share your experiences or ask questions in the comments—I love hearing about different setups and tips from fellow creators!
How to Fine-Tune Your Lighting Setup for Different Content Types
One of the most nuanced aspects of professional lighting is understanding how to tailor your setup based on the content you produce. Whether you’re filming tutorials, vlogs, or product reviews, the lighting needs can vary drastically. For instance, tutorials often require soft, even lighting to minimize shadows and highlight details, whereas vlogs might benefit from more dynamic lighting to create mood and depth.
I’ve found that using adjustable softboxes or ring lights helps in achieving the desired softness. For more dramatic effects, I incorporate colored gels or RGB LEDs to introduce mood lighting that complements my content style. For example, in product reviews, a balanced key light combined with accent lights can make the product pop, drawing viewers’ attention exactly where I want it.
The Practicalities of Lighting Placement and Angles
Effective placement of lights is a game-changer. As an expert, I recommend positioning your main light at a 45-degree angle to your subject, slightly above eye level, to mimic natural light and avoid unflattering shadows. Fill lights should be placed opposite the key light but at a lower intensity to soften shadows without flattening the image.
In my setup, I often experiment with different heights and angles to see how shadows fall and how the lighting interacts with my background. Using a light meter or even a simple smartphone app can help in maintaining consistent exposure levels across shoots, especially when switching between different setups or locations.
Could the right lighting angles make or break your content’s professionalism?
Absolutely. Directional lighting influences not just visibility but also the mood and perceived quality of your videos. Properly angled lights can emphasize textures, create depth, and subtly guide viewers’ focus. Conversely, poorly placed lights can cause unwanted shadows or overexposure, diminishing the visual appeal. For more advanced techniques, consider experimenting with three-point lighting or even creative backlighting to add dimension and interest.
For comprehensive insights, check out PremiumBeat’s guide to video lighting, which offers expert advice on mastering angles and light placement.
Leveraging Natural Light and Combining It with Artificial Lighting
Natural light remains one of the most beautiful and cost-effective lighting sources. However, it requires careful planning and adaptability. I often shoot during the golden hour—shortly after sunrise or before sunset—when sunlight provides a warm, flattering glow. To complement natural light, I use reflectors and diffusers to control intensity and soften shadows, creating a balanced look.
Combining natural and artificial lighting demands an understanding of how they interact. For example, mixing daylight with tungsten lights can cause color temperature mismatches, resulting in undesirable color casts. Using a simple light meter or color thermometer helps in matching these sources for a seamless look. Additionally, employing gels or adjustable LED panels allows for precise control, enabling you to craft the perfect lighting environment regardless of weather or time of day.
< >
>
What Do I Overlook When Perfecting My Lighting Angles for That Polished Look?
Reflecting on my journey, I realize that one of the most underestimated aspects of professional lighting is the subtlety of angles and how they influence the final image. Early on, I was tempted to stick with straightforward setups—mainly placing my key light directly facing me. It wasn’t until I experimented with more nuanced positioning that I started noticing a real difference. Moving my light slightly higher, or angling it to the side, created depth and natural shadows that mimicked the way sunlight contours our faces. These small shifts can have a profound impact, turning a flat shot into something visually engaging and professional-looking.
In fact, industry pros often emphasize the importance of the three-point lighting setup, but the real magic lies in the details—like the precise angles and distances. According to PremiumBeat’s guide to video lighting, mastering light placement is about understanding how each angle influences mood, texture, and depth. I’ve found that a little experimentation with angles—sometimes even just tilting a light slightly—can bring out textures in skin or objects, adding richness to your visuals.
How Can I Use Advanced Lighting Techniques Like Hard vs. Soft Light to Elevate My Content?
Once I started exploring beyond basic setups, I realized the power of combining hard and soft lighting to craft mood and focus. Soft light, like from a large umbrella or softbox, provides gentle, flattering illumination—perfect for tutorials or vlogs where clarity is king. Conversely, hard light, such as direct LED panels or bare bulbs, creates stark shadows and high contrast, ideal for dramatic effects or emphasizing textures.
For example, I often use a soft light as my main source, then add a pinpoint hard light at a strategic angle to highlight specific details or create shadows that add dimension. This layered approach adds complexity and visual interest, making the content feel more professional and engaging. Industry expert B&H Photo Video discusses how understanding the interplay between different light qualities can elevate your storytelling.
Can Dynamic Lighting Changes During a Shoot Enhance the Narrative?
Absolutely. I’ve experimented with shifting lighting conditions during shoots to match different scenes or emotional beats. For instance, starting with a cool, dim light to evoke introspection, then gradually brightening and warming the scene to symbolize hope or clarity. This dynamic use of lighting requires careful planning and quick adjustments, but it can make your videos more compelling and cinematic.
Using controllable RGB LEDs or dimmable fixtures allows me to seamlessly transition between moods without breaking the flow of the shoot. The key is to think of lighting as a storytelling tool, not just a technical requirement. As I’ve learned, subtle changes in angle, color, and intensity can subtly guide viewers’ emotions and perceptions, adding depth to your content.
What Are the Hidden Challenges of Mastering Light Placement and How Do I Overcome Them?
One challenge I faced was dealing with unintentional shadows or hotspots that distracted from the subject. Achieving the perfect balance often felt like a game of trial and error. To overcome this, I began using tools like light meters and reflection cards to measure and control light spread. I also started paying more attention to background elements, ensuring that lights weren’t causing unwanted glare or shadows.
Another subtle obstacle is maintaining consistency across different shoots or locations. Small variations in angle or distance can change the entire feel. To manage this, I developed a mental checklist and used markers or tape to replicate setups. Over time, these techniques became second nature, allowing me to focus more on creativity than technical adjustments.
Have you experimented with advanced lighting angles or techniques? I’d love to hear your stories and insights—share your experiences in the comments or explore more about mastering professional lighting. Remember, the journey to perfecting your lighting setup is ongoing and deeply personal—embrace the process of discovery!

Unlocking the Nuances of Light Directionality for Textural Richness
One of the most transformative insights I gained was understanding how subtle adjustments in light angles can unveil textures and details that elevate the visual storytelling. For instance, angling a light just slightly off-center can accentuate skin textures or intricate product surfaces, creating a tactile sense that draws viewers deeper into the scene. This technique is especially vital when filming products where minute details matter, or in portraiture where skin texture adds authenticity. As industry veteran PremiumBeat emphasizes, mastering light directionality is about understanding how shadows and highlights interplay to produce depth and realism.
In my practice, I often employ a combination of low-angle side lighting with fill lights to sculpt features, avoiding flatness and ensuring that every nuance is visible. This approach requires patience and a keen eye but results in content that resonates with authenticity and professionalism.
How Can I Use Light Falloff to Create Cinematic Depth?
Light falloff, or how quickly light diminishes over distance, is a powerful yet often overlooked tool for creating cinematic depth. By controlling falloff, I can emphasize foreground elements while gently fading out background distractions, guiding the viewer’s focus seamlessly. For example, by placing a light close to my subject and reducing its intensity, I achieve a natural vignette effect that isolates the subject beautifully. Conversely, using larger, softer lights with gradual falloff helps in producing a gentle, immersive atmosphere.
This technique is crucial when working in smaller spaces where controlling ambient light is challenging. It allows for nuanced control over scene mood and focus, making the difference between amateurish and cinematic visuals. Industry insights from B&H Photo Video highlight how mastering falloff can add compelling depth and dimension to your shots.
What Are the Best Methods to Incorporate Practical Lighting Elements for Realism?
Integrating practical lights—such as lamps, candles, or even neon signs—can significantly boost realism and aesthetic appeal. I’ve found that carefully placing practicals within the frame not only adds authenticity but also provides natural motivation for the lighting, making scenes more believable. For instance, a desk lamp or a vintage Edison bulb can serve as a source that complements my artificial lights, creating a layered and compelling visual environment.
To optimize their effect, I match their color temperatures with my primary lights or intentionally contrast them for artistic impact. Using dimmers or smart bulbs gives me dynamic control during shoots, allowing real-time adjustments that enhance storytelling. This technique is especially effective in narrative content where mood and atmosphere are paramount. For deeper insights, I recommend exploring dedicated guides on practical lighting integration, such as those available on PremiumBeat.
Can Advanced Color Manipulation Elevate Your Content’s Emotional Impact?
Absolutely. Beyond basic white balance adjustments, advanced color manipulation—using gels, RGB LEDs, or post-production grading—can profoundly influence emotional perception. I often experiment with color gels to create mood-specific environments; warm tones evoke intimacy or nostalgia, while cool hues suggest detachment or futurism. RGB LED panels enable me to change colors on the fly, adding dynamic shifts that mirror narrative beats or character emotions.
Incorporating these techniques requires precision and an understanding of color theory, but the payoff is substantial. As industry experts suggest, mastering color manipulation transforms static scenes into emotionally resonant stories, heightening engagement and professionalism.
Engage with these advanced lighting concepts and share your own experiences—I’m eager to hear how you’ve pushed the boundaries of your creative lighting setups. Remember, continuous experimentation and refinement are key to achieving that polished, cinematic look that sets your content apart.
Things I Wish I Knew Earlier (or You Might Find Surprising)
Lighting Is More Than Brightness
Early in my journey, I thought brighter lights automatically meant better quality. It wasn’t until I experimented with different color temperatures and modifiers that I realized the subtlety of lighting is what truly makes a difference. Learning to control warmth and coolness transformed my videos from flat to cinematic.
Angles Are Everything
Initially, I placed my lights directly in front of me, thinking it was the simplest setup. Over time, I discovered that angling lights at 45 degrees or experimenting with side lighting added depth and texture. Small adjustments in angles created a more natural and engaging look, elevating my content significantly.
Natural Light Is a Powerful Ally
I used to rely solely on artificial lights, but now I see natural light as a creative tool. Shooting during golden hours or using reflectors to bounce sunlight can produce stunning results without breaking the bank. Combining natural and artificial lighting often yields the most authentic and pleasing visuals.
Mastering Shadows Adds Drama
Shadows are often seen as undesirable, but I learned to use them intentionally. Playing with shadow placement and falloff can add mood, focus, and a three-dimensional feel to your videos. It’s a subtle art that separates amateur content from professional-looking productions.
Consistency Is Key
One challenge I faced was maintaining consistent lighting across shoots. Using markers, tape, or presets helped me replicate setups effortlessly. Consistency ensures your audience always sees your best work, and it simplifies the creative process on busy days.
Resources I’ve Come to Trust Over Time
- B&H Photo Video: Their detailed guides and reviews have been invaluable in understanding different lighting options and techniques. I often recommend their content to fellow creators seeking reliable advice.
- PremiumBeat Blog: This site offers in-depth tutorials and expert tips on lighting and video production. It’s a go-to resource for deepening my technical knowledge.
- Film Riot YouTube Channel: Their practical demos and behind-the-scenes insights make complex lighting concepts accessible and fun. I’ve learned a lot from their hands-on approach.
- Lighting for Film and Video by Brian Pearson: A comprehensive book that covers everything from basic setups to advanced techniques. It’s a great read for anyone serious about mastering lighting.
Parting Thoughts from My Perspective
When I reflect on my journey with professional lighting, I realize that the most valuable lesson is the importance of experimentation and patience. The right lighting can dramatically elevate your content, making it more authentic and engaging. Remember, mastering light is an ongoing process—each shoot is an opportunity to learn and refine your skills. If this resonated with you, I’d love to hear your thoughts or experiences. Share it with someone who might find it helpful, and keep pushing your creative boundaries!
Reading through this post really resonated with my own journey into lighting. Like the author, I started with basic equipment and quickly saw how upgrading to higher-quality lights transformed my videos. I especially appreciate the emphasis on angles and the subtle adjustments that can add depth and professionalism. I’ve found that even slight tilts or shifts in light placement make a noticeable difference in how textures and features pop onscreen. It’s fascinating how much control we can have when understanding the nuances of light falloff and direction.
One thing I’ve struggled with is maintaining consistency across different shoots and locations. I’ve begun using tape marks and small reference points to clone my setup visually, which helps a lot. Has anyone else developed specific routines or tools for quick setup and tear-down? Also, I’m curious about recommendations for versatile lighting kits that perform well both indoors and outdoors, especially for creators who film on the go. Would love to hear more insights or shared experiences on managing these challenges. Thanks for a thorough overview—it’s inspiring to see so much potential in mastering one’s craft with thoughtful lighting techniques.
This post really hits home for me, especially the part about how subtle angles can make such a difference. I’ve found that once you understand how small tweaks in light placement can add depth and texture, it completely elevates your content. I also appreciate the emphasis on using tools like light meters—even a smartphone app can help achieve consistent results, which is crucial when trying to match shots across different days or locations.
What has been your experience with battery-powered or portable lighting solutions? I film outdoors quite often, and I’ve struggled with keeping consistent lighting without access to power outlets. Do you have any recommendations for versatile, high-quality kits that work well on the go, perhaps with good battery life and adjustable settings? It’s inspiring to see fellow creators share these insights—thanks for the detailed guide! I believe mastering lighting truly is an ongoing journey, and it’s exciting to keep experimenting with new techniques.