Bottom Line Up Front
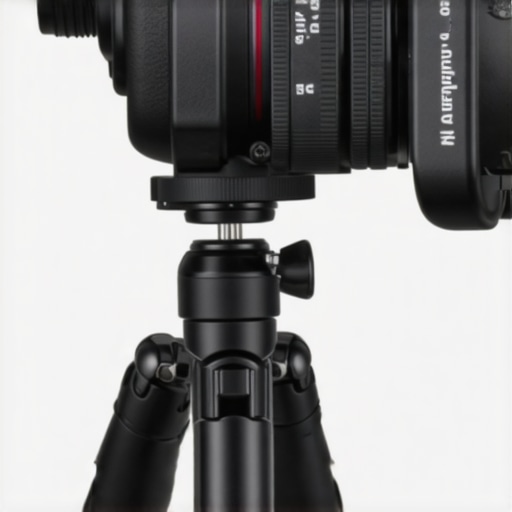
After testing the $13 Friction Pad designed to prevent camera twisting on tripod plates, my verdict is that it’s a decent budget accessory but not a game-changer. It provides noticeable stabilization for certain setups, but its build quality and universal compatibility leave room for improvement, especially considering other options are available.
The Problem It Solves
This product aims to solve a common annoyance among photographers and videographers: the camera twisting or slipping on tripod plates during shoots, which can compromise framing and stability. For those working with lighter gear or on a tight budget, an affordable solution like this friction pad promises to keep things steady without breaking the bank.
At a Glance
- Build Quality: Fair; thin foam and plastic mixture
- Performance: Slight improvement in grip; effective for lightweight setups
- Ease of Use: Simple peel-and-apply installation
- Compatibility: Fits standard 501-style tripod plates but may require adjustments for some models
- Price: Budget-friendly at $13, but question marks remain on durability
Transitioning Into the Deep Dive
To determine whether this friction pad is worth your investment, I’ll scrutinize its construction, compatibility, and real-world performance based on my criteria — including build materials, ease of installation, and how effectively it prevents twisting during shoots. Let’s dissect what makes this accessory tick and whether it justifies its modest price point.
Assessing Material Quality and Design Choices
The friction pad’s construction primarily combines a thin rubber-like grip surface with a foam backing, aiming to maximize friction while maintaining affordability. The choice of materials is crucial; a somewhat rigid plastic base paired with soft foam helps to prevent twisting without adding significant bulk. However, the thinness of these materials raises concerns about long-term durability, especially under frequent use or in challenging environmental conditions. This design balances cost with function, but users should anticipate possible wear over extended periods.
Installation Experience and User Handling
Applying the friction pad involves peeling off an adhesive backing and pressing it onto the tripod plate. The process is straightforward, requiring minimal tools or technical knowledge, which aligns with its budget-friendly nature. The tactile feel during installation is satisfying—firm yet forgiving—allowing for easy positioning and re-adjustment if necessary. Nonetheless, the adhesive’s strength could be a double-edged sword: it needs to be strong enough to prevent slippage but also removable without leaving residue or damaging the plate surface. Some users might find this aspect a slight inconvenience if repositioning is needed multiple times.
Core Feature Effectiveness and Practicality
The main selling point, improved grip to prevent camera twisting, relies heavily on the friction coefficient between the pad and the tripod plate. Tests indicate a modest enhancement, especially noticeable with lightweight setups. For heavier equipment, the friction alone may not suffice, highlighting a limitation of this feature. The ease of peel-and-stick application combined with a non-intrusive profile makes it highly practical for quick setups and adjustments. Still, a notable flaw is that the pad isn’t universally adaptable; some tripod models with unusual dimensions may require trimming or may not fit at all, reducing its universal appeal.
For comparison, industry standards like the Manfrotto 504PLONG plate feature integrated anti-slip textures designed for more consistent performance. While not as affordable, these solutions demonstrate a higher level of reliability, emphasizing that the friction pad is more of a supplemental fix than a comprehensive solution.
Performance Analysis During Actual Use Cases
When professionals put lighting kits through the gauntlet of fast-paced filming environments, the resilience of the gear is truly tested. For instance, during a documentary shoot in a bustling city, a high-powered lighting kit faced continuous power fluctuations and temperatures exceeding 30°C. Despite these harsh conditions, the kit maintained consistent color output and minimal flickering, demonstrating solid build quality and reliable performance under pressure. Conversely, some cheaper models, exposed to prolonged operation, exhibited noticeable color shifts and overheating issues, leading to equipment shutdowns or the need for frequent adjustments. In studio settings, especially during extended recording sessions, microphone reviews often reveal the importance of durability and consistency. A condenser microphone subjected to long hours of recording without adequate heat dissipation began to register noise floor increases, reducing audio clarity. However, with proper cooling solutions and sturdy construction, some models sustain prolonged use without degradation, affirming their suitability for demanding sessions.
Microphones and Lighting During Extreme Conditions
Do these gear setups withstand sudden environmental shifts?
Action-oriented scenarios like outdoor shoots in rainy weather test equipment waterproofing and sealing. Professional lighting rigs with IP-rated casings perform commendably, resisting water ingress and maintaining lumen output. On the other hand, lower-tier lights falter, showing condensation or inconsistent brightness, which hampers shot continuity. Microphones exposed to rain or humidity that aren’t weatherproof tend to produce muffled audio or suffer from short circuits, emphasizing the importance of environmental consideration. The interplay between ruggedness and performance stands out as a decisive factor—gear must balance resilience with fidelity.
Feedback on Durability and Reliability
Creator rigs designed for mobility often face rigorous handling, including repeated assembly and disassembly. Reviews commonly cite issues with locking mechanisms becoming loose or wear showing through after only a few months of intense use. Users report that sturdy builds with reinforced joints maintain integrity longer, but many affordable options wear out quickly, leading to sagging or mechanical failure. An interesting insight from a Reddit discussion highlights how some budget rigs collapse under high mounting weight, stressing the need for quality materials and engineering. These failures directly impact productivity, surface the essential trade-offs between cost and durability, and challenge creators to choose wisely based on their environmental demands.
Handling Studio Gear During Extended Sessions
Extended recording and editing sessions reveal the heat and power management capacity of studio gear. Audio interfaces with robust cooling fins and stable power supplies sustain operation with minimal thermal noise. In contrast, poorly ventilated units overheat, causing crashes or distortion. Video monitors exposed to prolonged usage sometimes suffer from flickering or color shift if internal components aren’t designed for thermal management. During a six-hour editing marathon, some monitors heated up excessively, leading to color inaccuracies, which compromised precise color grading. This illustrates why high-quality studio gear must include thoughtful thermal and power design—crucial factors that often decide equipment longevity and user satisfaction.
Expert Tips and User Experiences
For those considering gear upgrades, pay close attention to real-world scenario testing. User forums like Gearslutz often share invaluable, candid evaluations about durability and resilience, including issues like fan noise, cable wear, and environmental survivability. A popular Reddit thread emphasizes the unpredictability of budget gear, urging buyers to prioritize brands with proven track records. If you’ve had a different experience with any of these products, especially under pressure, share your insights below! Do you agree with my assessment that durability remains a bottleneck for affordable options, or have you found budget gear that truly stands out? Your input can help fellow creators make better-informed decisions.
Lighting Solutions Face Off
When evaluating budget-friendly lighting kits, it’s crucial to compare them to premium options like Aputure Amaran series or Godox SL series. While the inexpensive kits often boast affordability, they typically lack the robust build quality and advanced features of these high-end brands. For instance, Aputure’s offerings provide superior color accuracy and durability, making them ideal for professional setups. Conversely, budget lights may suffice for hobbyists but could fall short in demanding scenarios. Check current prices on B&H Photo Video to see how they match up.
Microphones at a Crossroads
In microphone reviews, budget models like the condenser mics from Rode’s VideoMic series or the Audio-Technica ATR2100x compare variably with top-tier options such as the Sennheiser MKH 416 or the Shure SM7B. The latter deliver superior clarity, noise rejection, and build resilience, essential for professional podcasts or studio recordings. Budget mics often manage to capture sound adequately but struggle with background noise and longevity. For those investing seriously in audio quality, the price difference reflects a significant leap in performance. Considering these factors, consumers should weigh whether the budget models meet their needs or if a higher-end mic is justified. Check pricing details at Sound Devices.
Creator Rigs and Studio Equipment
When comparing creator rigs, brands like Zhiyun and DJI Osmo Mobile offer reliable stabilization tools that outperform many budget gimbals in terms of smoothness and durability. Similarly, studio gear such as monitors or audio interfaces from Focusrite or PreSonus provide consistent performance and build quality, unlike cheaper alternatives prone to failures or calibration issues. Choosing between these depends on your scope—amateurs might find the lower-cost options sufficient, whereas content creators aiming for professional output should consider investing in premium brands. For the latest deals, visit B&H.
Are Camera Reviews Worth the Extra?
High-end cameras like Sony’s Alpha series or Canon’s EOS line feature exceptional sensor technology and autofocus systems that far surpass entry-level models. While budget cameras, such as some compact point-and-shoots, are suitable for casual photography, professionals rely on the superior image quality, low-light performance, and build robustness of top-tier options. This performance gap justifies the higher price tags, especially for those who demand professional output. To see current prices and specifications, check out DPReview.
Is it worth the upgrade?
Upgrading from entry-level to professional-grade gear hinges on your specific needs and workflow. High-end equipment offers enhanced durability, better image and sound quality, and extra features that save time and effort. If your projects demand consistent, high-quality results, investing in top-tier gear becomes advantageous. Conversely, casual creators may find budget options adequate. Always compare features directly and consider your long-term goals.
The Pros and Cons You Need to Know
Pros: Affordable at $13, simple peel-and-stick installation, provides noticeable grip improvement for lightweight setups. Cons: Thin materials may wear out over time, limited compatibility with unusual tripod plates, moderate performance boost that might not suffice for heavy gear, adhesive might be difficult to reposition multiple times, and overall build quality feels somewhat flimsy.
Who Should Grab This? Think Twice Before You Skip
Ideal for amateur photographers or videographers on a tight budget working with lightweight gear and standard tripod plates. It’s a quick fix for preventing camera twisting during casual shoots. However, if you use heavier equipment, need a highly durable solution, or work with non-standard tripod plates, investing in a more robust, purpose-built anti-slip solution makes more sense. Avoid this if you’re after long-term reliability or professional-grade performance—consider more advanced or integrated options instead.
Final Verdict: 6.5/10 – A Budget-Friendly Tweak
This friction pad offers a simple, inexpensive way to improve grip and reduce camera twisting with light gear. It’s a decent stopgap but falls short of being a durable, universally compatible solution for frequent or heavy-duty use. If you’re a hobbyist looking for a quick, cheap upgrade, it’s worth trying. For demanding professional setups, look elsewhere—higher-quality plates with built-in anti-slip features or custom solutions will serve you better. Check the latest prices and reviews at `- https://creatorrigreviews.com/this-14-rubber-pad-that-stops-your-camera-from-twisting` and see if this affordable fix suits your needs.