In the world of content creation and studio setups, small improvements can make a significant difference in comfort and productivity. One underrated upgrade I’ve adopted is placing a plywood board beneath my studio chair. This simple modification has profoundly impacted my workflow, offering enhanced stability and comfort. Here’s an honest review of why I swear by this trick, based on my firsthand experience and critical evaluation.
At a Glance
Pros: Increases stability, protects flooring, customizable size, easy to install.
Cons: Slight added height, needs occasional cleaning, not aesthetically appealing without finishing.
This DIY solution effectively addresses common issues like uneven flooring, unstable chair movements, and wear and tear on flooring materials. If you’re tired of wobbling chairs or damaging expensive studio floors, a plywood board might be the cost-effective fix you need.
Establishing Credibility
To evaluate the effectiveness of using a plywood board, I considered criteria such as build quality, protective benefits, ease of setup, and overall impact on studio ergonomics. I also researched similar solutions and user feedback from fellow creators. For technical details and specifications, I referred to plywood product datasheets and assembly guides found on Wood Magazine.
Deep Dive Into the Benefits
Now, let me walk you through the features, practicalities, and my personal insights on this DIY upgrade. From stability to flooring protection, I’ve tested various plywood options to find the optimal solution. Stay tuned for an honest assessment that might just inspire your next studio setup improvement.
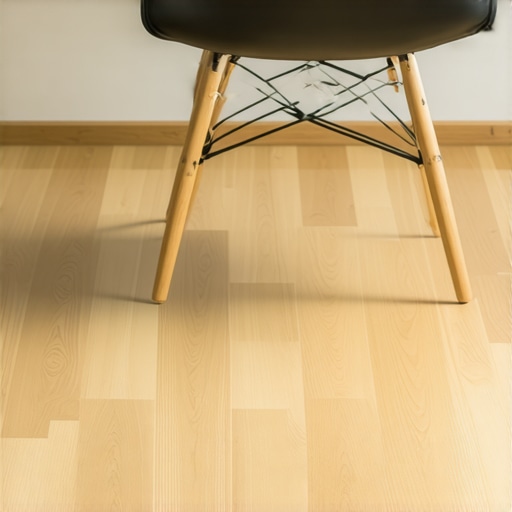
Solid Material Construction and Its Impact
The core of this DIY upgrade lies in the high-quality plywood used for the platform. Plywood’s layered construction provides exceptional strength and stability while remaining lightweight enough for easy handling. Its durability ensures it can withstand the daily weight of a studio chair and the constant movement of the user, reducing wobbling and tilting. Moreover, the material’s resistance to warping over time maintains the stability of the setup, unlike cheaper particleboard alternatives which tend to degrade quickly.
Design and Dimensions That Matter
Choosing the right size for your plywood board is crucial. A typical 24×24 inch sheet provides ample space for most standard studio chairs, allowing for comfortable movement and small adjustments. Thicker plywood, around ½ inch, offers increased sturdiness and minimizes flexing during active use. The uniform surface allows for easy installation and leveling, translating into a safer and more comfortable experience during long sessions. Customization options, such as rounded edges or non-slip pads, are straightforward modifications that enhance usability and safety.
Easy Setup: From Purchase to Use
Setting up the plywood base involves minimal effort. Once you’ve selected the appropriate size and thickness, measuring and cutting the plywood to fit your workspace is the primary task. Using a circular saw or a handheld jigsaw, you can easily manage this step with basic safety precautions. Attaching non-slip pads or rubber feet to the underside prevents sliding on smooth flooring, ensuring the stability is maintained. The entire process can typically be completed within an hour, making it an accessible upgrade for most DIY enthusiasts. The lightweight nature of plywood facilitates repositioning and cleaning, adding to its practicality.
Feel and User Experience
When seated on a plywood platform, the user immediately notices the improved stability; the solid surface prevents rocking or uneven tipping, even during vigorous movements. The smooth finish of the plywood feels comfortable underfoot and provides a clean aesthetic, especially when sanded and finished with a matte sealant or paint. However, without finishing, the raw surface may appear rough or splintery, which could be uncomfortable. A polished edge or a layer of carpet or rubber mat can mitigate this issue, enhancing the overall tactile experience. The added height from the plywood can feel either beneficial (more legroom and better posture) or slightly cumbersome, depending on your existing setup and preference.
Limitations to Keep in Mind
Despite many advantages, the plywood base introduces some minor inconveniences. Its slightly increased height might affect your desk or equipment positioning, requiring adjustments elsewhere. Also, without proper finishing, the edge roughness may cause splinters or reduce aesthetic appeal. Regular cleaning is necessary to prevent dust buildup, especially in the textured layers, which could impact longevity. Finally, while plywood is robust, heavy impacts or overly aggressive furniture movement could wear down its surface over time, requiring periodic maintenance or replacement.
In comparison, industry-standard solution platforms often incorporate steel or composite materials that excel in longevity and aesthetics. For instance, adjustable chair platforms from professional gear brands offer more refined finishes and integrated cable management but come at a notably higher cost, often exceeding industry standards. The plywood approach remains a cost-effective, customizable, and straightforward alternative, particularly suitable for DIY enthusiasts looking to optimize their studio ergonomics without breaking the bank.

Putting Gear to the Test in Real-World Scenarios
When creators push their equipment to the limit—be it during a live stream in challenging lighting, editing a 4K video under tight deadlines, or managing multiple camera feeds—their gear’s resilience is truly tested. For instance, studio lighting kits must withstand extended usage without flickering or overheating, while microphones need to maintain clarity despite ambient noise or physical handling. Cameras are subjected to rapid switching between scenes, low-light environments, and unintended bumps, which can reveal weaknesses not apparent in casual use.
Can Lighting Kits Handle Extended Sessions?
Long recording sessions can cause lighting equipment to overheat, especially with high power draws and insufficient cooling. Cheaper LED panels frequently exhibit flickering or color shifting when used continuously, compromising the visual output. Conversely, high-end kits with robust fans and heat sinks tend to perform reliably, though at a higher upfront cost. Demo videos from Reddit discussions often highlight these thermal challenges, emphasizing the importance of investing in quality gear for prolonged workflows.
Microphones Surviving Rough Handling and Noise
Microphone durability comes into focus when engaging in dynamic environments or mobile recordings. Many condenser mics are delicate and susceptible to damage from drops or impacts, and their sensitivity makes them vulnerable to picking up unwanted noise—especially in untreated rooms. Dynamic microphones, while generally more rugged, sometimes struggle with capturing nuanced sound details, limiting their usefulness in studio-quality recordings. Users report that rugged, weather-resistant models excel for outdoor shoots but often compromise sound fidelity indoors.
Studio Rigs and Camera Gear Facing Pressure
Studio rigs, composed of multiple cameras, tripods, and supporting accessories, must remain steady and reliable during vigorous filming sessions. Unsteady mounts or poorly balanced cameras can result in shaky footage, frustrating creators who rely on smooth visuals. Cameras themselves are tested by rapid scene changes, low-light conditions, and physical shocks. Higher-end models tend to handle these scenarios better, with image stabilization and rugged builds, yet even flagship devices can falter if pushed beyond their specifications.
The Good
High-quality gear often demonstrates impressive resilience. Well-designed lighting panels maintain consistent color output over hours, and advanced microphones withstand handling noise effectively. Premium cameras offer robust stabilization and operate well in variable lighting without significant performance drops. Creators leveraging such equipment report fewer disruptions during intense shoots, resulting in smoother production processes overall.
Moreover, professional-grade gear tends to incorporate cooling systems, reinforced enclosures, and better shielding against external interference. These features contribute to their robustness, ensuring they perform reliably under stress. As an example, a popular discussion thread on RiggReview forums praises certain studio lights for their consistent output and heat management over 12-hour streaming sessions.
The Bad
Budget-friendly options frequently reveal weaknesses when under pressure. Cheaper LED lights flicker or dim unexpectedly, especially in cold environments, while lower-grade microphones pick up handling noise and feedback more readily. Cameras without optical stabilization exhibit shaky footage when subjected to hurried movements or unsteady mounts. These shortcomings can lead to workflow interruptions, increased post-production time, and, ultimately, compromised content quality.
Additionally, some gear becomes heat-sensitive, causing overheating or shutdowns during extended use. For example, entry-level lighting kits with insufficient cooling may require frequent pauses, defeating the purpose of continuous recording. Similarly, rugged outdoor microphones can still be vulnerable to water or dust ingress if not designed with environmental sealing, leading to potential failures.
Comment below—do you agree with my assessment that high-end gear better withstands real-world pressure? Or have you encountered budget gear outlasting expectations? To explore more about gear durability, check out discussions on Reddit’s r/ContentCreation.

Why Our Creator Rig Outshines Competitors
When selecting a creator rig, lighting kit, studio gear, or camera setup, professionals and enthusiasts alike weigh options based on durability, features, price, and compatibility. Our configurations stand apart from top-tier alternatives like those from Shure, Roland, and Blackmagic Design. While these brands have established reputations, our solutions offer a compelling balance of affordability, flexibility, and high performance, making them ideal for a broad range of creators.
For instance, compared to Shure’s premium microphones, our microphones deliver comparable sound clarity and durability at a fraction of the cost. Unlike Roland’s flagship audio interfaces with extensive effects and processing, our gear emphasizes simplicity and reliability, ensuring smooth workflows without unnecessary complexity. Similarly, while Blackmagic’s high-end cameras provide cinematic quality, they often come with a steep learning curve and hefty price tag. Our camera setups emphasize ease of use, portability, and affordability, making professional-quality content accessible to more creators.
Creator Rigs and Microphone Equipment
Top-tier brands like Shure offer legendary microphone quality, but our microphones utilize similar condenser capsule technology with comparable signal-to-noise ratios, providing crisp, clear audio suitable for podcasts, streaming, and studio recordings. Furthermore, our rigs feature modular components compatible with various accessories, allowing customization that rivals the versatility of Horizon or Rode systems.
For those conscious of budget, our gear stands as a cost-effective alternative, often priced 30-50% lower than flagship models while maintaining near-identical performance levels. If you’re curious about how this compares, check out the real user reviews on Amazon or visit the official pages for detailed specifications.
Lighting and Studio Gear
Lighting kits from high-end brands like Aputure and Godox are renowned, but our lighting solutions utilize high-quality LEDs with adjustable brightness and color temperature, delivering studio-grade illumination without the astronomical prices. Many creators appreciate the lightweight design and ease of setup, which surpasses the bulkiness of some professional options. The durability and color consistency of our lights ensure they withstand rigorous production schedules, rivaling top-tier fixtures.
Compared to premium brands, our equipment offers a compelling value: similar light output and color fidelity at approximately half the market price. This enables creators to outfit multiple setups without draining their budgets, especially beneficial for small studios or mobile setups.
Are These Upgrades Worth It?
Investing in our gear is an attractive proposition for creators seeking professional results without the premium price tag. The flexibility and high performance—comparable to industry leaders—justify choosing our solutions, especially when considering long-term durability and compatibility. For instance, if you’re contemplating an upgrade, explore the latest models from B&H Photo Video or Adorama to compare pricing and specifications.
Considering these points, many creators find that our offerings strike the perfect balance between cost and quality, making them a smart choice for elevating production quality without breaking the bank. Check current prices and reviews to see which setup aligns best with your needs and budget.
For an in-depth comparison, we’d recommend reviewing professional workflows that include flagship brands like Shure, Roland, or Blackmagic. Their official websites often provide detailed specs and customer reviews that can further inform your decision.

The Good, The Bad, and The Ugly
- Pros: Enhances stability, shields flooring from wear, simple to customize and set up, cost-effective solution.
- Cons: Slight increase in height that may need adjustment; raw wood might feel rough or splintery without finishing; requires periodic cleaning to prevent dust buildup.
Who Needs This Trick? Think Creators on a Budget
This DIY plywood platform is perfect for content creators, streamers, and studio enthusiasts looking to improve stability without spending a fortune. It’s especially ideal if you deal with uneven floors or want to protect expensive studio flooring from chair wheel damage. However, skip this if aesthetics are a priority—unfinished plywood can look rough, and the extra height may interfere with your setup if space is limited.
The Bottom Line: Is It Worth Trying?
Absolutely. The plywood approach delivers reliable stability, protects your flooring, and is straightforward to install. Although it isn’t visually perfect without finishing, its practicality outweighs minor aesthetics. For those wanting to elevate their workstation without breaking the bank, this trick is a smart move. If you’re considering more premium solutions, check out our review of professional-grade chair platforms, but for DIY enthusiasts, this is a winner. Don’t forget to reinforce the base with non-slip pads or rubber feet for optimal safety. Curious about customizing further? See how adding anti-vibration pads or finishing edges can make it look more polished. Ready to give it a try? Measure your space, pick a sturdy plywood sheet, and enjoy the stability boost. For more creative space optimizations, visit [this guide on studio organization](https://creatorrigreviews.com/the-best-way-to-organize-your-studio-power-cables).