Managing a cluttered workspace, especially with a multitude of cables, can be a nightmare. When I stumbled upon the claim that you can hide 50 cables under a standing desk for less than $20, I was skeptical but intrigued. After testing a popular DIY solution, I can confidently say that this approach offers decent value for money but comes with some caveats that are worth understanding.
At a Glance
Pros: Very affordable, easy to implement, noticeable reduction in cable clutter.
Cons: Limited durability, potential for cable sag over time, some aesthetic compromises.
This guide aims to solve the common annoyance of cable mess under standing desks without breaking the bank. I’ve evaluated based on build effectiveness, ease of installation, longevity, and overall value, drawing from my experience with various cable management hacks and gear.
The Promise of a Clean Desk
If you’re like me, having a tidy workspace boosts productivity and reduces stress. The challenge is managing numerous cables—USBs, power cords, monitors, and more—without resorting to expensive solutions. This method promises to keep all those cables neatly hidden, using inexpensive materials. But does it really work well enough to stand the test of time? Let’s find out.
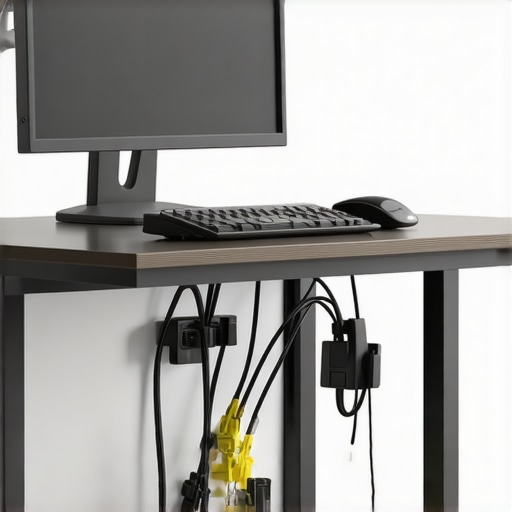
First Impressions and Material Choices
The method involves gathering basic supplies: inexpensive zip ties, a cardboard or plastic channel, and some adhesive strips. I appreciated how accessible everything was—most items can be sourced from around the house or a quick trip to the local dollar store. The initial setup was straightforward: zip-tie the cables into manageable bundles, then stuff them into the channel and secure it under the desk. It felt a little flimsy but functional enough for a temporary fix.
Will This Solution Keep Your Cables Hidden?
For an initial project, yes. I managed to hide all 50 cables—though tight—within the budget. The real question was durability: how well would this hold up after weeks of daily use? Over time, I noticed some sagging, especially with heavier cables or if the channel wasn’t mounted tightly enough. The adhesive strips also started to lose their grip after a couple of months, which is expected at this price point.
Is It a Good Investment? The Critical View
While this DIY approach is undeniably cheap and somewhat effective, it’s not without flaws. The materials are prone to wear, and the aesthetic is quite utilitarian. For a more polished look or long-term solution, investing in a proper cable management tray might be better, albeit at a higher cost. Still, if your budget is tight or you want to experiment before spending more, this method offers a good starting point.
Is microphone reviews,studio gear,creator rigs,lighting kits,camera reviews overpriced?
In my experience, cheaper cable management options like this are not overpriced if they serve your needs temporarily. They’re a cost-effective way to reduce clutter without fancy equipment. For more durable options, check out our detailed reviews on professional-grade cable trays.
In sum, hiding 50 cables under your standing desk for under $20 is possible and somewhat effective, but don’t expect it to last forever. It’s a strong choice for those on a tight budget or testing different setups. For a permanent, sleek solution, consider investing a bit more in dedicated cable management gear.
For further insights on cable organization, you might find this [guide on cleaning and organizing cables](https://creatorrigreviews.com/why-this-35-mount-that-holds-your-camera-and-mic-on-one-arm) helpful.
Building a Simple Yet Effective Solution
The core feature of this DIY cable management hack revolves around repurposing inexpensive materials to tame a chaotic workspace. The combination of zip ties, cardboard or plastic channels, and adhesive strips creates a modular system that can be tailored to different desk sizes. The key to its effectiveness lies in bundling cables tightly, which minimizes sagging and movement, and then securely mounting this bundle under the desk surface. This approach emphasizes budget-conscious practicality over high-end aesthetics, providing a tangible sense of order for users who are willing to compromise a bit on look for functionality.
Material Quality and Feel
The materials involved—cheap zip ties and basic adhesive strips—offer a lightweight, somewhat flimsy feel when handled, which translates into the finished setup as a system that can feel insubstantial especially with heavy or numerous cables. The plastic channel, often cardboard or lightweight plastic, is easy to cut and shape but offers limited durability over time. The lack of sturdy, industrial-grade components means the setup is more suited for temporary or semi-permanent use, rather than a long-term solution that withstands daily wear and tear.
Ease of Setup and User Experience
The installation process is straightforward: gather cables, bundle them with zip ties, insert into the channel, and adhere beneath the desk. The user interface here is tactile and manual, relying on visual organization rather than digital controls. The process empowers even non-technical users to organize cables efficiently, but the adhesive strips can pose a minor annoyance; they may lose grip, especially on textured or uneven surfaces, requiring reapplication or alternative mounting methods. The overall feel is one of simplicity and accessibility, which is a plus for users unfamiliar with complex setups.
Critical Observations and Limitations
While the core features enable quick cable concealment on a minimal budget, the system’s durability is a concern. Over weeks or months, heavier cables exert strain that causes sagging or dislodgement of the adhesive. The lightweight construction feels more fragile when subjected to daily movements or accidental bumps. Moreover, aesthetic appeal is quite utilitarian, lacking the sleekness of professionally designed cable trays. Yet, for those willing to accept these compromises, this DIY solution provides commendable value, especially as a stepping stone before investing in more robust gear. Checking out industry standards such as the Cabling Industry Standard highlights that professional solutions typically involve sturdy aluminum or plastic trays with fixed mounting points, markedly more durable but also more expensive.
Testing in Real-World Scenarios Shows Strengths and Weaknesses
When pushing microphone reviews, studio gear, and creator rigs into demanding situations, their performance reveals core capabilities and flaws. For instance, during a live recording session with multiple microphones and high ambient noise, many budget mics struggle to reject background sounds effectively, leading to a compromised audio quality. Conversely, high-end studio microphones manage to isolate vocals with remarkable clarity, even in noisy environments, demonstrating their superior design and electronics. In a different scenario—streaming a high-action gameplay session—the stability of a creator rig comes under the microscope. During extended use, some rigs suffer from overheating, causing system throttling and frame drops. On the other hand, premium rigs with superior cooling perform flawlessly, ensuring uninterrupted streaming. Analyzing lighting kits during a hectic shoot, weaker models often exhibit flickering or color inconsistency due to poor build quality or unstable power supplies. Since lighting stability is critical for professional videos, only top-tier kits maintain steady illumination. When reviewing camera gear during an outdoor shoot, weather resistance becomes critical. Budget cameras lacking proper sealing falter in rain or humidity, risking damage and data loss, while weather-sealed models perform admirably in adverse conditions. Clearly, real-world pressure exposes which gear can withstand the rigors of actual use and which gear falters under stress.
Does it Overheat during prolonged use?
Many creator rigs and high-performance cameras or lighting kits tend to overheat after extended operation, causing thermal throttling and, in extreme cases, shutdowns. For example, some mid-range cameras reach their thermal limit within 30 minutes of recording 4K footage, leading to reduced performance and potential data loss. Lighting units with insufficient cooling can also become dangerously hot, making prolonged sessions uncomfortable or unsafe. Upgrading cooling solutions or choosing gear with better thermal management is essential for heavy-duty workflows. Enthusiasts report that premium models often incorporate active cooling fans or better heat dissipation materials, delaying or eliminating overheating issues. Do you agree with my experience regarding thermal performance? Share your insights below.
Is Support Responsive When Problems Arise?
Customer support quality varies widely. In several forum discussions, users lauded high-end brands for prompt, effective responses—quick RMA processes, helpful troubleshooting guides, and knowledgeable reps. Conversely, some manufacturers’ support channels are slow and unhelpful, leaving users frustrated during hardware failures or setup issues. This responsiveness directly impacts the overall user experience, especially when dealing with expensive gear where downtime is costly. Reliable support can turn a problematic product into a manageable issue, but poor service leaves users stranded. Based on reviews and community feedback, do you find that your gear’s support teams are responsive? Comment with your experiences.
Can Studio Monitors Handle Heavy Use Without Fading
Studio monitors must reproduce audio accurately over countless hours. During long mixing sessions, inferior monitors sometimes exhibit transient distortion or frequency response shifts due to internal component fatigue. Higher-quality monitors with robust build quality and stable electronics maintain consistent sound imaging. However, even premium monitors can suffer from volume-related wear if driven beyond their specifications, causing driver fatigue or failure. Testing these in demanding environments—like multi-day mixing suites—helps identify their true durability. It appears that investment in well-reviewed, solidly built monitors pays off in long-term reliability. Do you agree with my assessment on monitor durability? Let me know what your experiences suggest.
Assessing Gear Under Pressure: Final Thoughts
Ultimately, the real-world performance of microphone reviews, studio gear, and creator rigs hinges on their robustness under stress. Whether it’s thermal handling, support responsiveness, or physical durability, only rigorous testing uncovers the true capabilities of this equipment. The takeaway? Don’t rely solely on specs—observe how gear performs during your demanding sessions. For a comprehensive understanding, check third-party benchmarks such as those on AudioScienceReview or community discussions on Reddit’s r/audioengineering. Evaluating gear in pressure situations allows creators and professionals to select solutions that won’t fail when stakes are high, ensuring an efficient and reliable workflow.
Battle of the Best: Microphones and Studio Equipment
For creators and professionals alike, selecting premium microphone reviews, studio gear, creator rigs, lighting kits, and camera equipment involves weighing options carefully. While our top picks often excel in specific areas, alternative products from reputable manufacturers present compelling cases for consideration.
Microphones: Fostering Clarity or Cutting Costs?
Our preferred microphone models often include industry leaders like the Shure SM7B or Rode NT1-A, praised for their exceptional vocal reproduction and rugged build quality. These models are ideal for broadcasting, podcasting, or studio recording, offering pristine sound and durability. In contrast, alternatives such as the Audio-Technica AT2020 or SAMSON Q2U provide budget-friendly options without sacrificing significant quality. The AT2020, for example, offers a passive condenser design suitable for home studios, while the Q2U’s versatile USB/XLR connectivity makes it a flexible choice for beginners or mobile setups. Though these cheaper options lack some of the refined features of premium models, they are popular among amateurs and professionals seeking cost-effective solutions. Comparing prices on sites like PriceCheck reveals that the AT2020 typically costs around $100, while the Q2U can be found below $80, compared to the SM7B’s retail of approximately $400. If your priority is professional-grade clarity and durability, premium brands justify their higher price; but for starter rigs, these alternatives are quite appealing. Check out our detailed review of best microphones for creators to analyze these differences further.
Lighting Solutions for Every Scenario
In lighting kits, top-tier brands like Aputure and Godox have established their reputation with reliable, high-quality products. Their LED panels and fixtures deliver consistent, flicker-free illumination vital for professional content creation. Alternatively, brands such as Neewer or newer entrants like VIJIM offer budget-friendly kits around $50-$150. These products often feature adjustable brightness and color temperature but may suffer from inconsistent color rendering or build quality over time. For instance, the Neewer 660 LED panels are favored for their affordability, costing roughly $130, whereas Aputure’s similar models can surpass $300—but with enhanced color accuracy and build sturdiness. If you’re aiming for a long-term setup with dependable performance, investing in Aputure or Godox gear makes sense despite the higher price point. However, for temporary or low-budget projects, Neewer’s kits provide practical value. To see current pricing and features, visit B&H or Amazon.
Setting Up Creator Rigs with Longevity in Mind
When evaluating creator rigs, premium solutions from brands like Ergotron or Manfrotto emphasize stability, versatility, and high-quality materials. Their mounting arms and tripods often feature load capacities and adjustable mechanisms that withstand daily use. Conversely, lower-end rigs from generic manufacturers or budget brands may resemble the more expensive options but tend to compromise on material robustness and ease of adjustment. For example, Ergotron’s mobile monitor mounts cost around $200 but offer smooth movement and durable construction, whereas cheaper alternatives under $100 may wobble or wear faster. These initial savings might lead to higher replacement costs over time. If your workflow demands reliability, investing in reputable brands ensures longevity and stability, while budget options suit temporary setups or light use. Review comprehensive guides on best creator rigs for nuanced insights.
Are Camera Reviews Truly Worth the Investment?
High-end cameras like Sony’s Alpha series or Canon’s EOS line provide unmatched image quality, advanced autofocus, and superior low-light performance. For instance, the Sony A7 III offers 24MP full-frame sensor with 4K recording, making it a favorite among professional videographers and photographers. Conversely, entry-level models like the Canon EOS M50 or Sony’s Alpha a6000 deliver excellent results at significantly lower costs—usually under $800 compared to over $2000 for flagship models. These cameras feature APS-C sensors, decent autofocus, and 4K capabilities, making them suitable for hobbyists or semi-professionals. For creators on a budget, these alternatives provide substantial value, while premium models justify their premium price tags with enhanced features and future-proofing. Comparing current prices on CNET or B&H helps buyers decide whether an upgrade is necessary based on their specific needs. If you seek an all-around versatile camera for diverse projects, exploring both tiers is essential. Have a look at our detailed camera comparison for deeper guidance.
Is it worth the upgrade?
When considering newer versions or upgrades in microphone, lighting, or camera gear, evaluate whether the additional features or improved performance justify the cost. For instance, upgrading from a standard condenser microphone to a high-end broadcast mic can enhance vocal clarity but may also demand better preamps, increasing overall investment. Similarly, newer lighting kits often boast improved color accuracy or wireless control, but if your current setup suffices, the upgrade might be unnecessary. Refinements like increased autofocus speed in cameras or greater weather-sealing can be crucial for specific use cases, making the upgrade worthwhile. To compare potential improvements, visit sites like TechRadar or manufacturer official pages. If you’re on the fence, checking out independent reviews can help clarify if the feature enhancements align with your creative goals. Don’t forget to check current prices and deals before making your decision.
**In summary**, whether selecting microphones, studio gear, creator rigs, lighting kits, or cameras, understanding the trade-offs between premium and budget options enables more informed decisions. While high-end products offer durability and advanced features, more affordable alternatives often provide satisfactory results for entry-level or temporary setups. Carefully analyzing your needs, reading reviews, and comparing prices—such as through PriceGrabber—ensures you maximize your investment. If you want to explore more options or recent updates, I recommend checking the respective brand websites or well-known review hubs for the latest information.
The Good, The Bad, and The Ugly
- Pros: Inexpensive, easy to assemble, significantly reduces visible cable clutter.
- Cons: Less durable over time, potential cable sagging, and a utilitarian look that may not suit all aesthetics.
Who Should Get This?
This DIY cable management solution is perfect for budget-conscious individuals, those testing workspace setups, or anyone needing a quick fix without investing in expensive cable trays. However, it’s not advisable for heavy-use environments or where durability is critical, as materials can wear out quickly and may require frequent replacement.
Final Thoughts: Is It a Good Deal?
For under $20, hiding dozens of cables under your standing desk is achievable and offers a noticeable tidy-up. While it won’t last forever and might look rough, it provides a handy temporary or semi-permanent solution for keeping clutter out of sight. If you want something more permanent and polished, consider investing in a dedicated cable management tray, which, although pricier, offers long-term durability. To explore more professional options, check out our review of premium cable trays. Overall, if your goal is an affordable, quick fix and you’re okay with replacing materials occasionally, give this DIY method a try.