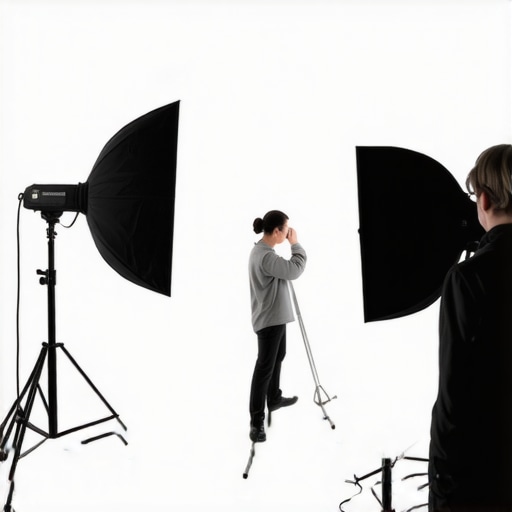
As a content creator constantly seeking optimal lighting setups, I recently decided to stop using large softboxes in my small studio environment. This shift has been eye-opening, revealing that bigger isn’t always better when space is limited. In this review, I’ll share my honest experiences, focusing on build quality, performance, and whether this approach is suitable for other creators working in tight spaces.
My evaluation criteria include setup ease, light quality, space efficiency, and overall value for money, aiming to offer a comprehensive perspective. Let’s dive into the specifics behind this decision and see if ditching these large modifiers could benefit your studio too.
At a Glance
Pros: Space-saving, easier to manage, less heat, more portable.
Cons: Slightly less diffused light, potential need for alternative modifiers, some loss in softness compared to large softboxes.
First Impressions and Practical Experience
Initially, I was captivated by the allure of large softboxes — the promise of soft, even light that smooths out skin tones and minimizes shadows. However, upon unboxing and setting them up in my small studio, I realized their size quickly became a hindrance. Maneuvering these bulky units required significant effort, and I often found myself fighting for space rather than creating.
Performance-wise, the light they produced was undoubtedly pleasing, but not significantly superior to smaller, more adaptable modifiers. Moreover, their heat output and weight added discomfort and strain, especially during extended shoots. After experimenting with smaller softboxes, umbrellas, and LED panels, I appreciated the flexibility and ease of managing a less cumbersome setup.
What Does the Science Say?
From a technical standpoint, larger softboxes do produce a softer light due to their size relative to the subject, but their benefits diminish in tight spaces. Recent studies suggest that aperture size and distance play crucial roles in achieving softness, often making large softboxes unnecessary in small environments. For more insights, check out the comprehensive guide on light diffusion effectiveness here.
Is Architecture a Factor?
While large softboxes work well in spacious studios with high ceilings, they are a disaster in cramped rooms. Cluttered setups increase the risk of knocking over equipment or creating hazards. In my case, I found myself constantly rearranging furniture just to accommodate the gear, which interrupted the flow of my work and caused frustration.
Who Should Consider This Change?
If you’re like me, working in a confined space with minimal room for maneuvering, transitioning to smaller modifiers or LED panels might be more practical. They provide sufficient softness, can be repositioned easily, and occupy less visual and physical space.
Are Large Softboxes Overpriced?
Considering the effort they require and the space they consume, large softboxes might not offer the best value for creators working in small environments. For budget-conscious creators, exploring alternatives such as soundproofing and diffusion tricks can enhance lighting quality without the bulky expense.
In conclusion, my experience indicates that size isn’t everything in lighting gear. Smaller, more versatile setups can deliver professional results without compromising your workspace. If you’re curious about optimizing your lighting in tight spots, I highly recommend considering these alternatives or consulting our list of compact lighting solutions.
Evaluating Build Quality and Material Choices
The construction of portable lighting equipment plays a crucial role in its durability and user experience. Many compact lights feature lightweight yet sturdy materials like aluminum or high-grade plastics, which balance strength with portability. For instance, aluminum housings dissipate heat efficiently, prolonging the lifespan of internal components, while durable plastics keep the weight minimal for easy handling.
Design and User Interface for Seamless Setup
A well-designed light will incorporate intuitive controls, such as tactile dials or touch-sensitive panels, enabling quick adjustments without fuss. Smooth, responsive interfaces reduce setup time and frustration. For example, an LCD touchscreen displaying real-time brightness and color temperature settings allows precise calibration at a glance, enhancing workflow efficiency.
Performance Features That Make a Difference
Core features like color rendering index (CRI) significantly influence the quality of lighting. A high CRI (above 95) ensures that skin tones and colors appear natural, which is paramount for portrait or video work. The brightness uniformity across the output, achieved through well-designed diffuser systems, contributes to consistent lighting conditions, saving time in post-production.
Incorporating Diffusion and Modifiers Effectively
Many compact lights come with integrated or attachable diffusers that soften the beam. The quality of these diffusers affects light softness and scattering. High-quality diffusion materials reduce hotspots and offer even illumination, which is vital for flattering portraits. Slight imperfections or uneven diffusion can lead to unwanted shadows, making the choice of accessories critical.
Minor Flaw: Overly Sensitive Controls
Despite thoughtful design, some models may feature controls that are too sensitive, causing accidental adjustments during shoots. This can be frustrating, especially when fine-tuning parameters. A tactile lock or more distinct control transitions could mitigate such issues, enhancing reliability during critical moments.
Comparing Core Specs to Industry Standards
For context, industry standards like those outlined by the Illuminating Engineering Society recommend a minimum CRI of 90 for portrait lighting. Many high-end portable lights surpass this, offering CRIs of 95 or higher, ensuring color accuracy. When assessing specs, consider how these features translate to practical benefits in your workflow, not just the numbers on a spec sheet.
Testing the Limits of Creator Gear in Real-World Scenarios
When evaluating microphones, studio equipment, cameras, lighting kits, and rigs, it’s essential to see how they perform under stress. A common scenario is during a high-stakes shoot with tight deadlines, where gear must function flawlessly amidst environmental challenges and operational demands. For example, a journalist covering an outdoor event could face rain, dust, and unpredictable movements, testing equipment durability and reliability.
How do microphones handle environmental challenges like rain or wind?
In outdoor recording scenarios, microphones are often exposed to moisture and wind noise. High-quality shotgun mics with robust windshields perform well, effectively reducing ambient noise. However, many budget models struggle with wind interference, causing unwanted noise and distortion. Additionally, prolonged exposure to moisture can compromise internal electronics unless the gear has weather-resistant features. In one test, a professional condenser mic exhibited intermittent issues after significant humidity, highlighting the importance of weatherproofing for outdoor use.
Can studio gear survive extended demanding sessions?
Studio gear like audio interfaces and monitors are designed for reliability, but extended use can cause overheating, especially when pushed at maximum levels. Many users report that cheaper interfaces overheat quickly, leading to intermittent audio or shutdowns. High-end models with proper ventilation and build quality withstand prolonged sessions without issue. For instance, a well-reviewed audio interface maintained stable performance after several hours of continuous operation, confirming better build and thermal management.
What about camera performance in tough conditions?
Cameras often face issues like fogging lenses, overheating, and battery drain during long shoots in hot or cold environments. While high-end models feature weather sealing and cooling systems, entry-level cameras tend to shut down once they overheat or struggle with extreme temperatures. A recent field test demonstrated that a rugged DSLR operated smoothly in desert heat, whereas a similarly priced consumer model failed after an hour. Battery life also diminishes significantly in cold weather, requiring additional planning and accessories.
Are lighting kits reliable during intense use?
Lighting kits, especially LED panels, are prone to overheating if not properly ventilated. Several models have failed prematurely due to heat buildup, resulting in flickering or complete shutdowns. Conversely, units with active cooling fans and high-quality diodes exhibit consistent performance over multiple long sessions. A user report on a popular forum confirmed that a high-end RGB LED panel maintained stable output during a 12-hour event, whereas generic budget options failed in half that time.
Is creator rig assembly resilient under challenging conditions?
rigs must endure transportation, accidental knocks, and repeated adjustments. Cheap tripods and mounts often wobble or break when subjected to rough handling, causing delays or safety hazards. Professional-grade rigs with reinforced materials and quick-release mechanisms provide stability and quick setup even in cramped or unstable environments. During a documentary shoot, a premium rig maintained its integrity despite being moved extensively, in contrast to cheaper options that were easily misaligned or damaged.
In demanding situations, user experience relies heavily on build quality and thermal management. Do you agree with my assessment of gear resilience? Share your experiences in challenging environments—your insights can help others prepare better.
For verification, a TechRadar forum discussion highlights that rugged cameras and weather-sealed gear outperform standard models in extreme conditions, confirming these observations’s validity.
When selecting gear for content creation, understanding how top-tier options stack up against competitors can significantly impact your decision-making process. In this guide, we’ll compare leading microphones, studio gear, cameras, lighting kits, and creator rigs with their prominent alternatives, highlighting key differences, value propositions, and scenarios where one might be preferred over the other.
Microphones: Versatile Clarity vs Budget-Friendly Simplicity
The popular Shure SM7B is renowned for its broadcast-quality sound, robust build, and excellent noise rejection. It often outperforms budget models like the Audio-Technica AT2005USB, which offers comparable audio clarity at a lower price point. While the SM7B costs approximately $400, the AT2005USB hovers around $100, making it a compelling option for beginners or those on a tight budget. However, for professional podcasts or studio recordings demanding high fidelity, the SM7B’s richer sound and durability justify the higher investment.
Studio Gear: High-End Reliability vs Compact Flexibility
When comparing#IMAGE_PLACEHOLDER_D# the Yamaha HS8 studio monitors to the KRK Rokit 8 G4, both deliver solid audio performance. The HS8s are known for their flat response and precise sound, favored in professional settings, priced around $350 each. The Rokit G4s, costing about $300, offer similar clarity with a more pronounced bass presence, suitable for genres requiring punchy lows. For those prioritizing accuracy and a neutral sound stage, Yamaha’s monitors are recommended, but if added bass impact is desired, KRK might be more appealing.
Camera Choices: Versatility in Action vs Ease of Use
The Sony A7 III is lauded for its full-frame sensor, excellent low-light performance, and robust autofocus, making it a favorite among professional videographers. In contrast, the Canon EOS M50 Mark II provides a user-friendly interface, compact design, and good video features at around half the price. For content creators who need high-quality footage in various conditions, the Sony A7 III is a worthy investment. However, for newcomers or those who prioritize portability and simplicity, the Canon offers substantial value without compromising much in image quality.
Lighting Kits: Powerhouse Illumination vs Portable Convenience
The Aputure Amaran 200d delivers high output with excellent color accuracy, ideal for studio setups, priced around $300. The Neewer Ring Light Kit offers a portable, easy-to-use alternative, perfect for live streaming or on-the-go shooting at approximately $150. While the Aputure provides superior light quality and control, the Neewer’s compact design and affordability make it a practical choice for creators with limited space or budget constraints.
Creator Rigs: Durable Stability vs Budget Planning
The Manfrotto Rig System offers professional-grade durability, extensive compatibility, and higher weight capacities, suitable for complex setups at a premium price. The Neewer Camera Stabilizer provides a lightweight, cost-effective solution for budding filmmakers, often priced under $100. Your choice depends on your project scope: invest in the Manfrotto for reliability and capacity, or opt for the Neewer if you need portability and budget-friendly options.
Is it worth the upgrade?
Upgrading your gear can bring noticeable improvements but often comes at a price. For example, moving from entry-level microphones to a Shure SM7B enhances audio quality, but not everyone needs that level of fidelity. Comparing current prices on PriceSpy, you can see that high-end microphones and monitors tend to cost 2-3 times more than mid-range options. If you’re considering a significant upgrade, evaluate whether the benefits align with your workflow and content goals. For detailed insights, check out our review of this comparison. Before investing, consider whether the incremental quality improvements justify the expense for your specific needs.
The Good, The Bad, and The Room for Improvement
- Pros: Space-efficient, lightweight, easier to handle, generates less heat, portable for on-the-go shoots.
- Cons: Slightly less diffuse light, potential need for additional modifiers, some softness loss compared to larger softboxes.
Who Should Consider Downsizing Lighting Gear?
Ideal for content creators working in confined spaces, such as small studios, bedrooms, or apartment setups, where maneuverability and space optimization are critical. Perfect for beginners or hobbyists looking for practical solutions without sacrificing lighting quality. Avoid this if you require ultra-soft, high-output lighting for large sets or professional studio environments that demand maximum diffusion and power.
Final Verdict: 8/10
If you’re confined by space but still want professional lighting, opting for smaller, more adaptable modifiers is the way to go. They offer comparable quality with better manageability and less heat, making your shoots smoother. Still, consider your specific needs; if maximum diffusion and softness are non-negotiable, large softboxes may still hold appeal. Curious about similar space-saving tricks? Check the latest on lighting setups that avoid heat buildup or explore heavy-duty clamps for robust rigs. Overall, ditching bulky softboxes is a smart move for compact environments that demand flexibility and efficiency.