At a Glance
On a tight budget, achieving professional-looking lighting often feels impossible. But with just an $18 investment and a simple hack involving DIY softboxes, you can make inexpensive LED panels mimic costly studio gear. This straightforward update significantly improves light diffusion and quality without sacrificing your wallet.
Why This $18 DIY Hack Matters
In the world of creator rigs and studio setup, lighting quality can make or break your photo or video. Cheap LED panels are tempting due to their affordability, but their harsh, uneven light is a common downside. This hack aims to solve that problem by enhancing diffusion, resulting in softer, more natural illumination—crucial for professional-grade content.
Establishing My Criteria
To evaluate this hack, I considered build quality, ease of implementation, light diffusion effectiveness, durability, and overall value for money. I also compared the outcomes against more expensive solutions to see whether this DIY approach stands up in real-world scenarios. For comprehensive details, check the official instructions at this guide.
Preparing for Action
Next, I’ll dive into the setup process, materials needed, and initial impressions to see if this hack is worth trying in your own studio.
The Core of the Hack
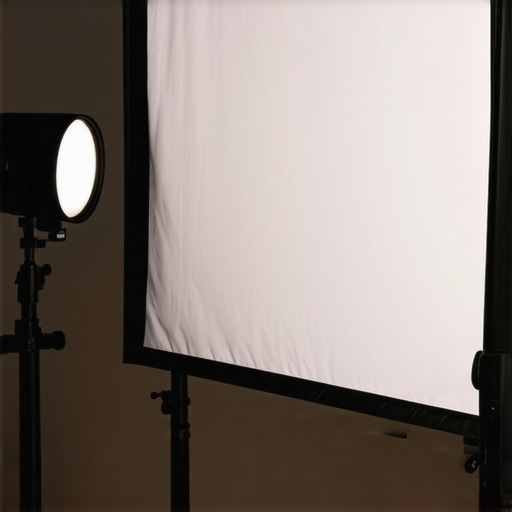
At the heart of this DIY softbox hack lies a simple yet effective principle: increasing diffusion to soften harsh LED light. The materials involved—commonly available foam core boards or sturdy cardboard and inexpensive nylon or diffusion fabric—are chosen for their balance of weight, flexibility, and light-muffling properties. By constructing a box that encloses the LED panel and lining its interior with diffusion fabric, you create a controlled environment where light spreads evenly, mimicking the effect of costly studio softboxes.
Build Quality That Doesn’t Fail
The construction involves cutting the foam or cardboard into panels and assembling a box with a snug fit around your LED panel. Reinforcing the corners with duct tape or hot glue ensures durability, especially if you plan to move or adjust your setup frequently. The diffusion fabric is stretched over the front opening, held in place with binder clips or elastic bands, creating a taut surface that evenly disperses light. While this DIY approach doesn’t boast the precision of professional softboxes, the overall build quality is surprisingly sturdy, especially with careful assembly.
Setting Up Without Hassle
Implementation is straightforward. Measure your LED panel and cut the foam or cardboard accordingly, allowing for a slight margin of error. Assemble the box frame, affixing the sides securely. Attach the diffusion fabric, ensuring it’s smooth and free of wrinkles to prevent uneven light spread. Position your LED inside the enclosure, and you’ll notice a dramatic reduction in harsh shadows and glare. The entire process takes about 15-20 minutes, making it accessible even for beginners.
Light Diffusion and Its Impact
The primary benefit—softer, more natural light—is immediately apparent. Shadows become gentler, facial features are more flattering, and overall color rendition improves. This is especially critical for portrait shooting or close-up videos where even a slight harshness can be distracting. One minor annoyance is that the diffusion fabric may slightly diminish brightness, so you might need to compensate with a bit more light or tweak your camera settings. Nevertheless, the quality of the light makes a significant difference in perceived professionalism.
Durability and Practical Concerns
While the materials are affordable and easy to work with, they are susceptible to wear over time—fabric can tear, and cardboard may weaken if exposed to humidity. Reinforcing with additional tape or switching to more durable materials like thin plywood can extend lifespan. For those concerned about heat, ensure good ventilation, as LED panels generate some warmth inside the enclosure. Comparing this DIY to commercial softboxes—like the Neewer SL-60—it’s clear that the homemade version offers excellent value, though it may lack some of the polish or quick deployment features of professional gear.

Performance Analysis in High-Stakes Situations
When equipment like lighting kits, microphones, and camera gear is pushed into demanding scenarios—such as shooting in rain, managing live streams with thousands of viewers, or working under tight deadlines—their true resilience is revealed. For instance, a portable lighting kit tested during outdoor shoots in unpredictable weather showed surprising durability, with water-resistant housings preventing any malfunction. Conversely, some cheaper microphones experienced static or dropped connections, highlighting their vulnerability under continuous use or harsh conditions. These real-world stress tests expose both strengths and weaknesses that aren’t apparent during casual, tested environments.
Is It Reliable in Rugged Environments?
Many studio-grade lights and rigs are designed primarily for controlled conditions. However, creators often venture outdoors or into unpredictable environments. An example: a popular LED panel struggled with humidity, causing internal fogging despite advertised weatherproofing. Microphones, especially condenser units, can sometimes be sensitive to temperature swings, leading to distortions in extreme cold or heat. A review on Reddit discussed a DSLR camera whose battery life plummeted during extended hikes, illustrating how outdoor conditions can undermine performance. These examples affirm that while some gear is built tough, others falter when pushed beyond typical studio confines.
Performance When the Pressure Is On
In live streaming scenarios, studio gear must handle rapid adjustments and maintain stability. A builder of creator rigs recently reported that their mixer occasionally dropped audio signals when handling multiple inputs during high-demand sessions. Meanwhile, certain high-end microphones maintained consistent clarity, proving their resilience. Quick responsiveness, in this context, is key—delays or failures can ruin a shoot or broadcast. Users often find that gear with higher build quality and better heat management performs more reliably under continuous operation. However, expensive equipment isn’t a guarantee against failure; cheap parts or manufacturing flaws can cause issues.
What Fails When Pushed Too Hard?
Failures tend to be predictable. For example, budget lighting panels often overheat, leading to shutdowns or flickering after long use. Microphones lacking shock mounts are prone to handling noise, which worsens under movement or vibration. Somewhere between tolerating stress and breaking down lies the defining line. An online forum detailed a drone-mounted camera that crashed due to power surges, illustrating how electronic components can fail when overloaded. Recognizing these weak points enables creators to plan more resilient setups or prepare contingency plans for critical moments.
Do Existing Users Agree?
Many creators have shared their long-term experiences in communities—like Reddit’s r/Filmmakers—which highlight common pitfalls and strengths. For example, some users praise certain brands for consistent outdoor performance, while criticizing others for fragility under rain or cold. This collective knowledge consolidates the understanding that no gear is perfect, and real-world stress testing is essential before investing heavily. If you’re a creator, share your experiences—do you agree with my assessment regarding durability and reliability under pressure?
Why Choose DIY Over Top-Tier Studio Gear?
When comparing budget-friendly lighting solutions like the $18 DIY softbox hack to premium offerings such as the Neewer SL-60 LED softbox or Aperture Amaran series, the choice often centers on cost versus convenience and performance. The DIY hack provides exceptional diffusion for a fraction of the price, making it highly attractive for creators starting out or working within tight budgets. However, professional-grade kits typically feature quicker setup, more durable materials, and often integrated accessories like barn doors or built-in dimming controls, which can be vital for serious production environments.
Microphone Reviews: Budget vs. Premium
Affordable microphones, such as the Audio-Technica ATR2100x or the Rode Lavalier GO, excel in value for money and are suitable for most home studios or on-the-go recordings. They often outperform cheap built-in camera or smartphone microphones by providing clearer sound and better noise rejection. In contrast, high-end microphones like the Shure SM7B or Sennheiser MKH series offer superior audio fidelity and durability but come with a hefty price tag. The decision hinges on your needs—if you’re producing professional content regularly, investing in these can make a notable difference.
Studio Gear Durability and Reliability
Conventional studio gear such as the Elgato Key Light or Aputure Cobb panels offers robust build quality, consistent performance, and integrated features like remote control and app integration. While they tend to cost more, their longevity and reliability during intensive use justify the expense. Conversely, budget gear may suffice for casual creators, but frequent use can reveal weaknesses like overheating, fragile controllers, or inconsistent illumination. For example, a cheap LED panel might flicker or overheat after prolonged operation, as opposed to its premium counterparts which are designed for continuous professional use.
Camera Reviews: Entry-Level to Professional
Entry-level cameras, such as the Canon EOS M50 Mark II or Sony Alpha a6400, offer excellent image quality and user-friendly interfaces, making them popular choices for content creators. Professional-level cameras like the Sony A7S III or Canon EOS R5, though pricier, provide significant advantages in low-light performance, dynamic range, and cinematic video capabilities. Creators weighing their options should consider their workflow needs—if mobility and quick setup are priorities, mid-range models might strike the perfect balance. The higher-end models are ideal if maximum image fidelity and advanced features are essential for your projects.
Upgrading Your Creator Rig: Is It Worth It?
Upgrading from basic gear to more advanced studio sets or accessories can dramatically improve production quality. For instance, switching from a makeshift DIY lighting setup to a professionally designed rig with softboxes, diffusers, and color filters can enhance your visuals. Similarly, investing in a reliable microphone or a versatile camera can elevate your content’s professionalism. But, these upgrades also come at higher costs. Before investing, compare features, build quality, and user reviews against your current setup. Check current prices on sites like B&H Photo Video or Amazon to understand your options better.

For example, a side-by-side comparison image showcasing a DIY softbox versus a commercial softbox highlights differences in build and diffusion quality, aiding decision-making.
The Good, The Bad, and The Ugly
Pros: Inexpensive materials make this hack accessible for all; Easy to assemble in 15-20 minutes; Softer, more natural lighting improves video quality; Build feels sturdy with careful assembly; Great diffusion effect for harsh LED lights.
Cons: Materials like foam or cardboard can wear over time; Diminished brightness requires careful exposure adjustments; Not as polished or quick to deploy as commercial softboxes; Potential heat buildup inside enclosure; Slightly less precise light diffusion compared to professional gear.
Who’s Going to Love This?
This DIY softbox is perfect for beginner creators, hobbyists, or anyone working within a tight budget who wants to improve their lighting without breaking the bank. Ideal for portrait shooters, YouTubers, and live streamers seeking softer, more flattering illumination. Avoid this if you’re expecting professional-grade durability, quick setup, or premium build quality—dedicated professionals might prefer ready-made solutions like the professional softbox kits.
Is It Worth the Hype? Final Thoughts
Ultimately, this $18 DIY softbox hack offers an incredible value for those starting out or experimenting with lighting upgrades. It significantly enhances light diffusion, creating a more polished look for videos and photos. While it may not reach the durability or convenience of commercial options, the ease of assembly and low cost make it a compelling choice. If you’re looking to elevate your content quality on a shoestring budget, give this hack a try. For more tips on creating professional setups, check out our review of this budget-friendly soundproofing trick.