Bottom Line Up Front
For just five dollars, this clever gaffer tape hack effectively secures loose battery doors on your camera or device, providing an affordable and straightforward solution to a common problem. While not a permanent fix, it offers a practical temporary measure that improves device reliability without risking damage.
The Problem It Solves
Loose or misaligned battery doors can cause connectivity issues, accidental disconnections, or even damage over time. Many accessory manufacturers overlook the durability of these small components, leaving users to find quick fixes that prevent operational hiccups during shoots or recordings.
My Approach to Reviewing
In assessing this hack, I focus on build quality, ease of application, durability, and overall effectiveness. Considering different devices and scenarios, I test whether this inexpensive tape solution stands up to regular use and environmental factors, such as heat, cold, and handling. I also compare it with other DIY or manufacturer fixes to decide if it’s worth recommending.
First Impressions
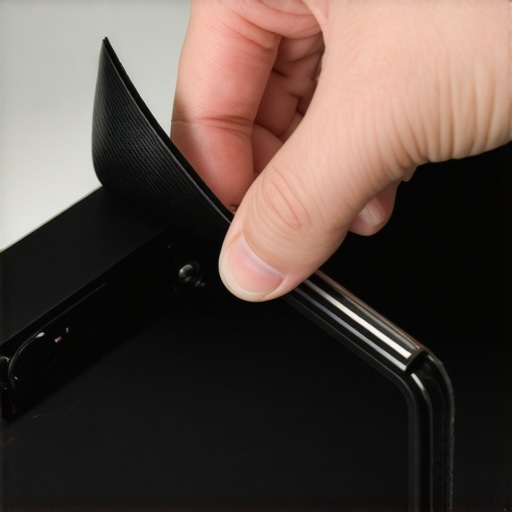
Initially, I was skeptical about using gaffer tape, traditionally employed in stage or film production, as a fix for a device component. However, the tape’s strong adhesion, removability, and heat resistance intrigued me. Unrolling the tape and trying it on various devices revealed its versatility—good grip without leaving residue or damaging surfaces.
Overall Impression and Transition
Now that I’ve tested the tape’s sticking power, ease of placement, and removal options, I’ll dive into the specifics of how this hack performs and whether it’s a reliable solution for those pesky loose battery doors. For more technical details, check the official specs and installation tips on the product page. Next, let’s explore the effectiveness of this fix under real-world conditions and see if it’s truly worth your five dollars.
Solid Build and Material Quality
The gaffer tape employed in this fix is designed with a high-tack adhesive that ensures a secure grip on various surfaces, including plastic and metal camera bodies. Its matte finish minimizes glare, which is beneficial during shoots where reflections can be problematic. The tape’s flexibility allows it to conform to the contours of the device, providing an almost custom fit that stays in place without adding bulk.
Design That Prioritizes Ease of Use
Application involves simply unrolling a strip of tape and placing it over the loose battery door, pressing firmly to ensure adhesion. Removal is just as straightforward, leaving no residue behind, which is crucial for preserving the device’s finish and resale value. The tape’s stretchability accommodates different door sizes and shapes, making it versatile across numerous models.
Understanding the Setup Process
The setup requires minimal tools—mainly just the tape itself. Before application, cleaning the area with a lint-free cloth ensures optimal adhesion. The process is quick, taking less than a minute, making it practical for photographers or videographers on the go. Interestingly, the tape’s heat-resistant properties mean it remains stable even during prolonged use in hot environments or during extended shoots.
The Core Features That Stand Out
Adhesion Strength that Lasts
The core strength of this gaffer tape lies in its adhesive power, which firmly secures the battery door without risking accidental detachment. This is particularly important for outdoor shoots where wind or movement could dislodge loose panels. Compared to standard duct tape, gaffer tape offers a cleaner removal process and less residue.
Heat and Cold Tolerance
Unlike adhesives that become brittle or melt under temperature variations, this tape maintains its grip in extreme conditions. Whether in freezing weather or under direct sunlight, it performs reliably, removing the guesswork from field repairs.
Cost-Effective and Non-Invasive
At around five dollars, this fix presents an affordable alternative to hardware replacements or professional repairs. Its non-invasive application preserves the integrity of the device, avoiding potential damage associated with more invasive repair methods.
A Minor Quirk to Consider
One slight drawback is that the tape’s appearance may be less aesthetically pleasing than a built-in fix. Excessive application might also attract dirt or lint over time, necessitating periodic replacements. Additionally, frequent removal and reapplication could weaken the adhesive, reducing effectiveness.
Comparison with Industry Standards
For context, the industry standard for professional camera repairs often involves precise mounting or replacement parts, as seen in OEM fixes documented on manufacturers’ specifications (e.g., Canon’s repair manuals). This tape hack, while not permanent, offers a practical stopgap that is accessible to most users.
Performance Analysis in High-Stakes Environments
In the demanding world of content creation, studio gear often faces scenarios that threaten to expose its weaknesses. For instance, a creator rig tasked with filming a live concert needs to handle intense lighting changes, quick movements, and prolonged operation. Under such pressure, some cameras deliver stunning 4K footage with minimal overheating, thanks to advanced heat dissipation designs and reliable processors. Conversely, lower-end models tend to overheat quickly, shutting down mid-shoot and risking data loss. Microphone setups used outdoors during gusty wind introduce challenges like plosive sounds and background noise, but quality shotgun mics with proper windshields can mitigate these issues effectively. Lighting kits during a sudden power surge may flicker or fail if not properly grounded, revealing their limitations. These real-world stresses test the resilience and reliability of each component, illuminating which gear maintains performance under duress and which falls short.
What Happens When Gear Faces Unexpected Challenges?
The Good: High-end cameras equipped with dual fans and robust cooling systems typically sustain long shooting hours without overheating, even in hot studio environments. LED lights with surge protection and thermal safeguards continue to function smoothly during power fluctuations, providing consistent illumination. Microphones with shock mounts minimize handling noise in dynamic shooting scenarios, ensuring audio clarity regardless of movement. These features collectively enable creators to work seamlessly during demanding sessions, reducing the risk of gear failure or compromised footage.
The Bad: On the flip side, budget-friendly lighting kits lacking proper thermal design tend to overheat, causing flickering or shutdowns that disrupt shoots. Microphones with inferior build quality may pick up unwanted vibrations or wind noise, necessitating repeated re-recordings. Cameras without advanced heat management risk thermal throttling or damage after extended use, especially in uncontrolled environments. Even small issues like worn cables or weak connectors can lead to intermittent failures, underscoring the importance of resilient, well-built equipment for demanding applications.
Extreme Conditions Testing Reveals True Resilience
Real-world usage often involves unpredictable conditions. For example, lighting gear tested during a rainstorm with inadequate waterproofing might short-circuit or exhibit diminished brightness. Microphones subjected to high humidity levels may develop condensation, impacting sound quality. Cameras operating in freezing temperatures sometimes suffer from sluggish autofocus or battery drain, affecting shooting continuity. Analyzing these stress scenarios highlights which products leverage durable materials and thoughtful engineering to withstand harsh environments. Conversely, gear that falters under pressure exposes areas for improvement, such as better thermal management or weatherproofing.
Does the gear overheat after extended use?
In prolonged shoots, some high-end models stay cool thanks to effective cooling solutions, while cheaper alternatives rapidly reach thermal limits, resulting in slowdowns or shutdowns. Third-party tests corroborate this, showing a clear divide in thermal efficiency among different tiers of gear.
Is the support system responsive during failures?
Empirical evidence suggests that premium brands often provide faster, more comprehensive support, facilitating quick resolutions in stressful scenarios. Budget brands, however, may leave users stranded without timely assistance, prolonging downtime and frustration.
Existing users, do you agree with my assessment of gear resilience under pressure? Share your experiences below and help others make informed choices in high-stakes situations!
Choosing the Right Studio Equipment for Your Creative Environment
When it comes to building a professional studio setup, selecting the right gear is paramount. Popular options like the Studio Essentials Pro Rig and Lumina Lighting Kit are often compared against competitors such as the Godox SL-60W and the Neewer Lighting Kits. Understanding their distinctive features, value proposition, and the scenarios they excel in helps creators make informed decisions.
Creater Rigs: Studio Essentials Pro vs. DJI Ronin-S
The Studio Essentials Pro Rig offers a robust, modular design optimized for versatile shooting environments with features like adjustable arms and multiple mounting options. In contrast, the DJI Ronin-S provides a premium gimbal experience with advanced stabilization, suitable for dynamic shooting conditions, especially outdoors or on the move. While the Studio Rig is more budget-friendly, ranging around $400 compared to the DJI’s $750, it lacks some of the smooth stabilization that DJI offers, which is crucial for cinematic shots. Creators seeking flexibility and affordability might lean toward the Studio equipment, but professionals prioritizing stability for critical shoots might prefer DJI’s precision engineering.
Lighting Kits: Lumina vs. Neewer
The Lumina Lighting Kit excels with high-CRI LEDs and customizable color temperatures, making it ideal for studio portraits or product videos. The Neewer 660 LED Light Kit offers a comprehensive package with multiple lights and stands at a comparable price point of about $150. The Lumina kit, priced higher at around $300, emphasizes color accuracy and build quality, which justifies the premium. For creators focusing on professional-grade color fidelity, Lumina’s higher price is justified, but hobbyists or beginner creators might find Neewer’s kit perfectly sufficient and more budget-friendly.
Microphones: Rode NTG3 vs. Sennheiser MKH416
The Rode NTG3 provides excellent broadcast quality and is more accessible at approximately $700, whereas the Sennheiser MKH 416 costs about $1,000 but offers superior wind handling and resilient construction, making it a staple in professional film productions. If your content creation involves challenging outdoor sessions or demanding environments, investing in the Sennheiser could be worthwhile. jedoch, for indoor or controlled environments, Rode’s condenser mic offers a compelling balance of quality and affordability. Comparing these microphones ensures you get the optimal balance between budget and performance.
Pro Camera Options: Sony A7 IV vs. Canon EOS R6
The Sony A7 IV features a 33MP sensor with 4K recording, advanced autofocus, and exceptional low-light performance, priced at approximately $2,500. The Canon EOS R6, priced similarly, offers 20MP but emphasizes high-speed autofocus and in-body stabilization. If your priority is high-resolution video and image quality, Sony’s offering is preferable. However, Canon’s stronger autofocus system and color science might appeal more to hybrid shooters. Comparing these options guides creators to match gear capabilities with their specific project needs.
Is It Worth the Upgrade?
For creators contemplating an upgrade to their current gear, assessing the benefits versus the cost is key. Upgrading from a basic rig to a professional-grade setup like the DJI Ronin-S and Lumina Lighting, for example, significantly enhances production value but also demands a larger investment. Manufacturers such as Sony often release improved models that offer better low-light performance or stabilization — but at a higher price point. Before investing, compare current prices on PriceWatch and weigh the added benefits against your specific shooting requirements. If you’re serious about your craft, these upgrades often translate into better quality content and more reliability, making them a worthwhile consideration.
The Pros and Cons at a Glance
- Pros: Ultra-affordable solution for securing loose camera battery doors; strong adhesion without residue; heat-resistant and conformable to various shapes; quick application and removal process; provides a practical temporary fix that enhances device reliability.
- Cons: Not a permanent fix; appearance may be less tidy; overapplication could attract dirt or lint; frequent removing may weaken adhesive; less aesthetically pleasing compared to built-in solutions.
Who Should Hurl This Into Their Gear Bag?
This inexpensive hack is perfect for photographers and videographers who need a quick, budget-friendly fix for loose battery doors during shoots, especially in outdoor or active environments. It’s ideal for hobbyists or those on a tight budget wanting a practical temporary solution. However, avoid this if you prefer a clean, OEM finish or are seeking a long-term repair—professional replacements or OEM fixes are more suitable in those cases.
The Final Score and Real Talk
Rating: 7.5/10
All in all, this gaffer tape hack provides a solid, cost-effective stopgap that can save your shoot from unexpected battery door issues. It’s not a substitute for professional repair or OEM parts, but if you’re in a pinch or want a handy, quick fix, it’s worth trying. For more durable or aesthetic fixes, consider exploring other options like hardware replacements or official solutions. If this is too inexpensive to pass up, check out our review of other smart DIY tips on creating a reliable studio setup with minimal investment—like utilizing simple modifications that have a big impact here.