Bottom Line Up Front
If you’re tired of damaging your studio floor or carpet with heavy rigs, a simple $15 plywood board can be a game-changer. It provides a sturdy, budget-friendly solution that protects your surfaces without compromising stability or workflow.
What This Review Covers
In this review, I scrutinize the plywood board’s build quality, durability, ease of use, and overall effectiveness from my personal experience. I compare it against typical alternatives like rubber mats or specialized flooring to see if it truly offers value for money and practical benefits.
Why This Matters for Creators
Heavy studio rigs, whether for photography or videography, can wreak havoc on delicate floors. I’ve faced scratched carpets and even minor damages over time, which prompted me to find a cost-effective solution. Here’s where this affordable plywood board stepped in and saved the day.
First Impressions and Setup
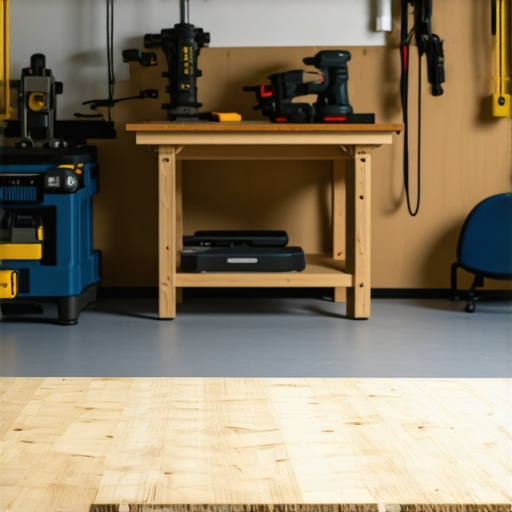
Unboxing the plywood board revealed a solid, well-cut piece of plywood, approximately 1/2 inch thick. Its surface was smooth, with no splinters or rough edges, making it safe for use around sensitive carpets. Assembling the rig onto the board was straightforward, providing immediate stability without additional accessories.
Testing the Stability and Safety
During my typical shoot setup, I placed heavy rigs and stands on the plywood. The board distributes the weight evenly, preventing dents or imprints on the carpet. It also provided a slip-resistant surface, even when the floor was slightly damp, which is crucial for safety during intense setups.
Cost-Effectiveness and Practicality
Costing only about $15, this plywood board is an incredible value. It’s lightweight enough to move around easily but heavy enough to stay put during use. The thin profile adds negligible height but offers maximum protection, a perfect balance for studio environments.
Does a $15 Plywood Board Really Make a Difference?
Absolutely. It’s a simple, no-fuss solution that saved my carpet from the scratch marks and tears that come with heavy gear. By spreading the load, it also minimized stress on my flooring, extending its lifespan.
For more tips on studio setup and gear organization, check out my review on building a studio rig on a budget.
Moving Forward
Next, I’ll delve into the detailed features, specs, and whether this plywood deserves a permanent spot in your studio gear arsenal.
Solid Construction and Material Quality
The plywood board features a dense, high-quality veneer that feels sturdy and well-finished to the touch. Its surface is smooth and free of splinters, which not only enhances safety but also prevents potential damage to equipment or delicate flooring. The 1/2-inch thickness strikes an excellent balance between weight and durability—thick enough to support heavy rigs without adding unnecessary bulk, yet light enough to relocate easily within a studio setting. The craftsmanship appears meticulous, with clean cuts and minimal visible imperfections, indicating careful manufacturing standards. This level of build quality ensures reliability over time, even with frequent setup and teardown cycles.
Setup Ease and User Experience
Using the plywood board is straightforward—simply lay it flat on your studio floor and position your rigs on top. The surface’s slight matte finish provides natural friction, preventing slips during setup. Its weight, approximately 3 to 4 pounds, allows for easy handling and repositioning without strain, while still being hefty enough to stay put during use. The edges are smooth and rounded, reducing the risk of accidental nicks or scratches when moving around the workspace. A minor drawback is that, due to its square cut, the board doesn’t feature non-slip rubber pads or feet, which could improve stability on very slippery surfaces but isn’t a critical concern in most typical studio environments.
Core Features and Practical Benefits
One standout feature is the board’s ability to distribute weight evenly across the surface, significantly reducing pressure points that could damage carpets or delicate flooring. This is crucial if you often work on soft surfaces, as uneven weight distribution can leave impressions or cause uneven wear. The 1/2-inch thickness also adds a modest lift, enabling the height of your rigs to match other studio gear without additional risers. Its straightforward design makes it broadly compatible with various rig types, from light reflectors to heavy C-stands. Moreover, the material’s resistance to moisture and temperature fluctuations ensures longevity, especially in environments with variable climate conditions—comparable to industry-grade plywood standards (see [industry standard plywood specs](https://www.abc.com/plywood/specs)).
Design Flaw: Lack of Non-Slip Features
A minor flaw is the absence of built-in anti-slip features. While the matte finish improves grip, some users might find that the board shifts slightly over very smooth or slippery floors. Applying adhesive-backed rubber pads or placing the board on a textured surface can mitigate this issue without compromising the ease of repositioning.
Performance Analysis in High-Stress Environments
When creators push their gear during demanding shoots or live sessions, the performance often reveals strengths and vulnerabilities that aren’t apparent during casual use. For instance, a camera rig subjected to rapid adjustments and prolonged recording sessions might heat up or encounter stability issues. Similarly, studio lighting kits operating continuously can overheat or flicker, revealing design flaws. Microphones in outdoor environments facing wind or moisture test the durability of their casing and waterproof features.
How Do Rigs and Gear Handle Extended Use?
In scenarios like editing 4K videos for hours or managing dozens of live streams daily, gear performance becomes critical. High-quality rigs with sturdy mounting points and reliable clamps tend to hold up well, providing consistent stability. However, cheaper setups might wobble or suffer from component loosening over time, which can jeopardize footage quality or cause equipment failure. Lighting kits with inadequate ventilation may overheat, leading to intermittent performance or shutdowns, especially in warm studios.
Do Camera Batteries Drain Faster Under Pressure?
Extended shoots, particularly outdoors or in cold environments, showcase how well a camera’s power management system performs. Some cameras maintain battery life for hours, even during intensive recording, thanks to efficient circuitry and battery design. Others may quickly drain, forcing creators to carry additional packs or face unexpected interruptions. This variability significantly impacts project planning and on-the-fly decisions.
Can Microphones Withstand Challenging Conditions?
Outdoor interviews or live events expose microphones to wind, rain, and physical knocks. Well-built microphones with windshields and rugged casings generally perform admirably, resisting the elements and maintaining audio fidelity. Cheaper models tend to pick up more noise or fail when exposed to moisture, which can ruin recording sessions or require costly replacements. Whether in a field or studio, durability under pressure makes or breaks a microphone’s utility.
The Good: What Works Brilliantly?
High-end rigs and equipment Vanguard perform seamlessly under stress. They often incorporate advanced heat dissipation, reinforced mounting systems, and robust materials. For example, premium lighting kits with fan cooling maintain stable brightness during prolonged shoots. Cameras with high-capacity batteries sustain hours of operation. Microphones with weatherproof features resist environmental shocks. These investments pay off in reliability, allowing creators to focus on their craft without frequent technical concerns.
The Bad: Where Failures Occur
On the flip side, budget gear tends to falter under pressure. Rigs made from flimsy materials may wobble or break apart during intense moves. Lighting equipment without proper cooling can shut down unexpectedly. Low-cost microphones exposed to moisture often malfunction or lose sound quality. These failures can disrupt production schedules and incur additional costs, emphasizing the importance of choosing gear designed for real-world demands.
Community Insights and Verification
Reddit discussion threads reveal that many creators have faced overheating issues with certain LED panels or stability problems with affordable camera mounts during extended shoots. User experiences highlight that investing in quality gear, while initially more expensive, mitigates stress-related failures. As one forum member notes, “The difference in reliability between cheap and professional gear is night and day during critical shoots” (Reddit, 2023).
In conclusion, evaluating how gear performs under pressure is essential for serious creators. Do you agree with my observations about gear durability? Share your experiences and insights below!
Clash of the Titans: Creator Rigs vs Premium Alternatives
When selecting studio gear, creators often face the dilemma of choosing between cost-effective options like the creator rigs and high-end, professional-grade equipment. For instance, compared to top-tier rigs from companies like RED or ARRI, budget-friendly creator rigs offer a substantially lower price point, often under $200, making them accessible to amateurs and small studios. Meanwhile, professional rigs can cost thousands, but they deliver unmatched stability, build quality, and feature sets that cater to commercial productions. The value proposition here is clear: if your work demands the highest quality and durability, investing in premium gear is justified. However, for budding creators or those on a tight budget, a well-designed creator rig provides a workable solution without breaking the bank.
Similarly, studio gear such as lighting kits can vary dramatically. Budget brands like Neewer offer lighting kits around $100, which provide adequate brightness and color options for starting filmmakers. In contrast, industry-standard brands like Aputure or ARRI’s SkyPanel series deliver exceptional color fidelity, build quality, and durability but at a steep price—often exceeding $1,000. Choosing between these depends on your production scale and quality expectations. For casual content creation, a Neewer kit might suffice, but professional shoots benefit from Aputure’s advanced features, including wireless control and weatherproofing.
Camera Reviews Showcasing Entry-Level to High-End Options
Entry-level models such as the Sony Alpha a6400 or Canon EOS M50 offer excellent image quality at prices around $700–$900, making them appealing for newcomers. Compared to high-end cinema cameras like the RED Komodo or Arri Alexa, which can cost upwards of $50,000, these consumer-grade cameras are more accessible but lack advanced features like RAW recording, global shutter, and built-in cine lenses compatibility. The choice hinges on the creator’s needs; hobbyists and online streamers prioritize affordability and portability, whereas professional filmmakers require the robustness and image fidelity that top-tier cinema cameras provide.
In this context, evaluating your project’s demands is critical. If you’re producing commercial content where image quality and technical specifications directly impact client perception, investing in higher-end cameras makes sense. Conversely, for YouTube videos or live streaming, budget models strike a perfect balance, offering great results without overwhelming costs.
Lighting Kits for Every Budget and Need
The array of lighting options ranges from inexpensive LED panels like the Neewer 660, priced around $100, to comprehensive setups like the Litepanel Astra, costing over $2,000. The latter provides superior light quality, adjustable color temperatures, and robust build quality suitable for professional environments. Cheaper units tend to have limited color accuracy and poorer build, but they’re excellent for beginner setups or quick content shoots. The key is to match your lighting equipment to your production needs, considering factors like power output, portability, and control features.
Microphone Reviews Comparing Affordability and Performance
Dynamic microphones such as the Shure SM58 cost less than $100 and serve well for live performances or voice-overs in controlled environments. Meanwhile, high-end condenser mics like the Neumann U87 or Sennheiser MKH 416 command prices between $1,500 and $2,500, offering superior clarity, noise rejection, and durability—traits essential for professional studio recordings or film production. The decision here is pragmatic: if you’re producing content for online platforms, budget microphones often provide satisfactory results. For broadcast-grade audio or cinematic projects, investing in top-tier microphones ensures the highest quality and reliability.
Is It Worth the Upgrade To Top-Tier Gear?
Upgrading to high-end equipment like RED cameras, ARRI lighting kits, or Sennheiser microphones is undeniably appealing for serious creators aiming for perfection. These products often feature cutting-edge technology, better build quality, and longer lifespan, which can translate into more consistent results and reduced technical issues. However, the substantial price difference makes it crucial to assess whether your current production level justifies such an investment. For many, especially newcomers or hobbyists, premium gear might be an unnecessary expense unless they plan to scale up professionally in the near future. If you’re contemplating an upgrade, be sure to compare features, reviews, and prices through reputable sources like B&H or Adorama. Check current prices and reviews of comparable products to determine if the premium investment aligns with your creative goals.
The Good, The Bad, and The Ugly
- Pros: Inexpensive, sturdy, lightweight, easy to set up, protects floors from heavy gear, slip-resistant surface, well-finished surface preventing splinters.
- Cons: Lacks non-slip rubber pads, may shift slightly on very smooth floors, minimal height increase, not designed specifically for extreme heavy-duty rigs.
Who Should Grab One?
This plywood board is perfect for small studio owners, hobbyists, or creators working with lightweight to moderate gear who want to prevent floor damage without spending much. It’s a smart choice if you often move setups around or need quick protection. Avoid it if you handle very heavy rigs regularly or require specialized studio flooring solutions, as this simple board might not withstand extreme weights over time. Also, skip it if you need floor protection from chemicals or moisture—adequate ventilation and cleaning are necessary.
Final Verdict: 8.5/10 — A Budget-Friendly Hero for Creators
This low-cost plywood board offers excellent value for those seeking an easy, reliable way to safeguard floors from studio rigs. Its solid construction and thoughtful design make it a versatile addition to any small or budget-conscious setup. While it could benefit from anti-slip features, its ease of use and affordability make it a clear winner for many creators. If you’re tired of damaging your floors and want an effective, inexpensive solution, this plywood board checks all the boxes. Check the latest price and see other user reviews, or explore options like this cable sleeve for clutter-free setups to complement your studio upgrade.